Maxwell Render corso base

Ciao a tutti! In questi mesi abbiamo sviluppato un corso base di Maxwell Render in ambiente Cinema4D e finalmente da oggi è disponibile su www.c4dzone.com.
Il corso offre una panoramica per poter diventare autonomi nell’uso di questo fantastico motore di render unbiased e affronta alcune delle più comuni situazioni come Still life, oppure rendering di scene di esterno e di interno architettoniche.
Di seguito gli argomenti tratti nello specifico:
[br]
1 – STUDIO DEI MATERIALI:

[br]

[br]

  • – Panoramica delle varie applicazioni di Maxwell Render
  • [br]

  • – Analisi dell’oggetto “Scena”
  • [br]

  • – Analisi dei parametri di camera
  • [br]

  • – Utilizzo del Fire per l’anteprima in tempo reale
  • [br]

  • – Creazione dei materiali e analisi approfondita di tutte le caratteristiche
  • [br]

  • – Creazione di materiali multilivello
  • [br]

  • – Analisi dei fattori fisici dei materiali
  • [br]

  • – Creazione di plastiche e metalli
  • [br]

  • – Creazione di tessuti traslucenti
  • [br]

  • – Creazioni di tessuti con livelli di Fresnel multipli
  • [br]

  • – Applicazione dei materiali creati a una lampada con tessuto traslucente
  • [br]
    2 – STILL LIFE: RADIO TIVOLI ONE

    [br]

    [br]

  • – Creazione set fotografico bianco riflettente da still life
  • [br]

  • – Applicazione dei concetti studiati nella prima parte del corso sui materiali e creazione dei legni
  • [br]

  • – Creazione guidata di tutti i materiali presenti nella scena
  • [br]

  • – Il workflow migliore da utilizzare prima di lanciare il render e come ottimizzare al meglio i parametri
  • [br]

  • – Analisi dei parametri di render
  • [br]

  • – Creazione dei materiali in formato nativo Maxwell Render e utilizzo dei materiali Reference
  • [br]

  • – Creazione di altre 2 radio con diverse finiture
  • [br]

  • – Utilizzo del fuoco della fotocamera e gestione delle profondità di campo per la messa a fuoco controllata dei soggetti nel set
  • [br]

  • – Render del set con radio singola e con 3 radio
  • [br]
    3 – INTERNO

    [br]

    [br]

    [br]

    [br]

  • – Gestione di una scena con 8 fonti luminose
  • [br]

  • – Creazione passo passo di tutti i materiali della scena
  • [br]

  • – Analisi dei parametri di Cielo e Sole e impostazione illuminazione diurna
  • [br]

  • – Illuminazione con luci artificiali per un controllo totale della diffusione della luce in un ambiente con poche aperture
  • [br]

  • – Approfondimento delle mappe di Roughness per il controllo totale delle riflessioni con mappe in scala di grigio
  • [br]

  • – Creazione di 4 diverse immagini con 4 diverse illuminazione con un solo render tramite Multilight e trucchi per una pulizia di immagine con poche fonti luminose
  • [br]
    4 – ESTERNO

    [br]

    [br]

    [br]

    [br]

  • – Analisi di alcuni materiali della scena
  • [br]

  • – Illuminazione tramite HDR e gestione delle mappe nei vari canali di background, riflessione e rifrazione per un controllo totale dei parametri in post produzione
  • [br]

  • – Analisi di tutti i parametri del Maxwell Grass per la creazione di manti erbosi
  • [br]

  • – Salvataggio dei parametri di illuminazione del Multilight
  • [br]

  • – Creazione di scene diurne e notturne e controllo totale di tutte le luci interne ed esterne della scena
  • [br]
    Qualche immagine tratta dal corso:
    [br]

    [br]

    [br]

    [br]

    [br]
    Spero possiate trovarlo interessante! Noi intanto prepariamo le scne per il corso PRO, in uscita a breve!

    Ikea scene: VRayforC4d vs Maxwell Render

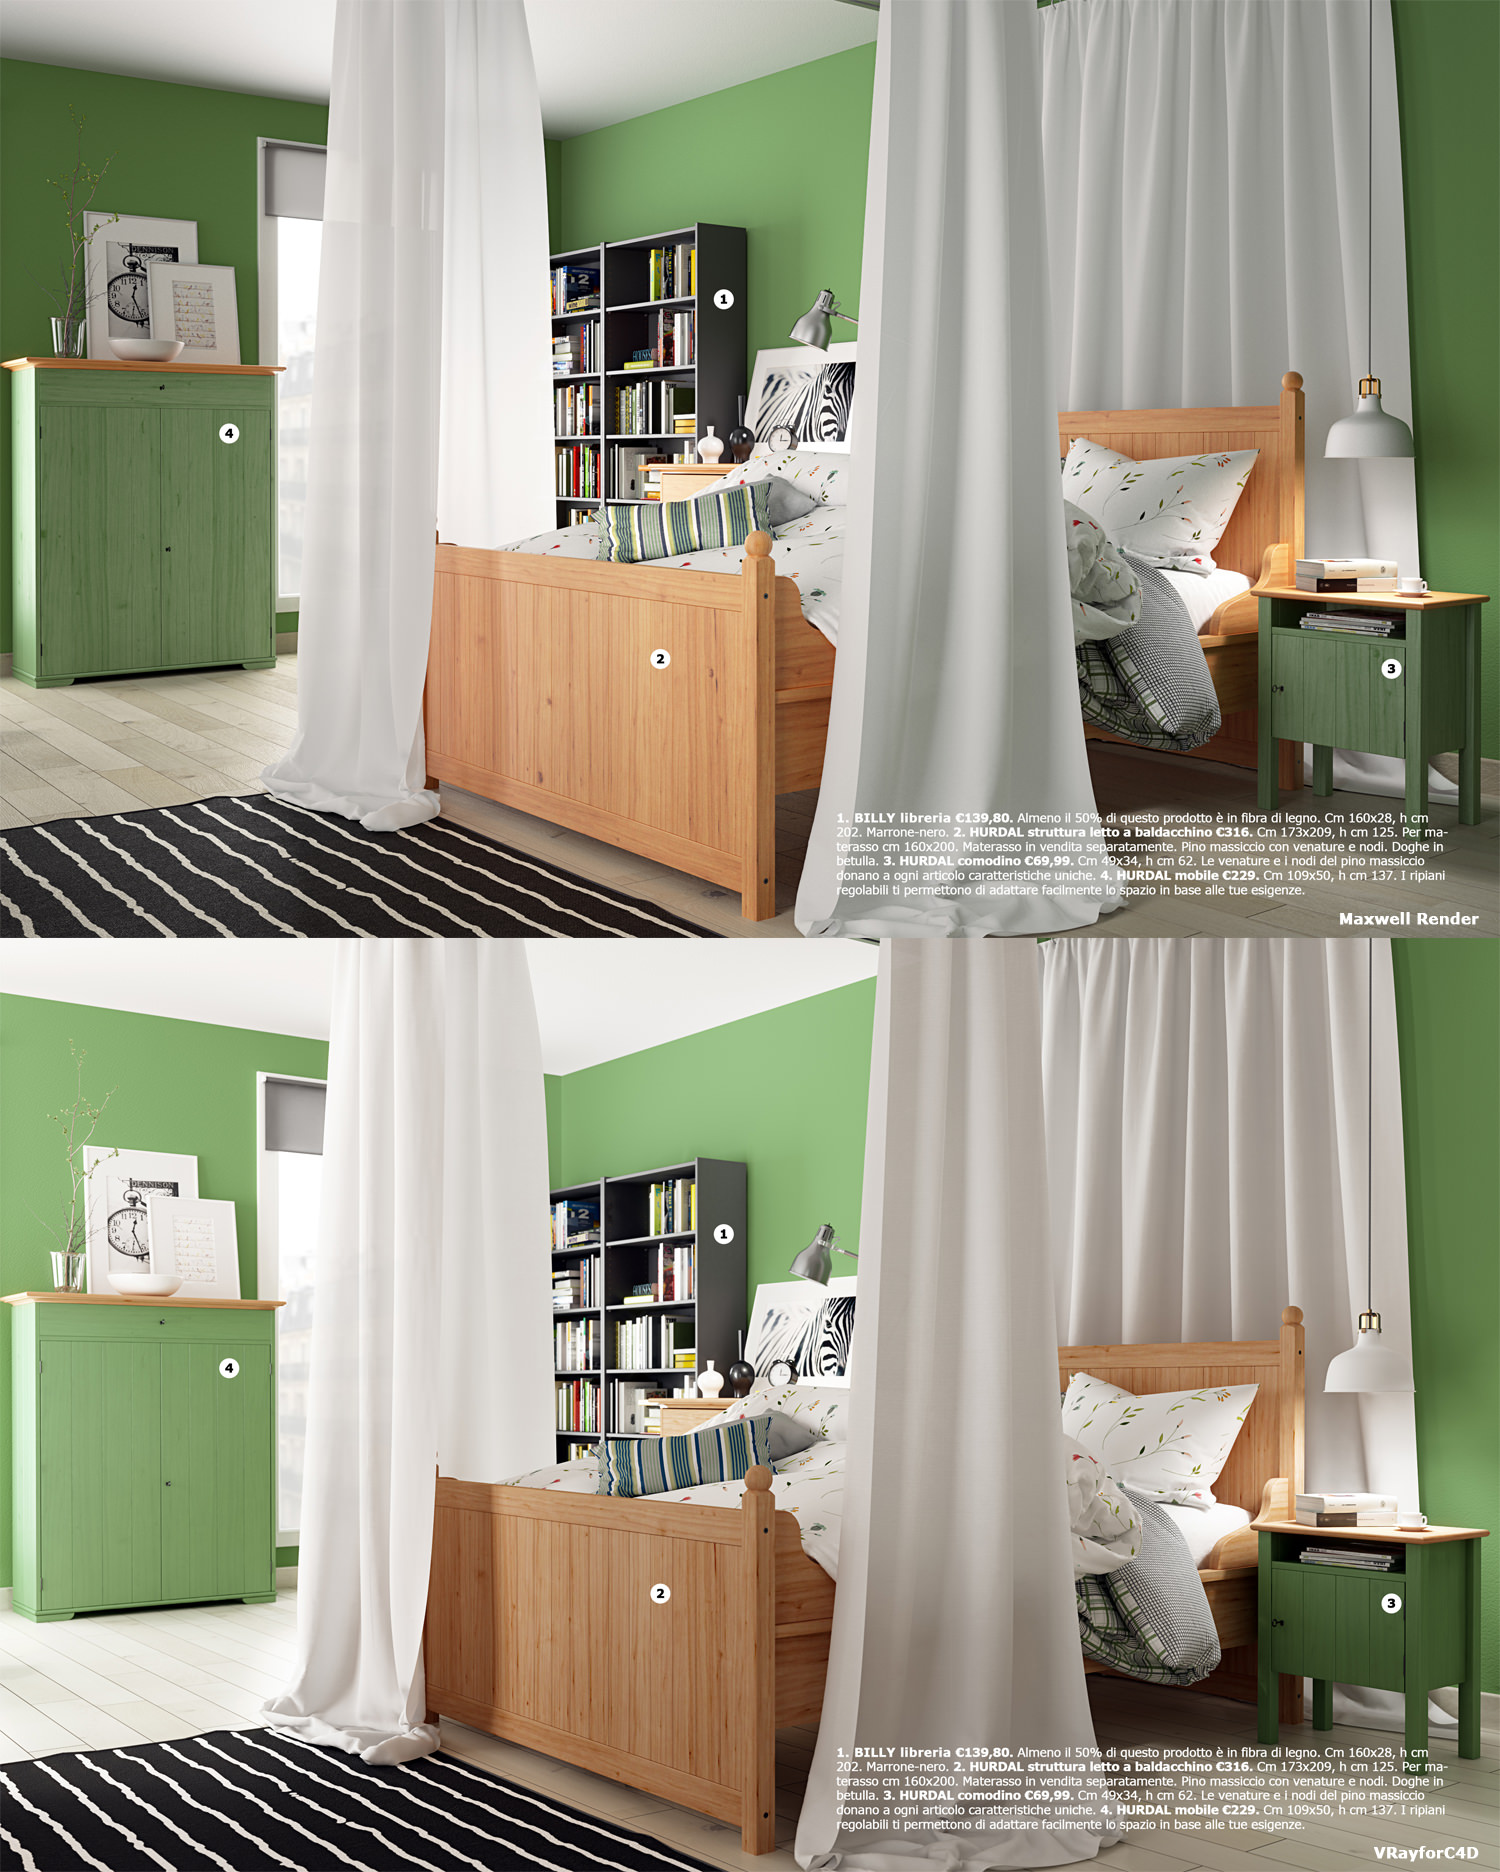
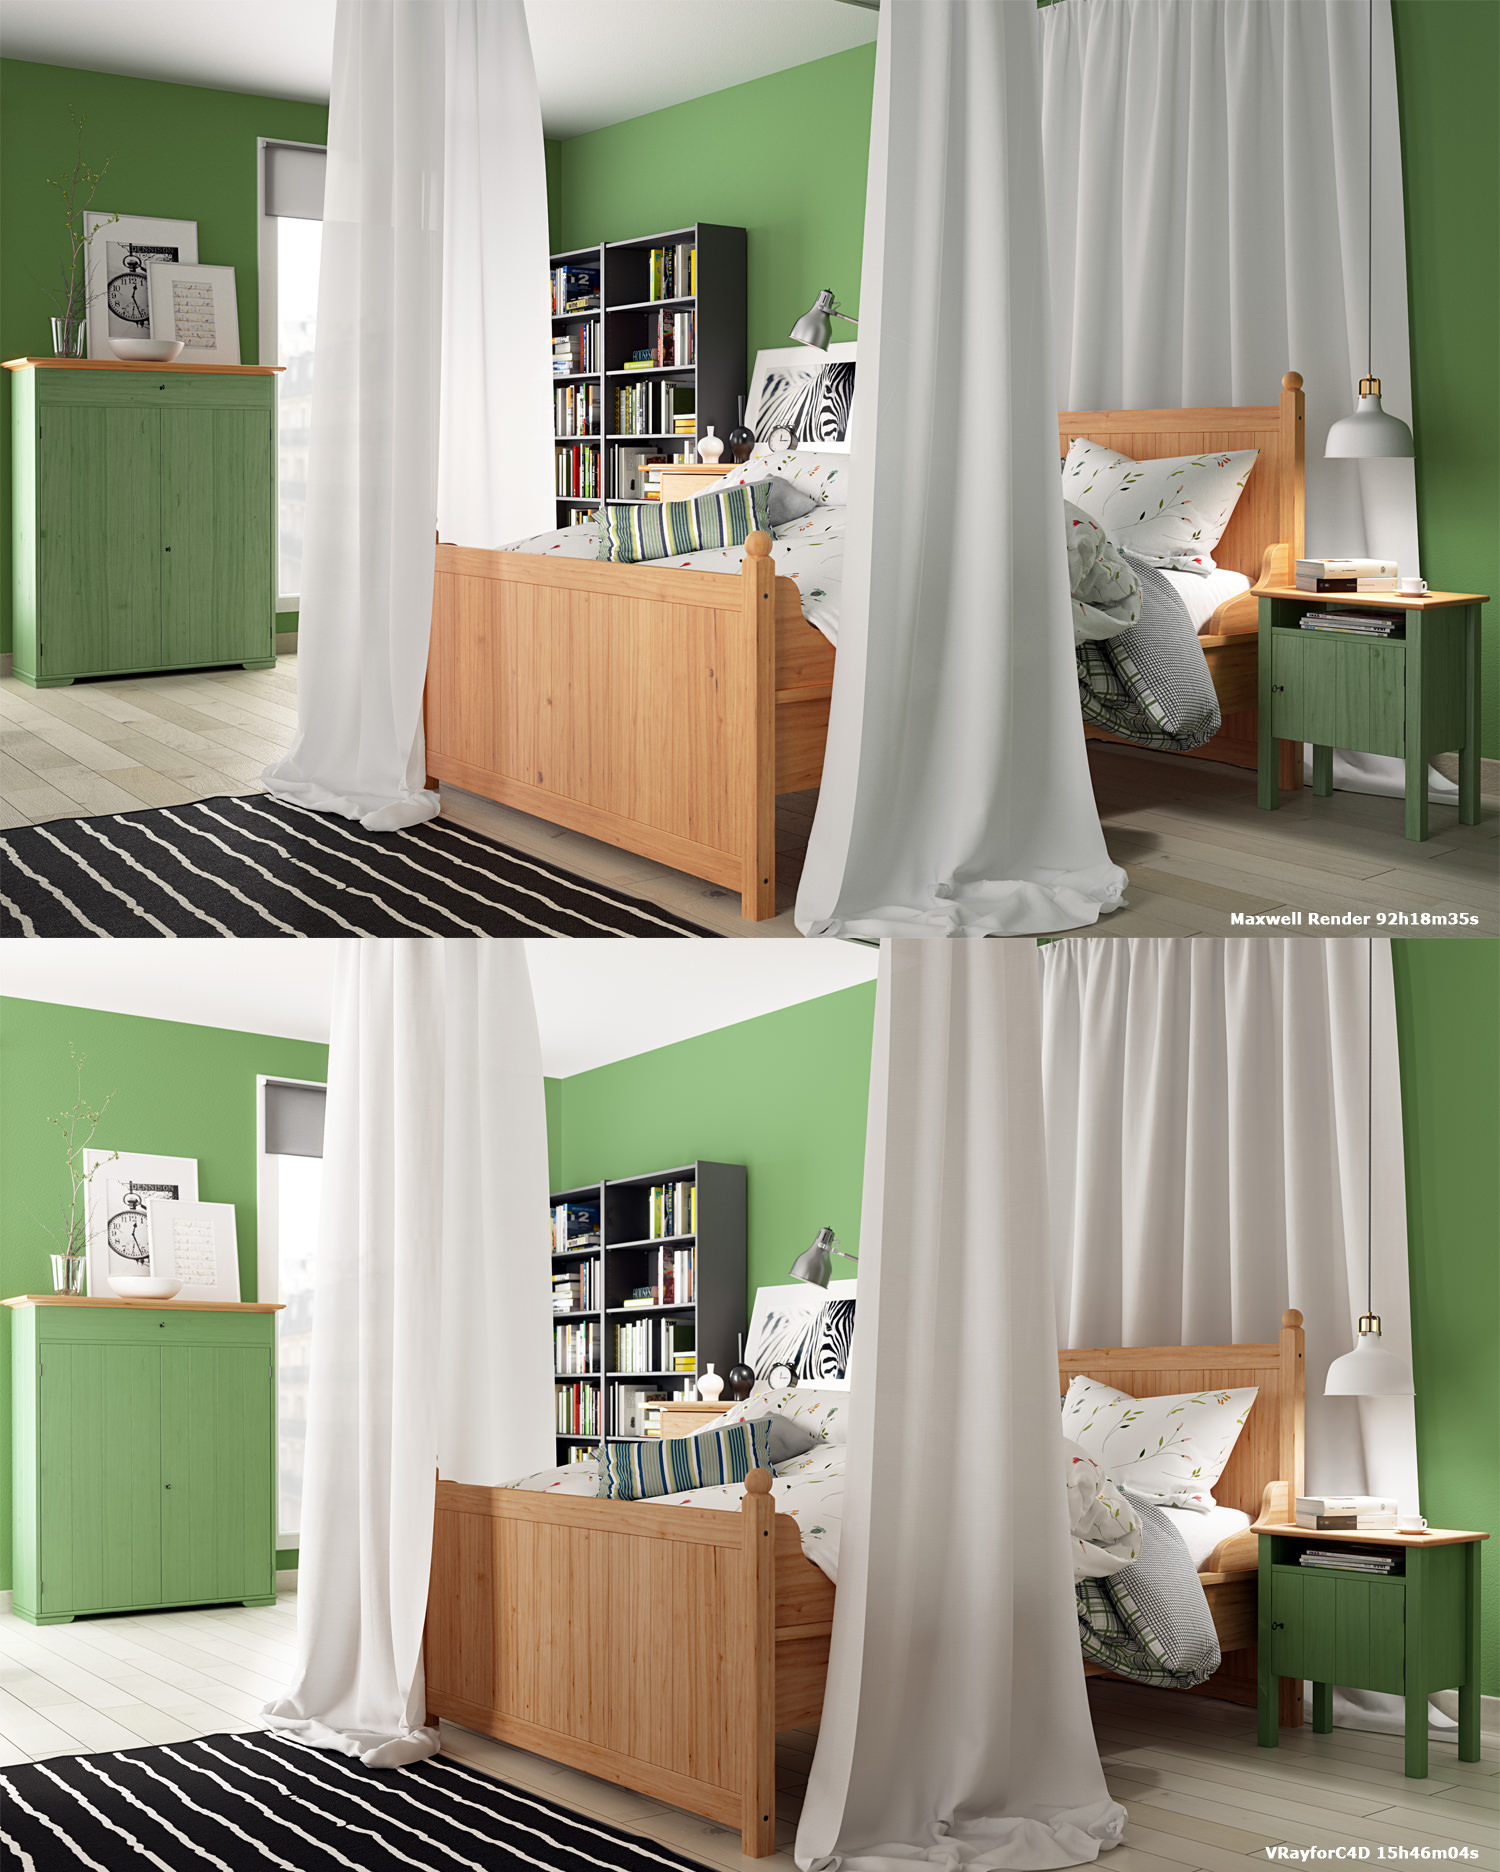
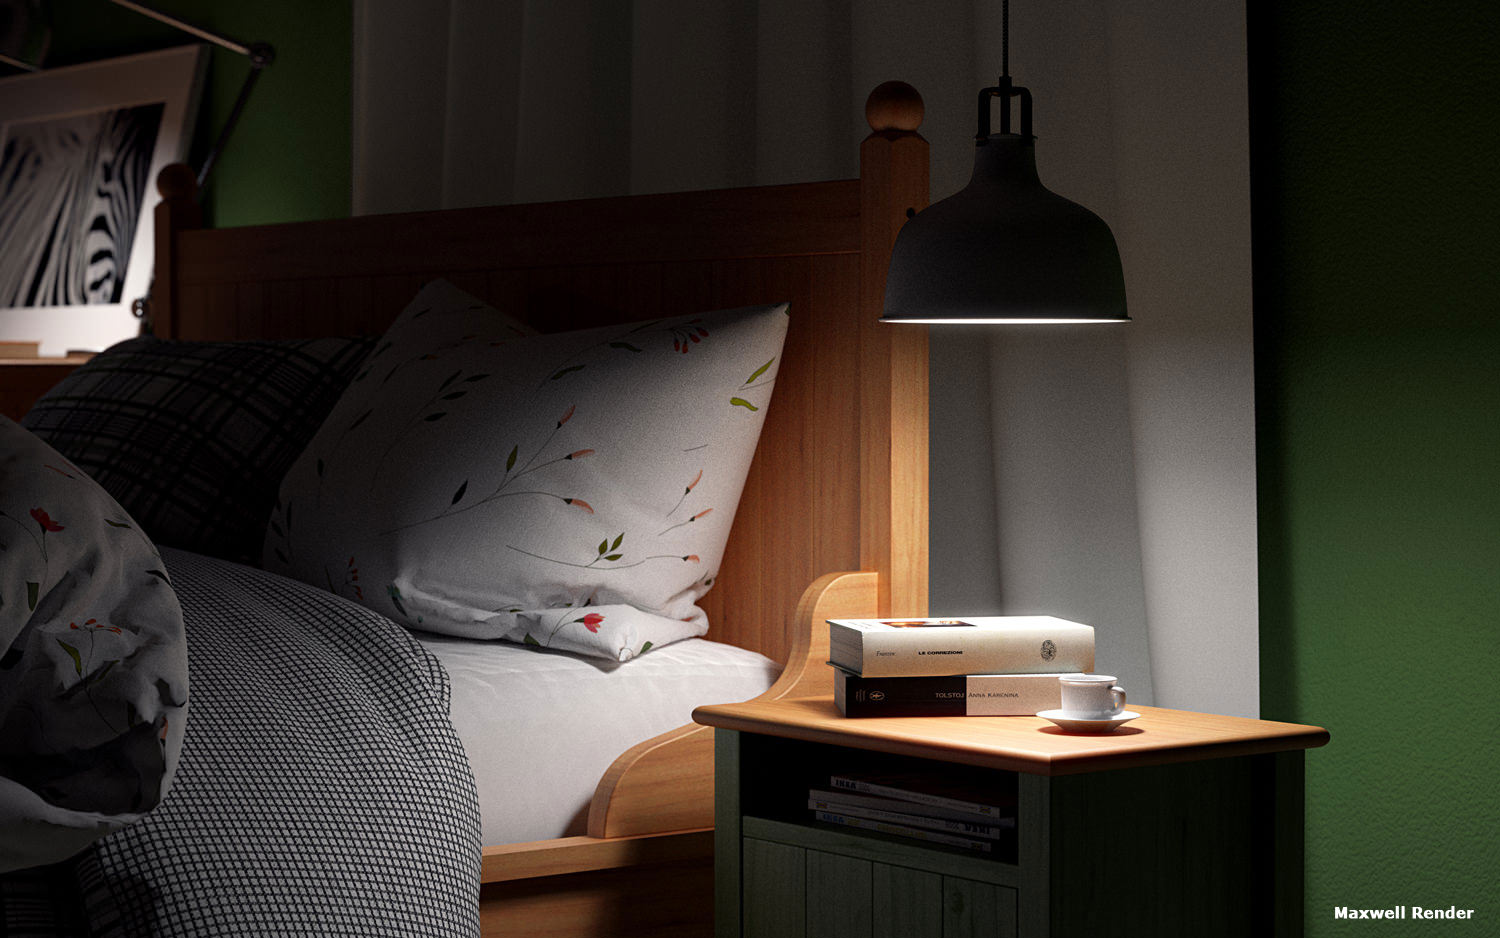
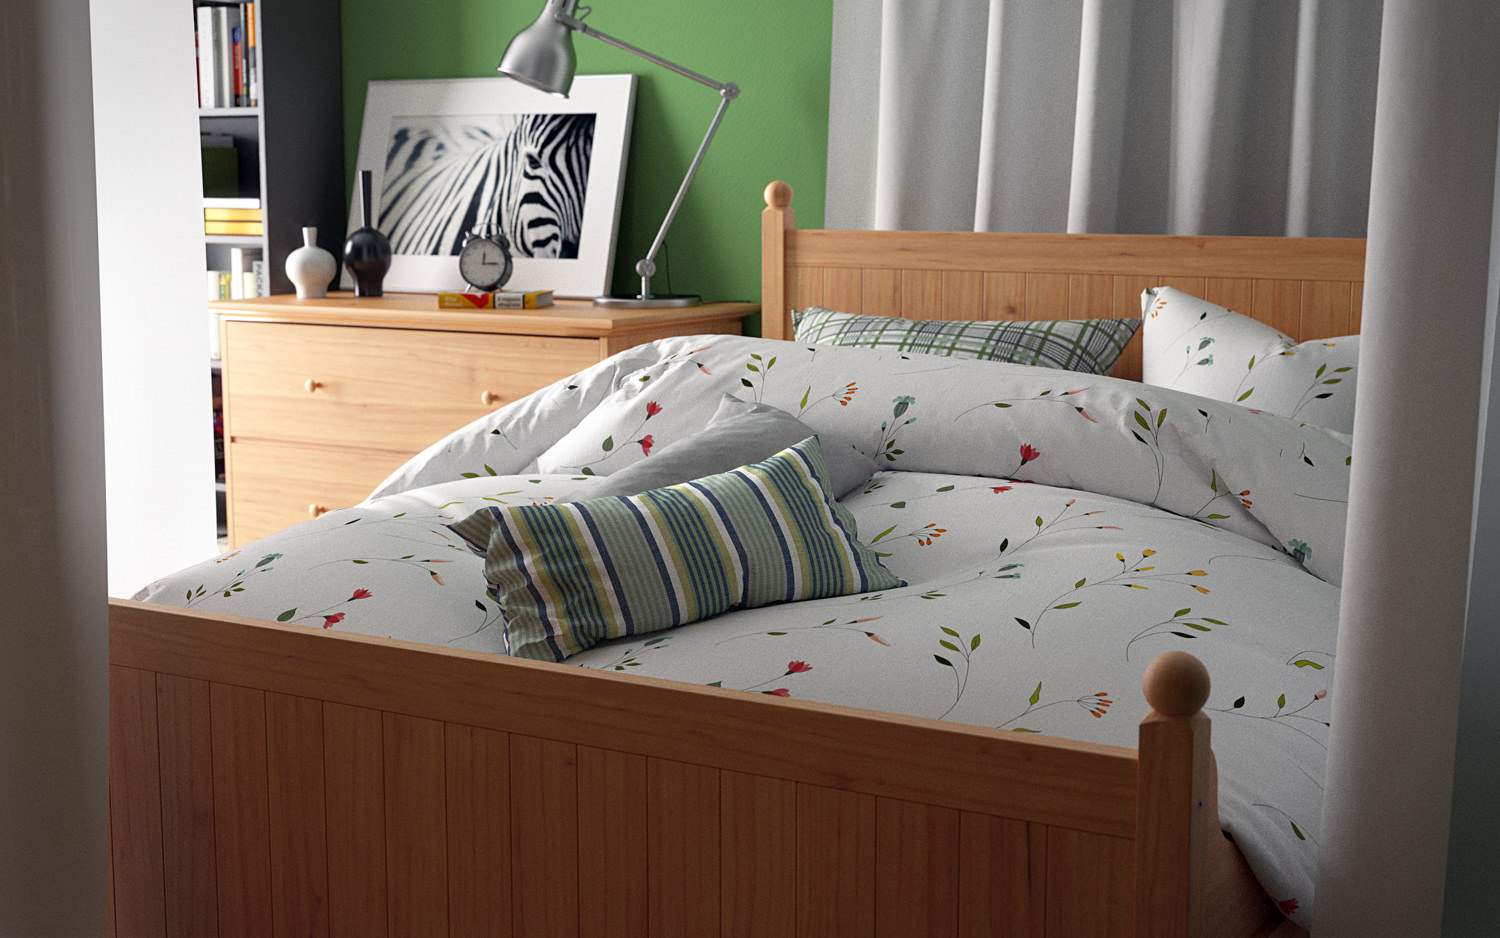
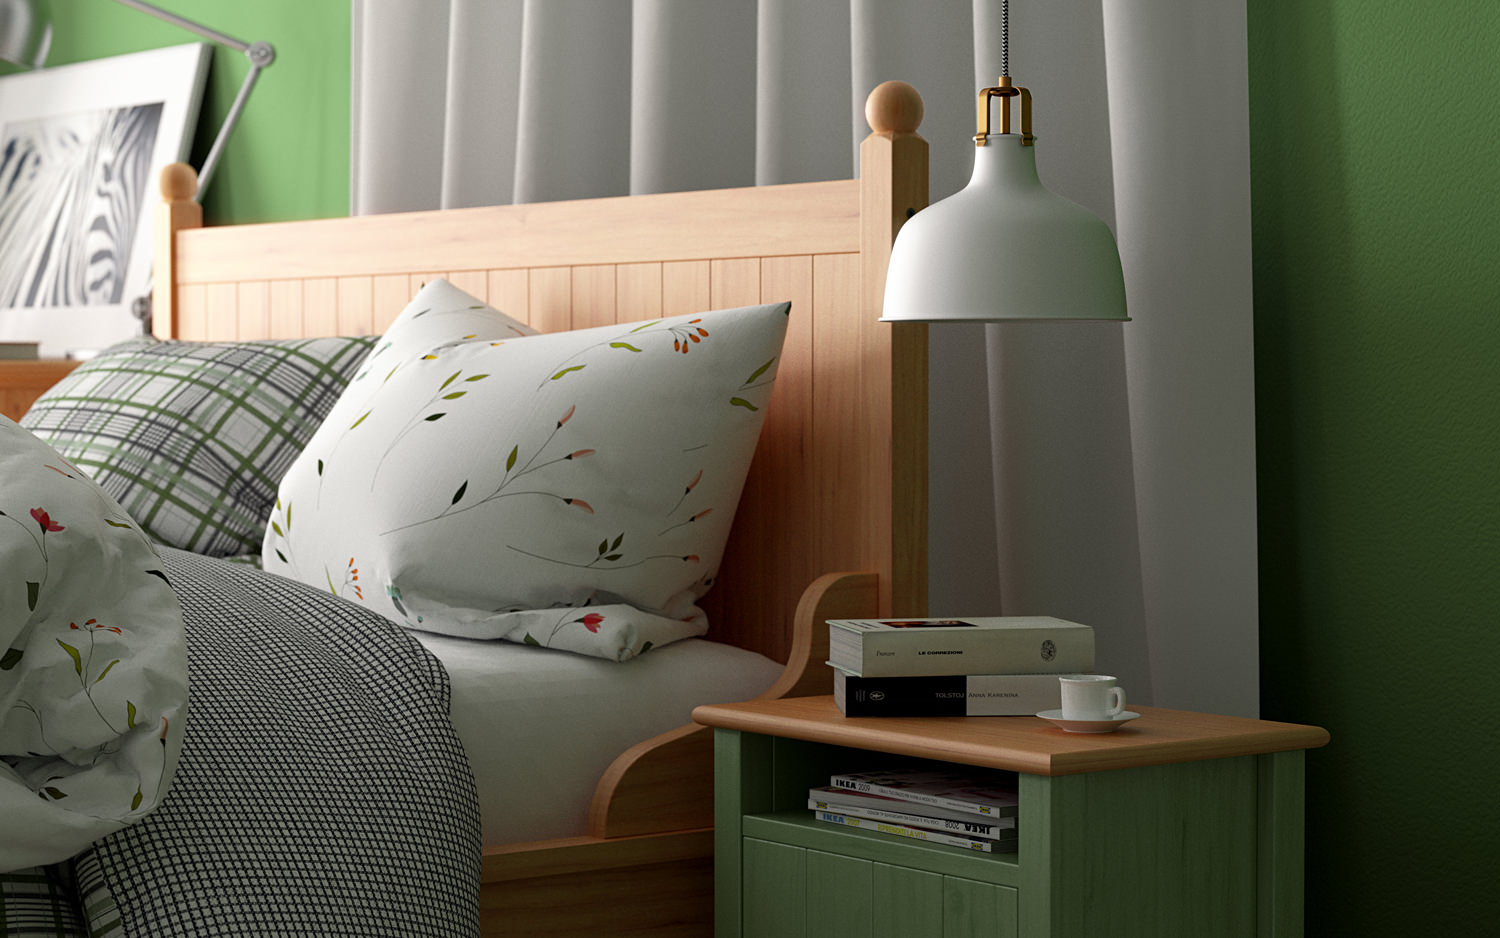
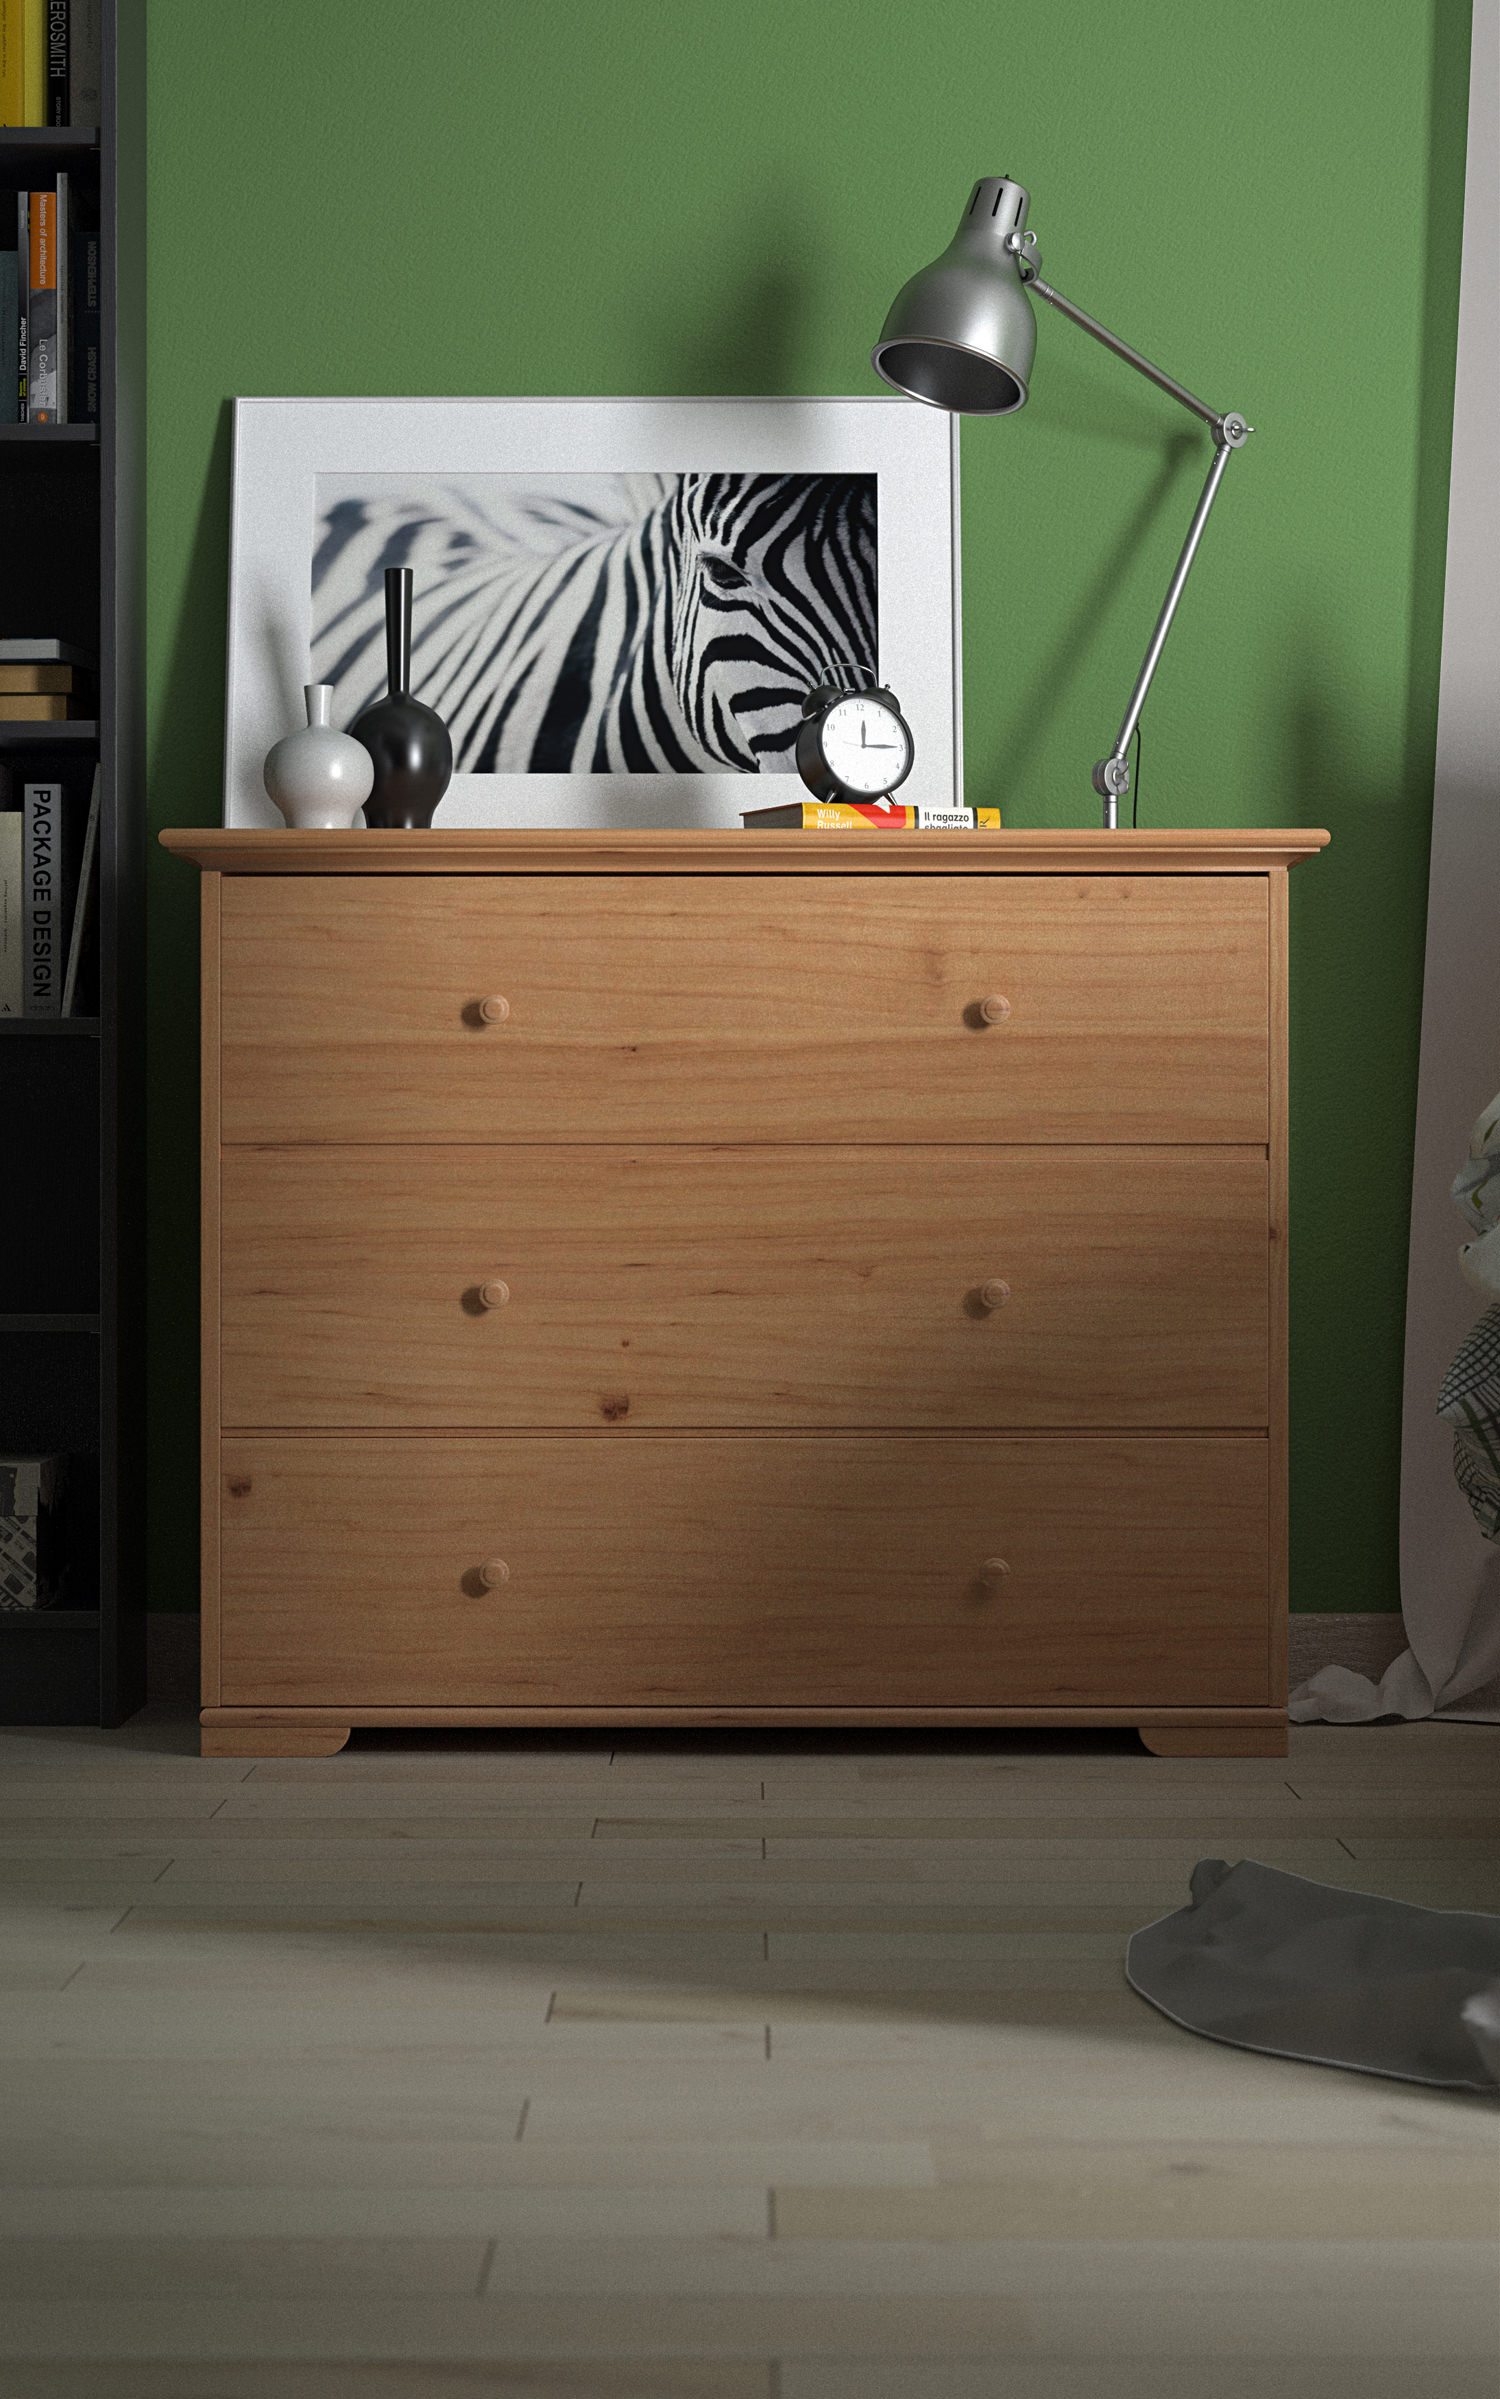
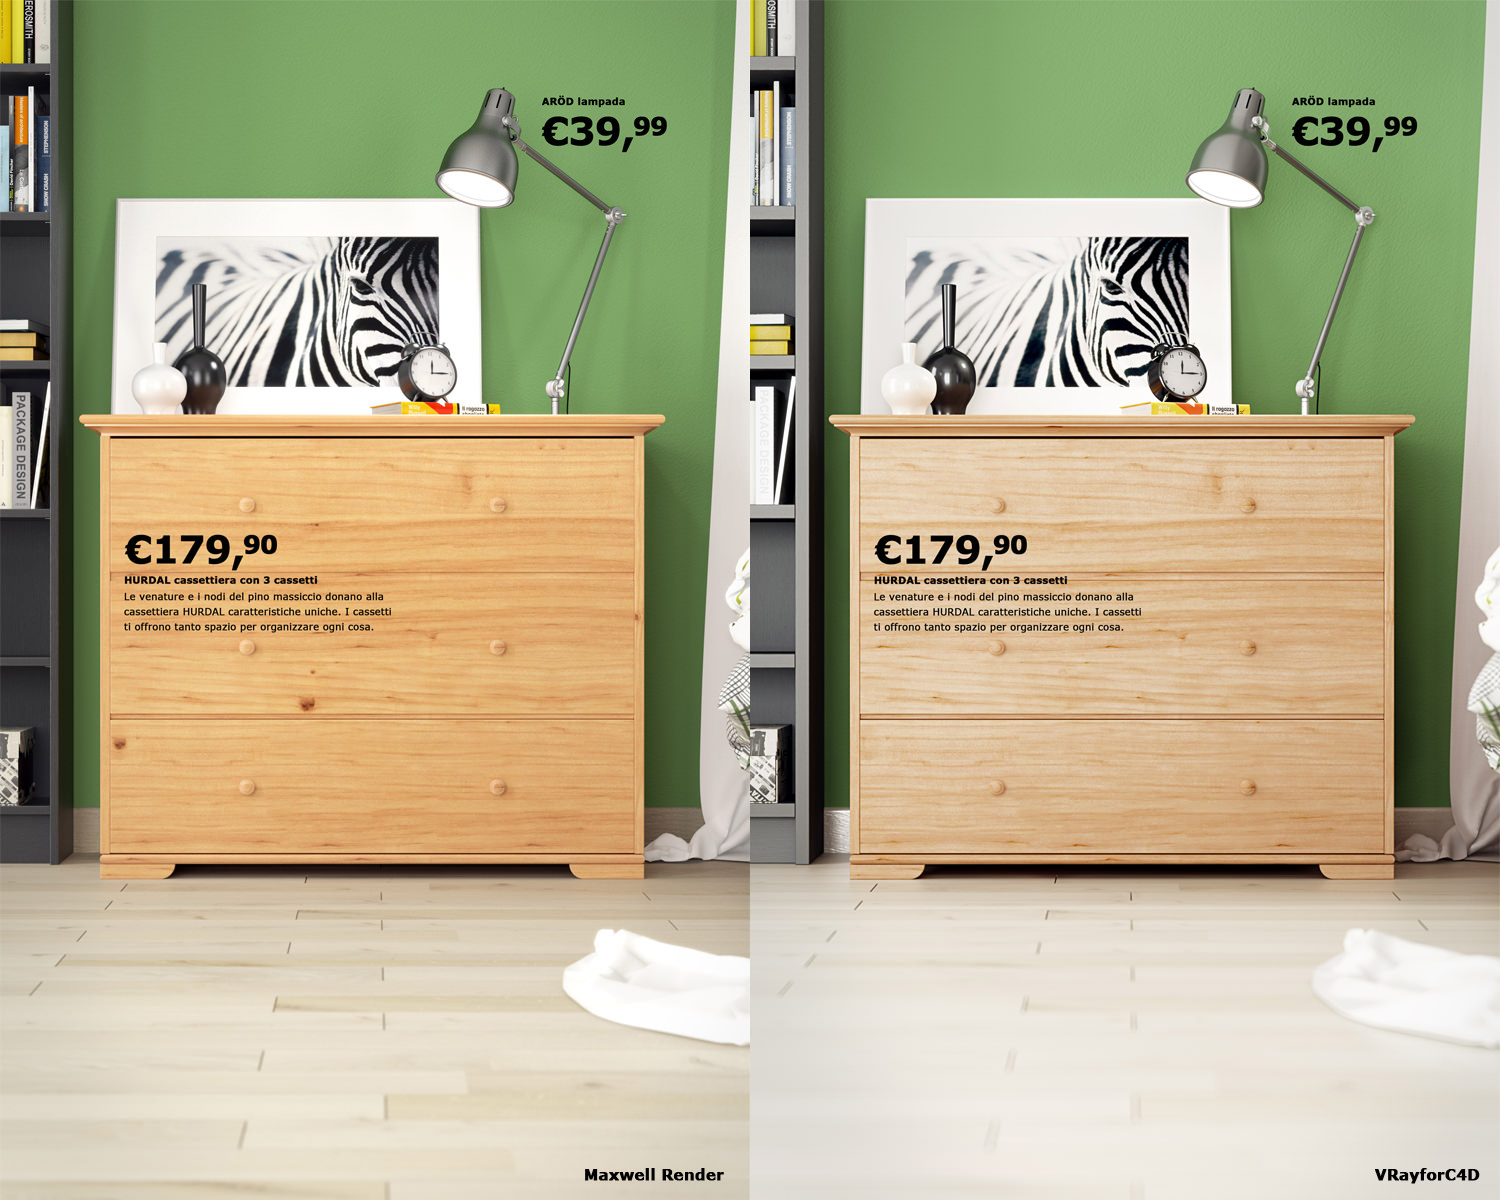
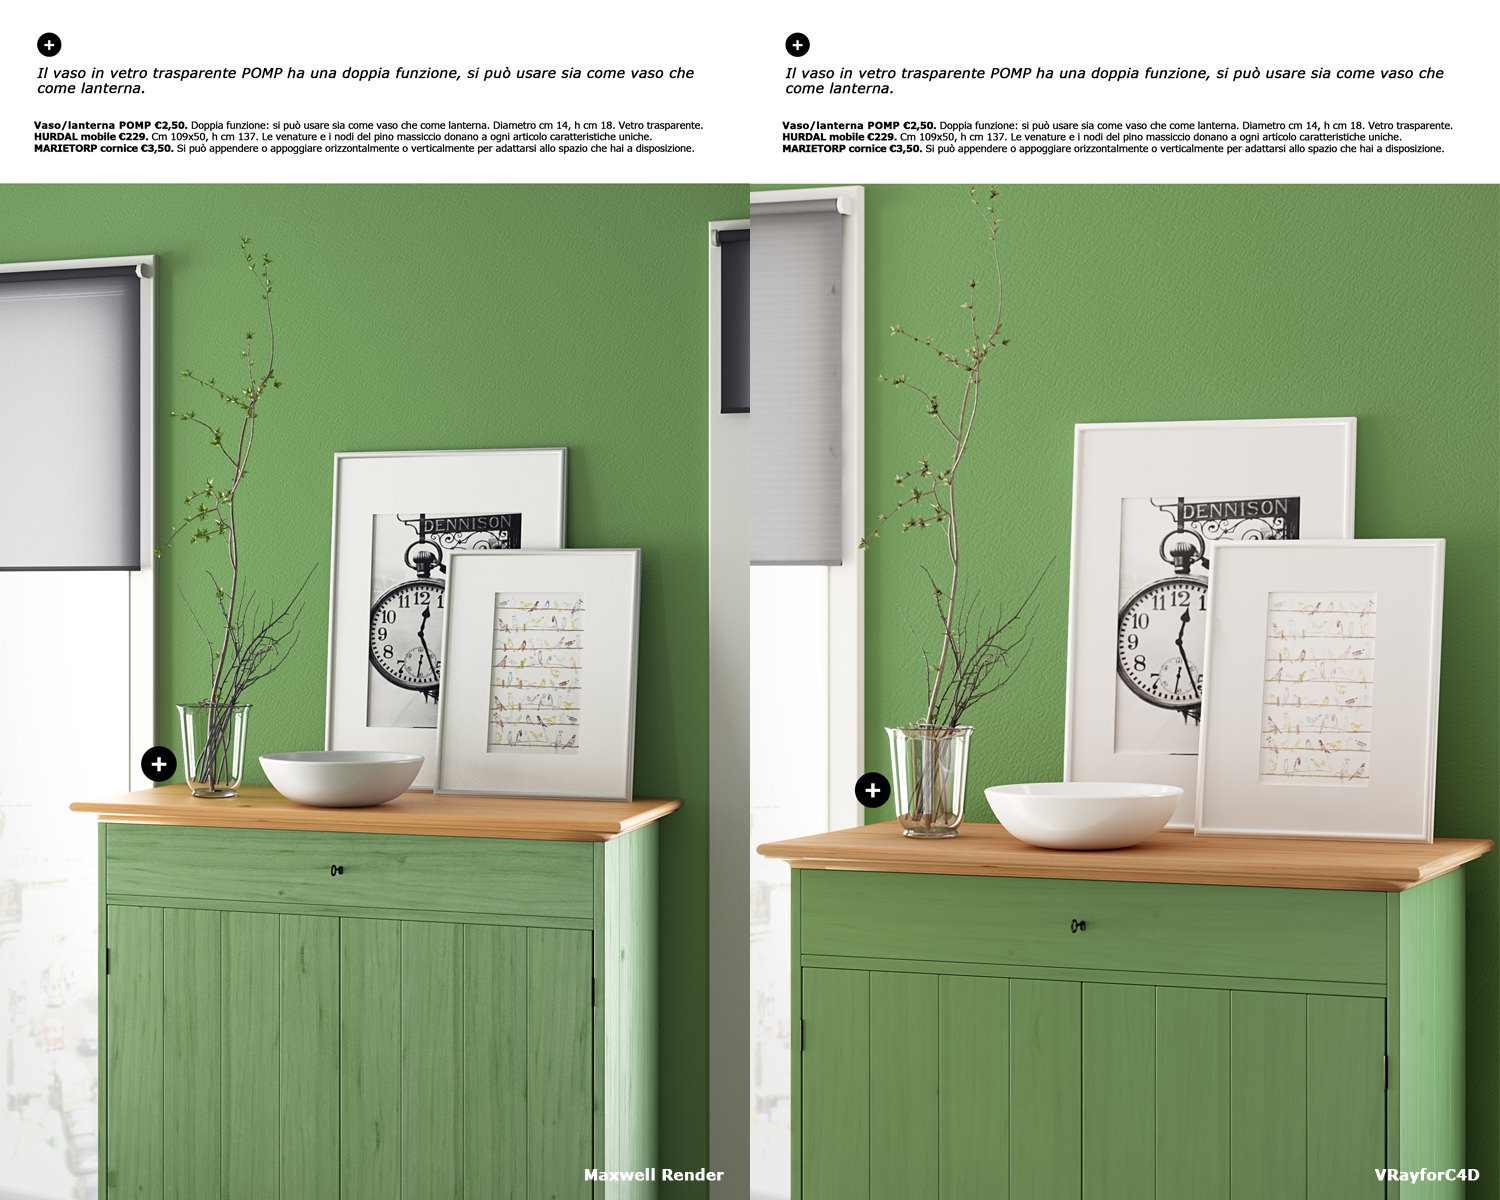
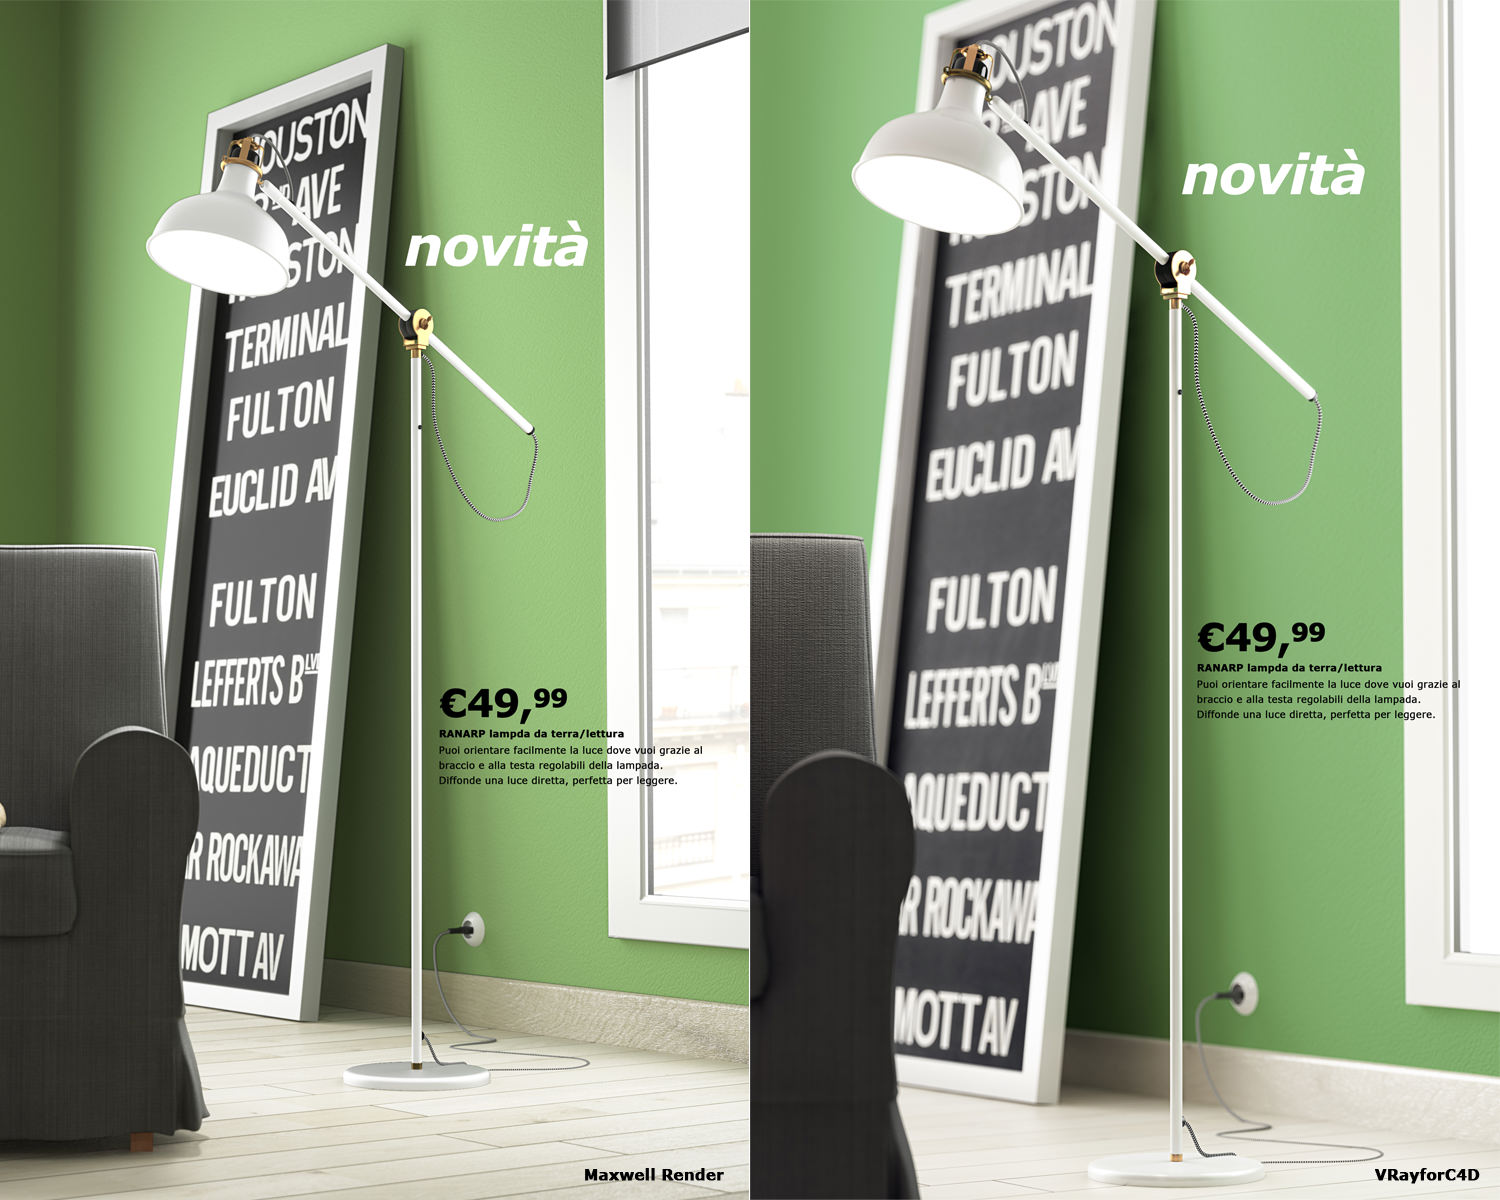
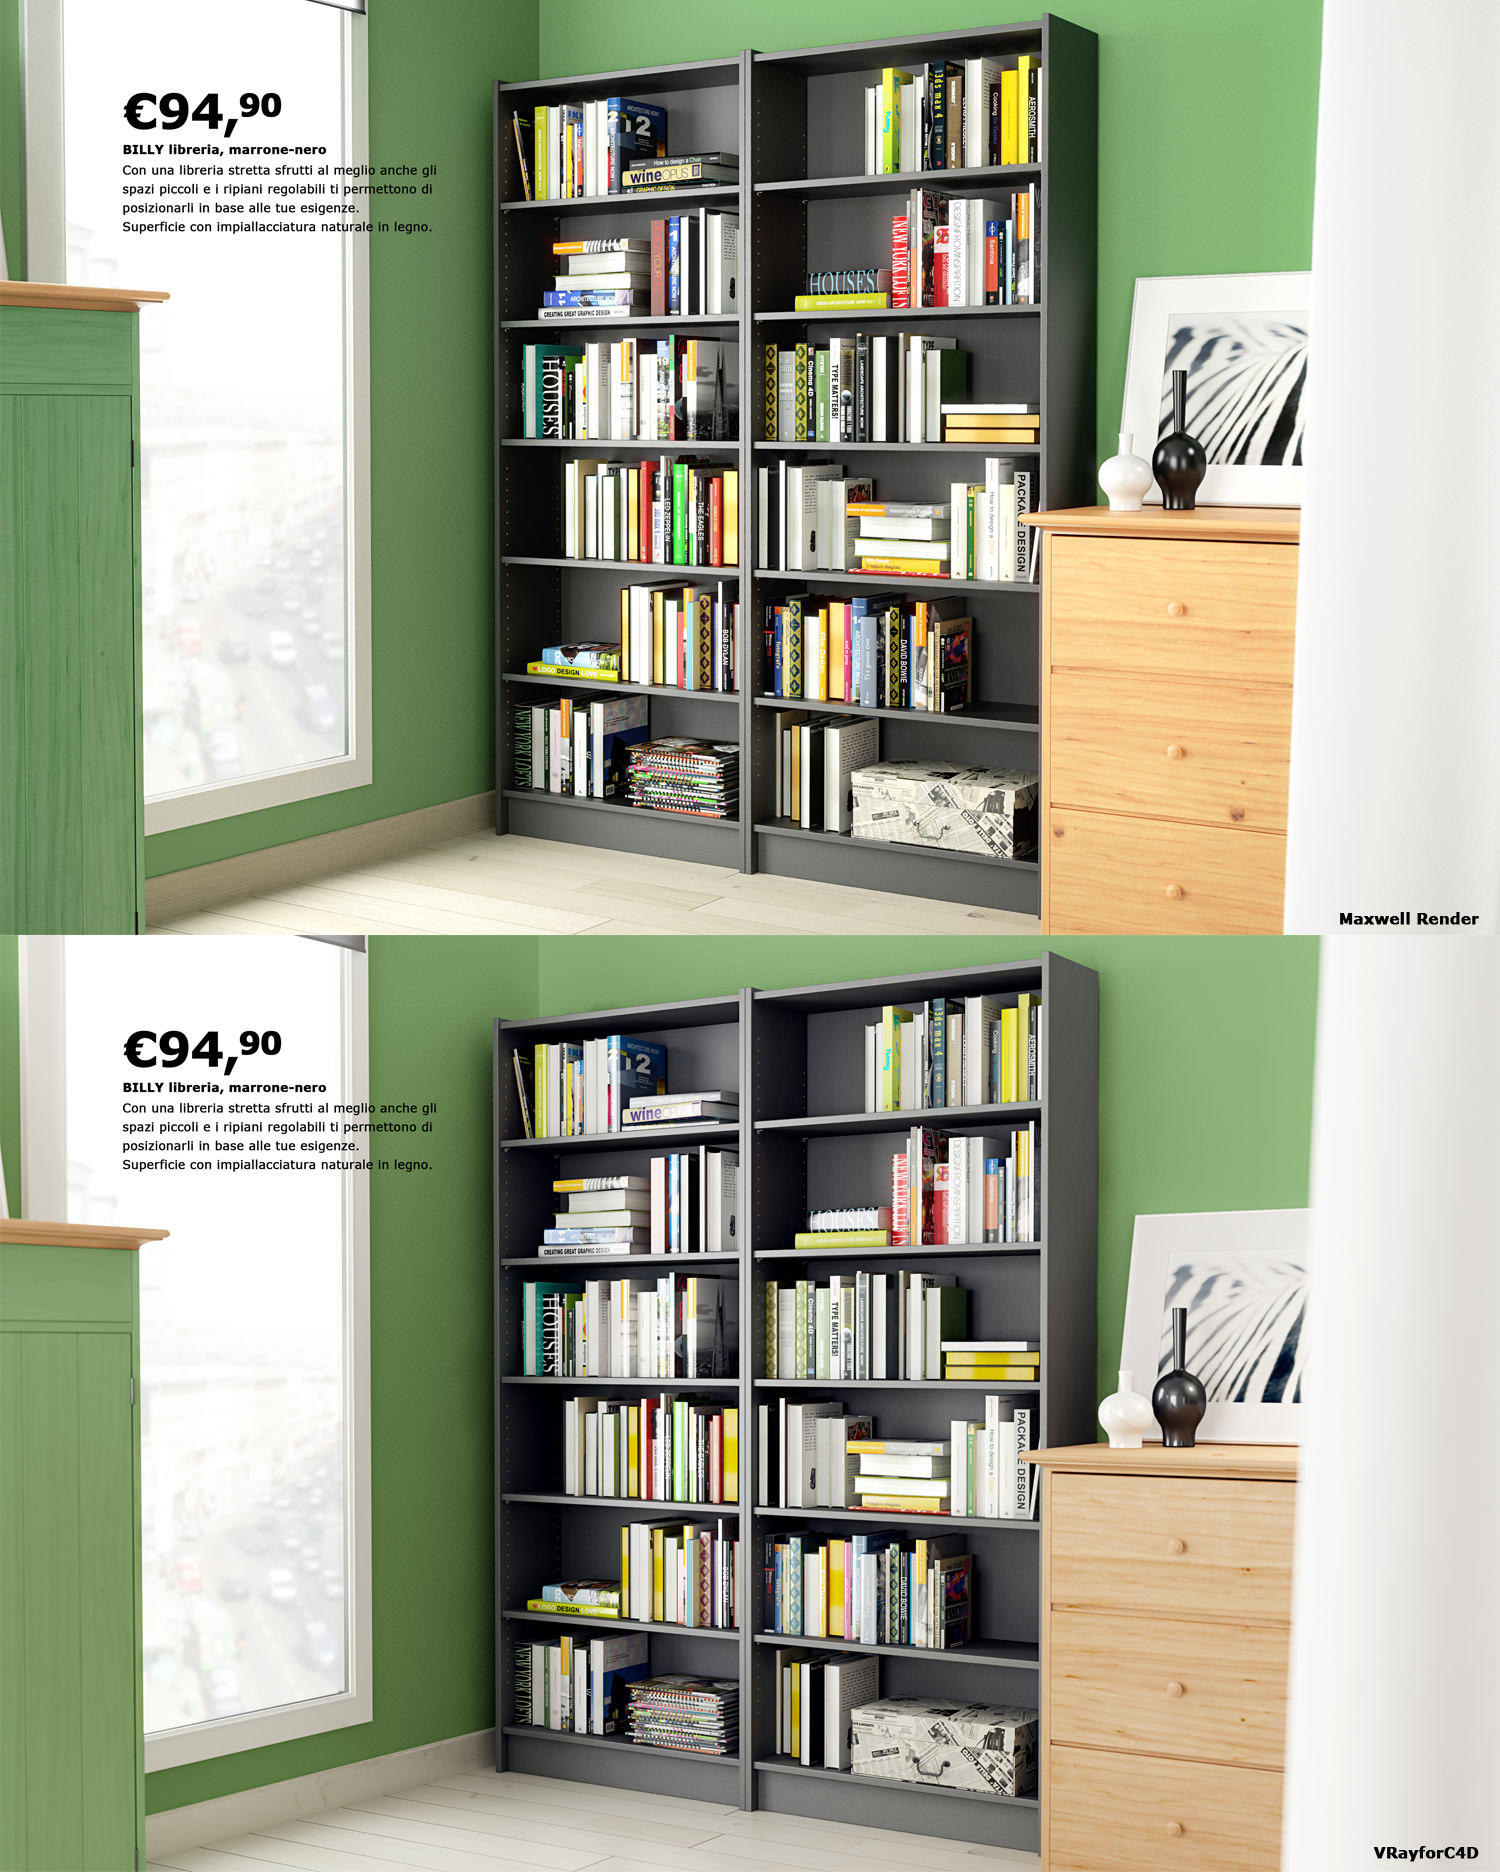
    Hi everyone, I am here to compare two incredible render engines like VRayforC4D and Maxwell Render on an interior scene created in Cinema4D. I often work with both of them but obviously not on the same project. I decided to model this scene and recreate a typical Ikea set to compare render speed, image cleaning, settings and materials used for the same set, lights and camera settings. This test doesn’t want to figure out which is the best render engine simply because it would not be possible, each of them has its own characteristics and they are two excellent products. It would be like comparing Canon and Nikon! In this test I used 1.9 versions of VRayforC4D and 3.2.5 version of Maxwell Render, both of CPU. The images are rendered on clients with two quad Xeon 2.13 Ghz.

    [br]

    Ciao a tutti, è da tanto tempo che volevo farlo, paragonare due mostri sacri come VRayforC4D e Maxwell Render su una scena di interni piuttosto complessa creata in Cinema4D. Spesso mi trovo a lavorare su entrambi i motori di render ma ovviamente mai sullo stesso progetto. Ho deciso allora di modellare questa scena ricreando un classico ambiente Ikea immaginando di dover produrre delle immagini da catalogo per verificare velocità di render, pulizia di immagine, impostazioni e materiali a parità di set, luci e valori di fotocamera. Premetto subito che il test non serve a capire quale sia il motore di render migliore semplicemente perchè non sarebbe possibile, ognuno ha le sue caratteristiche e stiamo parlando di due prodotti eccellenti, sarebbe come paragonare Canon e Nikon! Sono state utilizzate le versioni 1.9 di VRayforC4D e la 3.2.5 di Maxwell Render, quindi tutte e due su CPU. Le immagini sono calcolate su macchine con doppio quad Xeon a 2.13 Ghz.

    [br]

    [br]

    [br]

    [br]

    [br]

    [br]

    [br]

    [br]
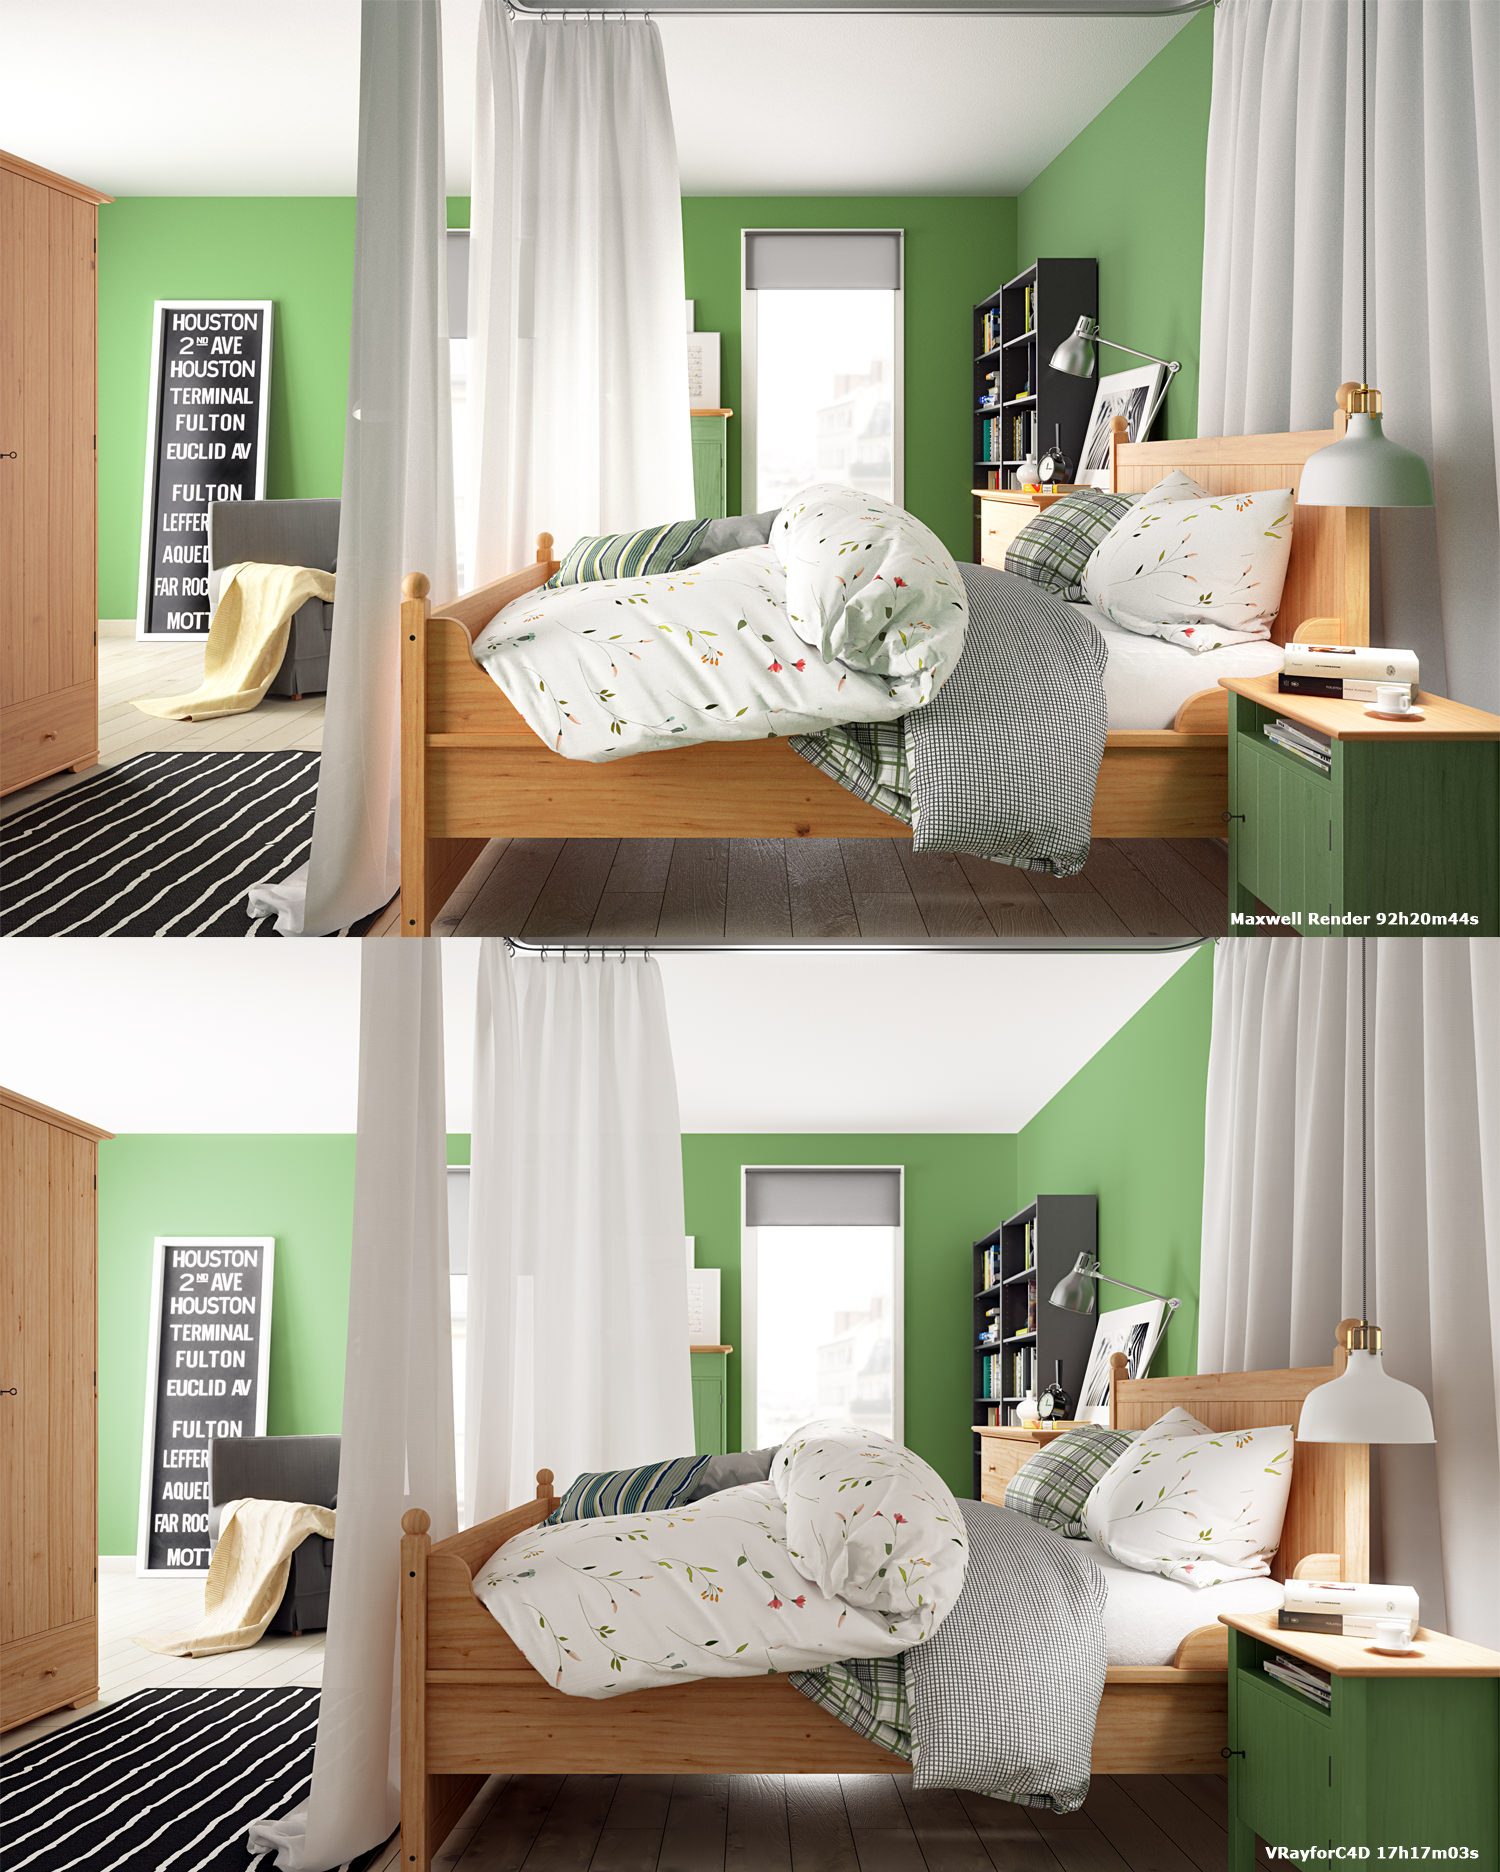
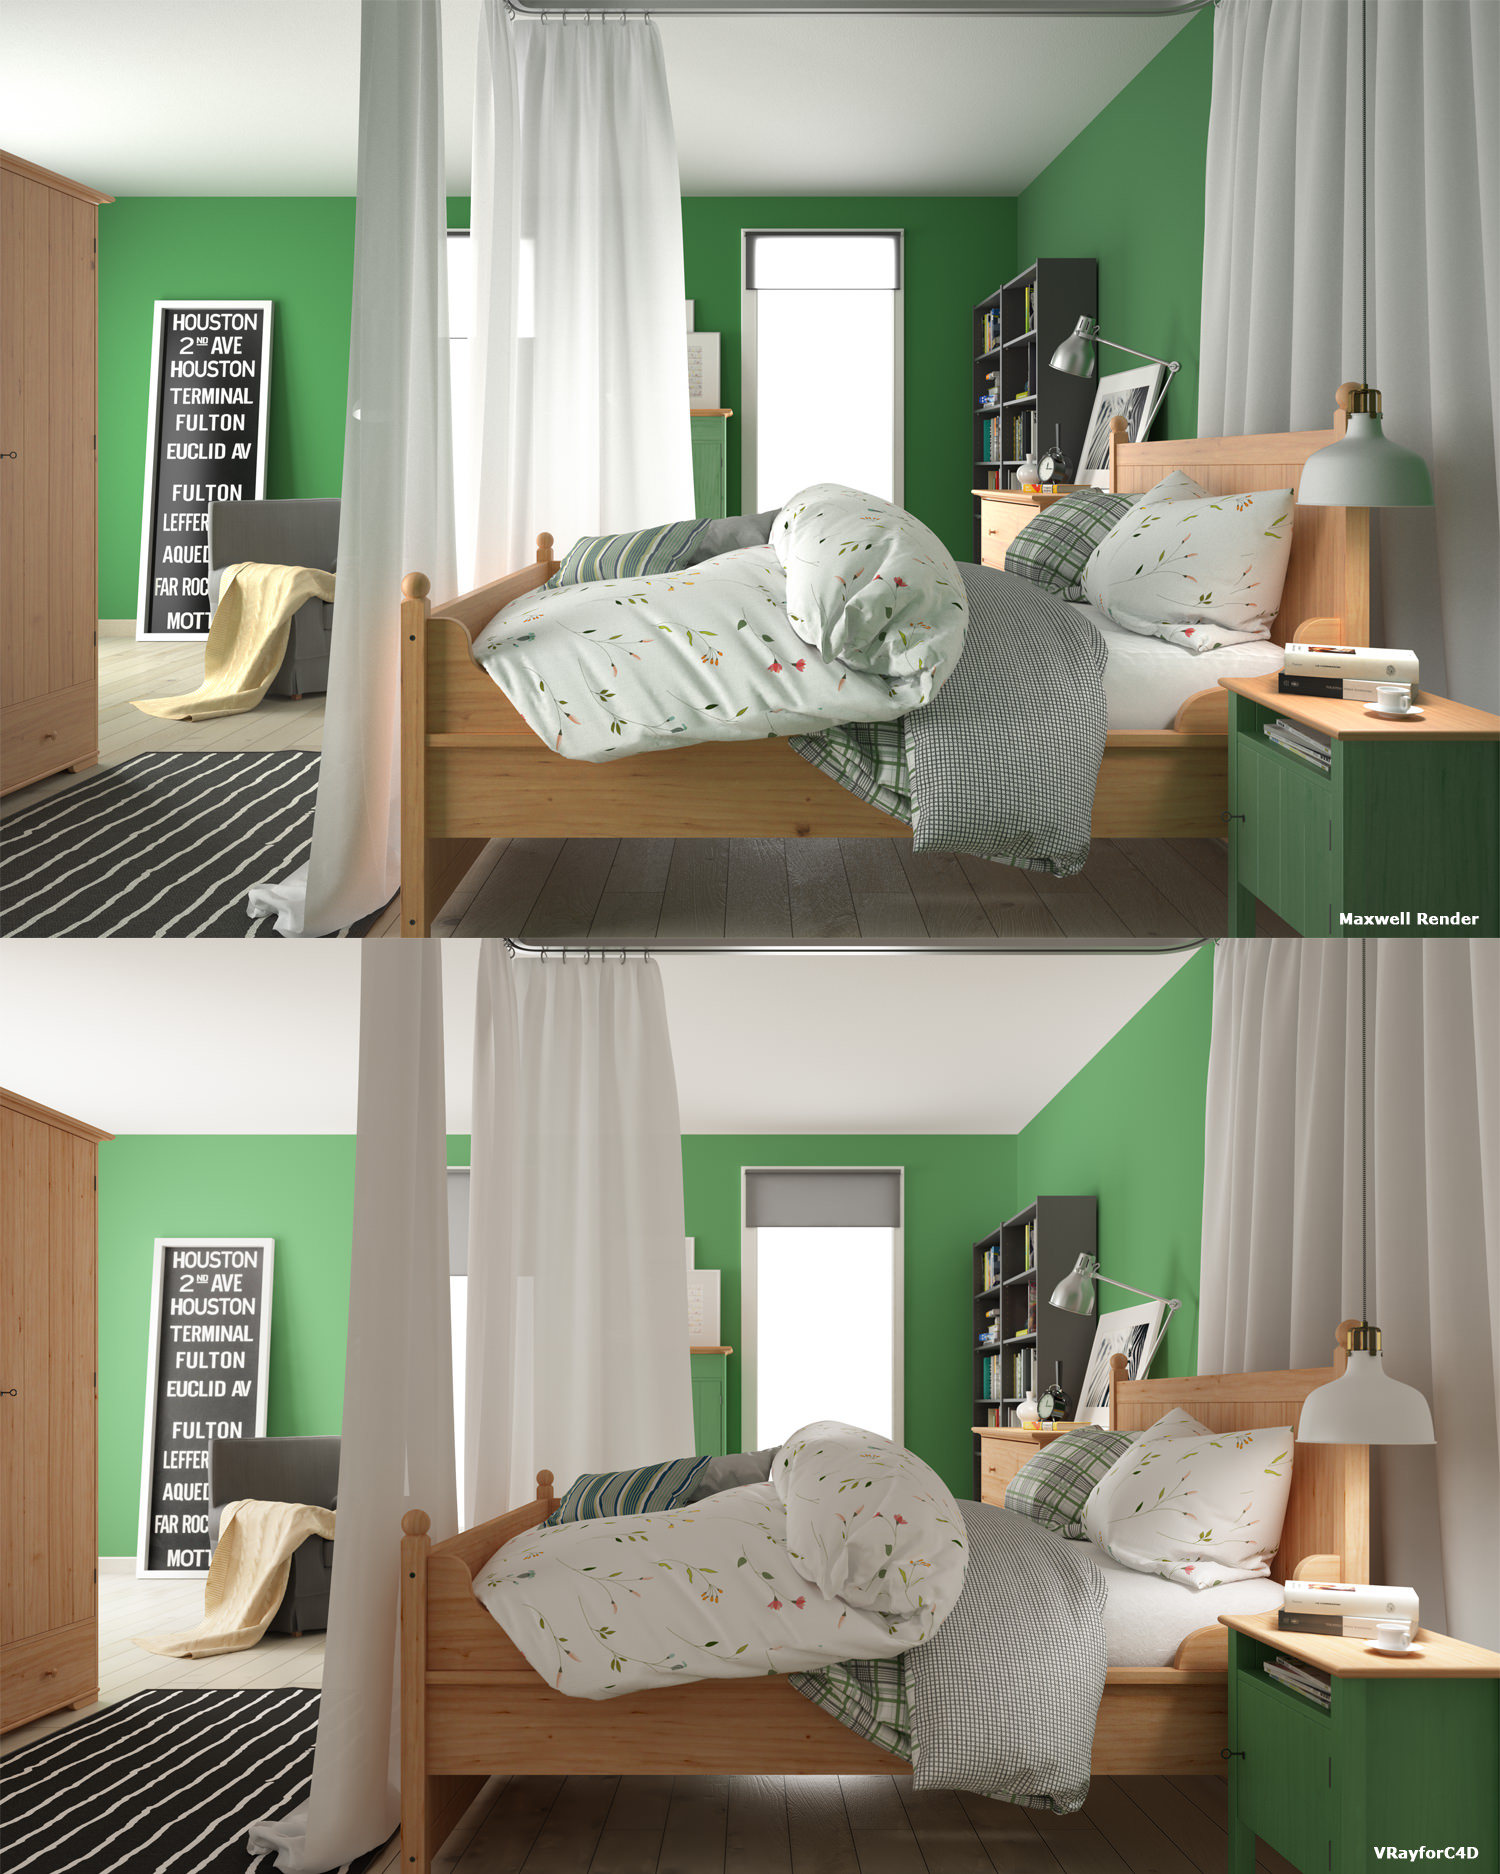
    The first thing to consider is that we are comparing two different concept of render engines. VrayforC4D is a raytrace engine and Maxwell Render is unbiased. This leads to the first consideration: Maxwell Render has fewer parameters to be set and the light result is physically correct; this is a great advantage if you don’t want to waste time to find the right compromise between image cleaning and render times. In VRayforC4D the time to calculate the the final render is less then using Maxwell Render. It will be up to our experience to evaluate whether to invest time in searching for the optimal parameters render in Vrayforc4d or avoid it and decide to calculate the final render in Maxwell Render. Without the aid of a render farm VRayforC4D is probably the best solution, especially for high resolution images. All the renders have been calculated at 3500x2188px and on all the images you will find the render times of the two engines. The great advantage of Maxwell Render, though, is that you can stop the render to check that everything is ok and then restart it without losing what it has already renderized. This has big advantages, for example we can send the preview to the customer in a short time, or start with the post production on an image not complete to correct levels, backgrounds etc … and then replace the final image once the render is complete. If we are working on an animation we can begin to edit the video with draft quality frames and replace them at the end of the rendering…. not bad !!! Maxwell Render also uses the Fire for a quick preview of the scene that helps in setting the light. The new version of VRayforC4D 3.4 uses in addition to the GPU some settings for incredible fast previews.

    [br]
    La prima cosa da considerare è che stiamo paragonando due motori di render concettualmente diversi, uno biased (Vrayforc4d), l’altro unbiased (Maxwell Render). Questo porta alla prima considerazione: Maxwell Render ha ovviamente molti meno parametri di render da impostare e la luce viene calcolata in maniera fisicamente corretta; questo è un gran vantaggio se non si vuole perdere tempo a trovare il giusto compromesso tra pulizia di immagine e tempi di render, prove che molte volte cubano in un render di interni. Di contro a parità di immagine, i render finali in VRayforC4D vengono calcolati in molto meno tempo. Starà alla nostra esperienza valutare se investire del tempo preventivo nella ricerca di parametri di render ottimali in Vrayforc4d oppure soprassedere considerando che per il calcolo finale dei render in Maxwell Render ci andrà molto più tempo. Lavorare di più noi o far lavorare le macchine?….Questo è il dilemma! Probabilmente senza l’ausilio di una render farm VRayforC4D è la soluzione migliore, soprattutto per immagini ad alta risoluzione. Tutti i nostri render sono stati calcolati a 3500x2188px e su tutte le immagini troverete i tempi di render dei due motori. Il grande vantaggio di Maxwell Render, però, è che è possibile fermare il render per verificare che sia tutto ok e in seguito farlo ripartire senza perdere il calcolo già eseguito. Questo presenta grandi vantaggi, possiamo ad esempio mandare delle preview al cliente in poco tempo o cominciare con la post produzione su un’immagine ancora non completa per correggere livelli, sfondi, etc… e poi sostituire l’immagine finale una volta terminato il calcolo. Ancora meglio in animazione possiamo cominciare a montare il video con frame a scarsa qualità e sostituire i frame alla fine del calcolo lavorando quindi in parallelo alle macchine….non male!!! Maxwell Render inoltre utilizza il Fire per una veloce preview della scena che aiuta nell’impostazione della luce. La nuova versione di VRayforC4D 3.4 invece utilizza oltre alle GPU anche alcune impostazioni per anteprime veloci veramente notevoli.

    [br]

    [br]

    [br]

    [br]

    [br]

    [br]

    [br]
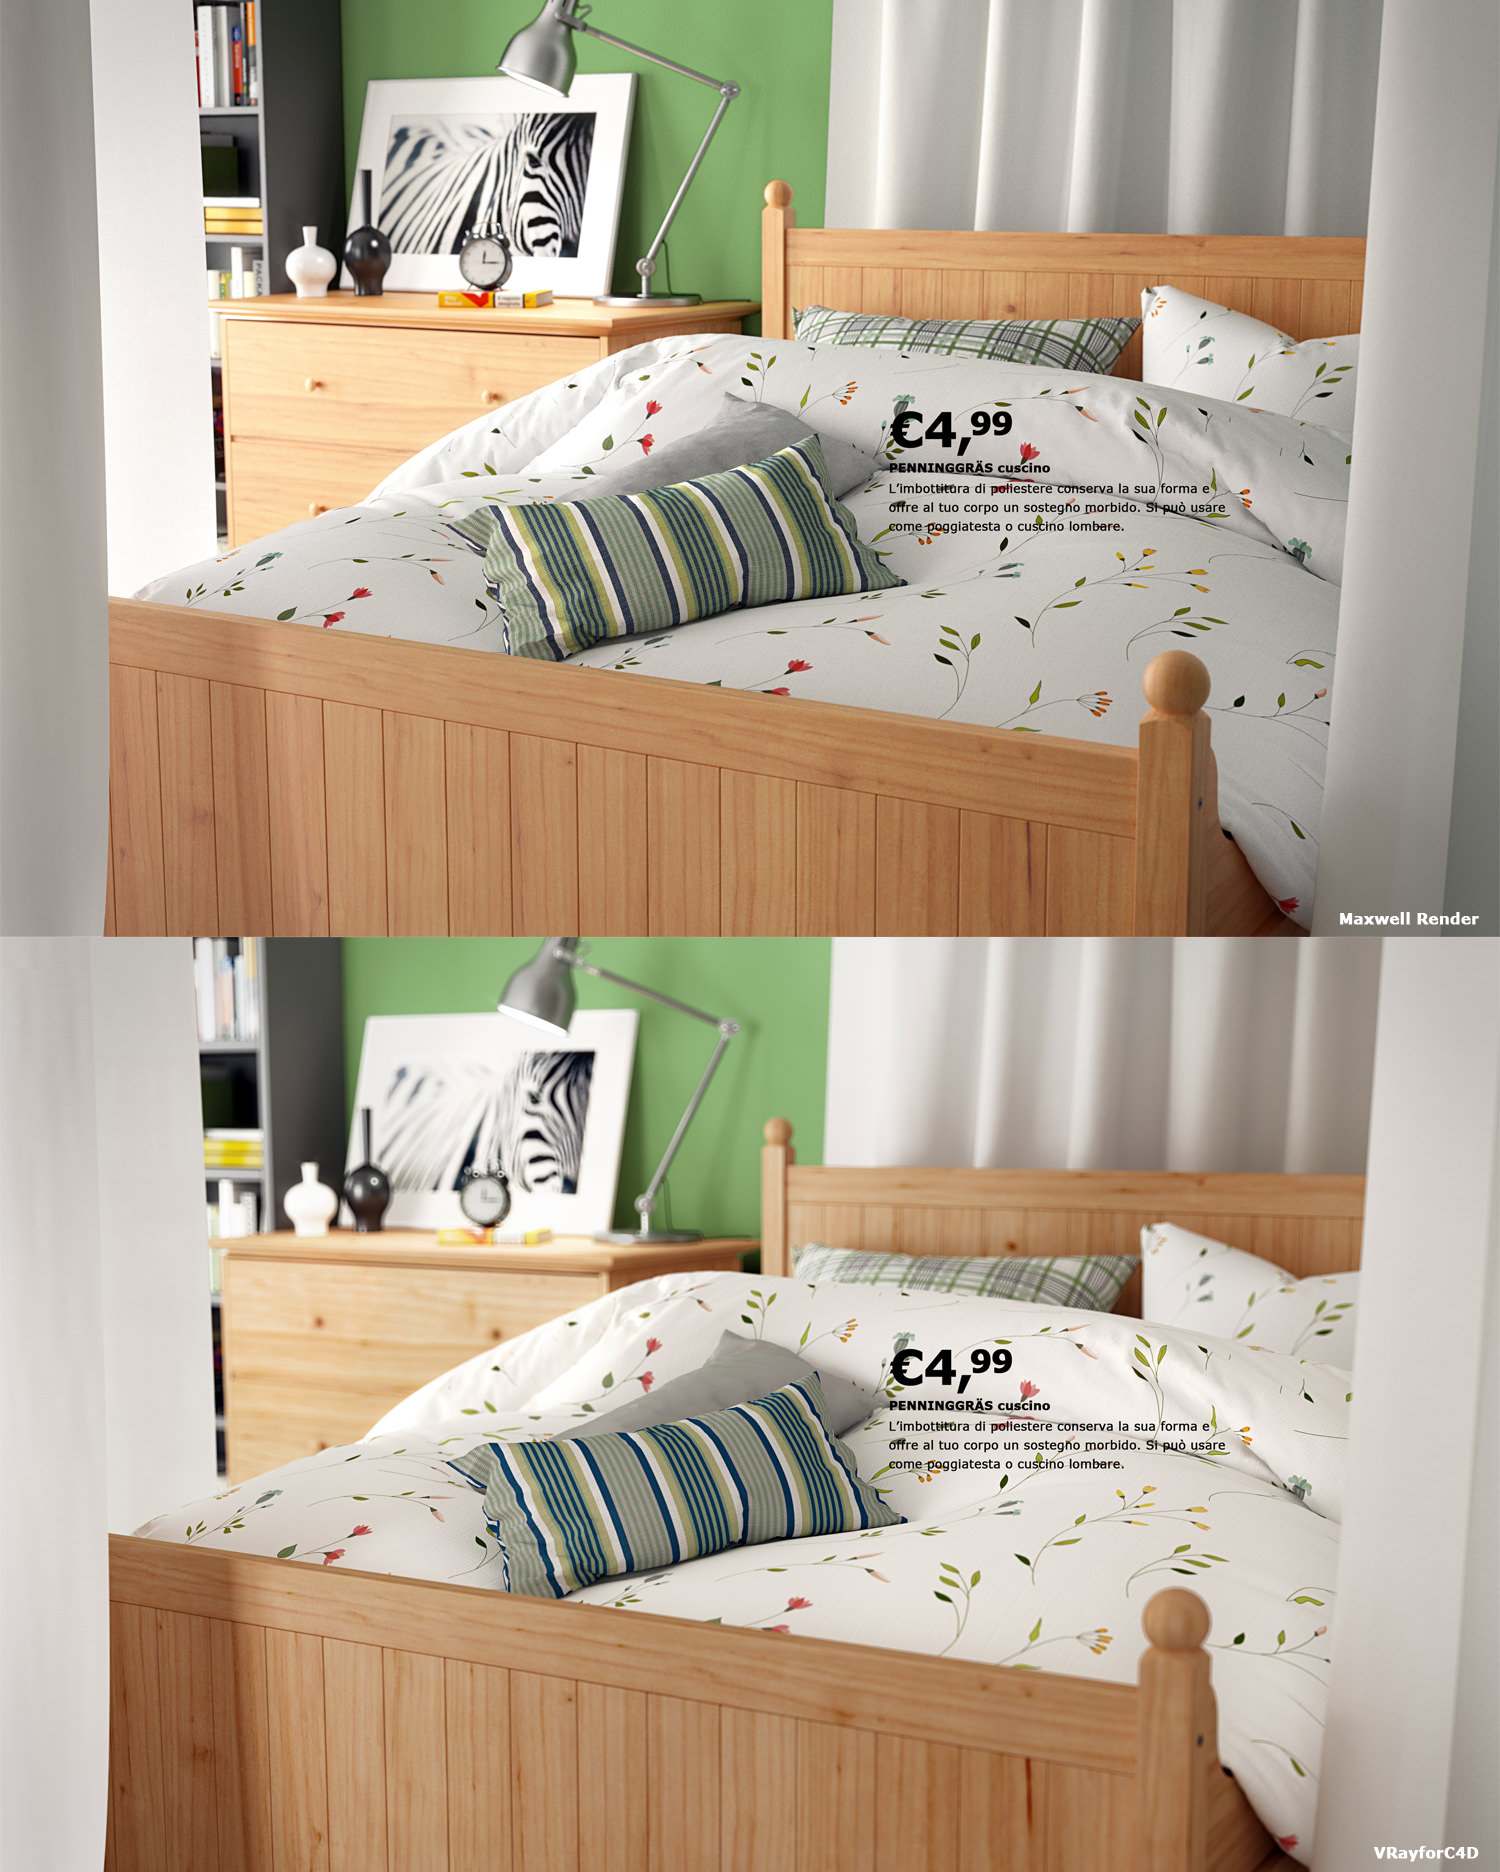
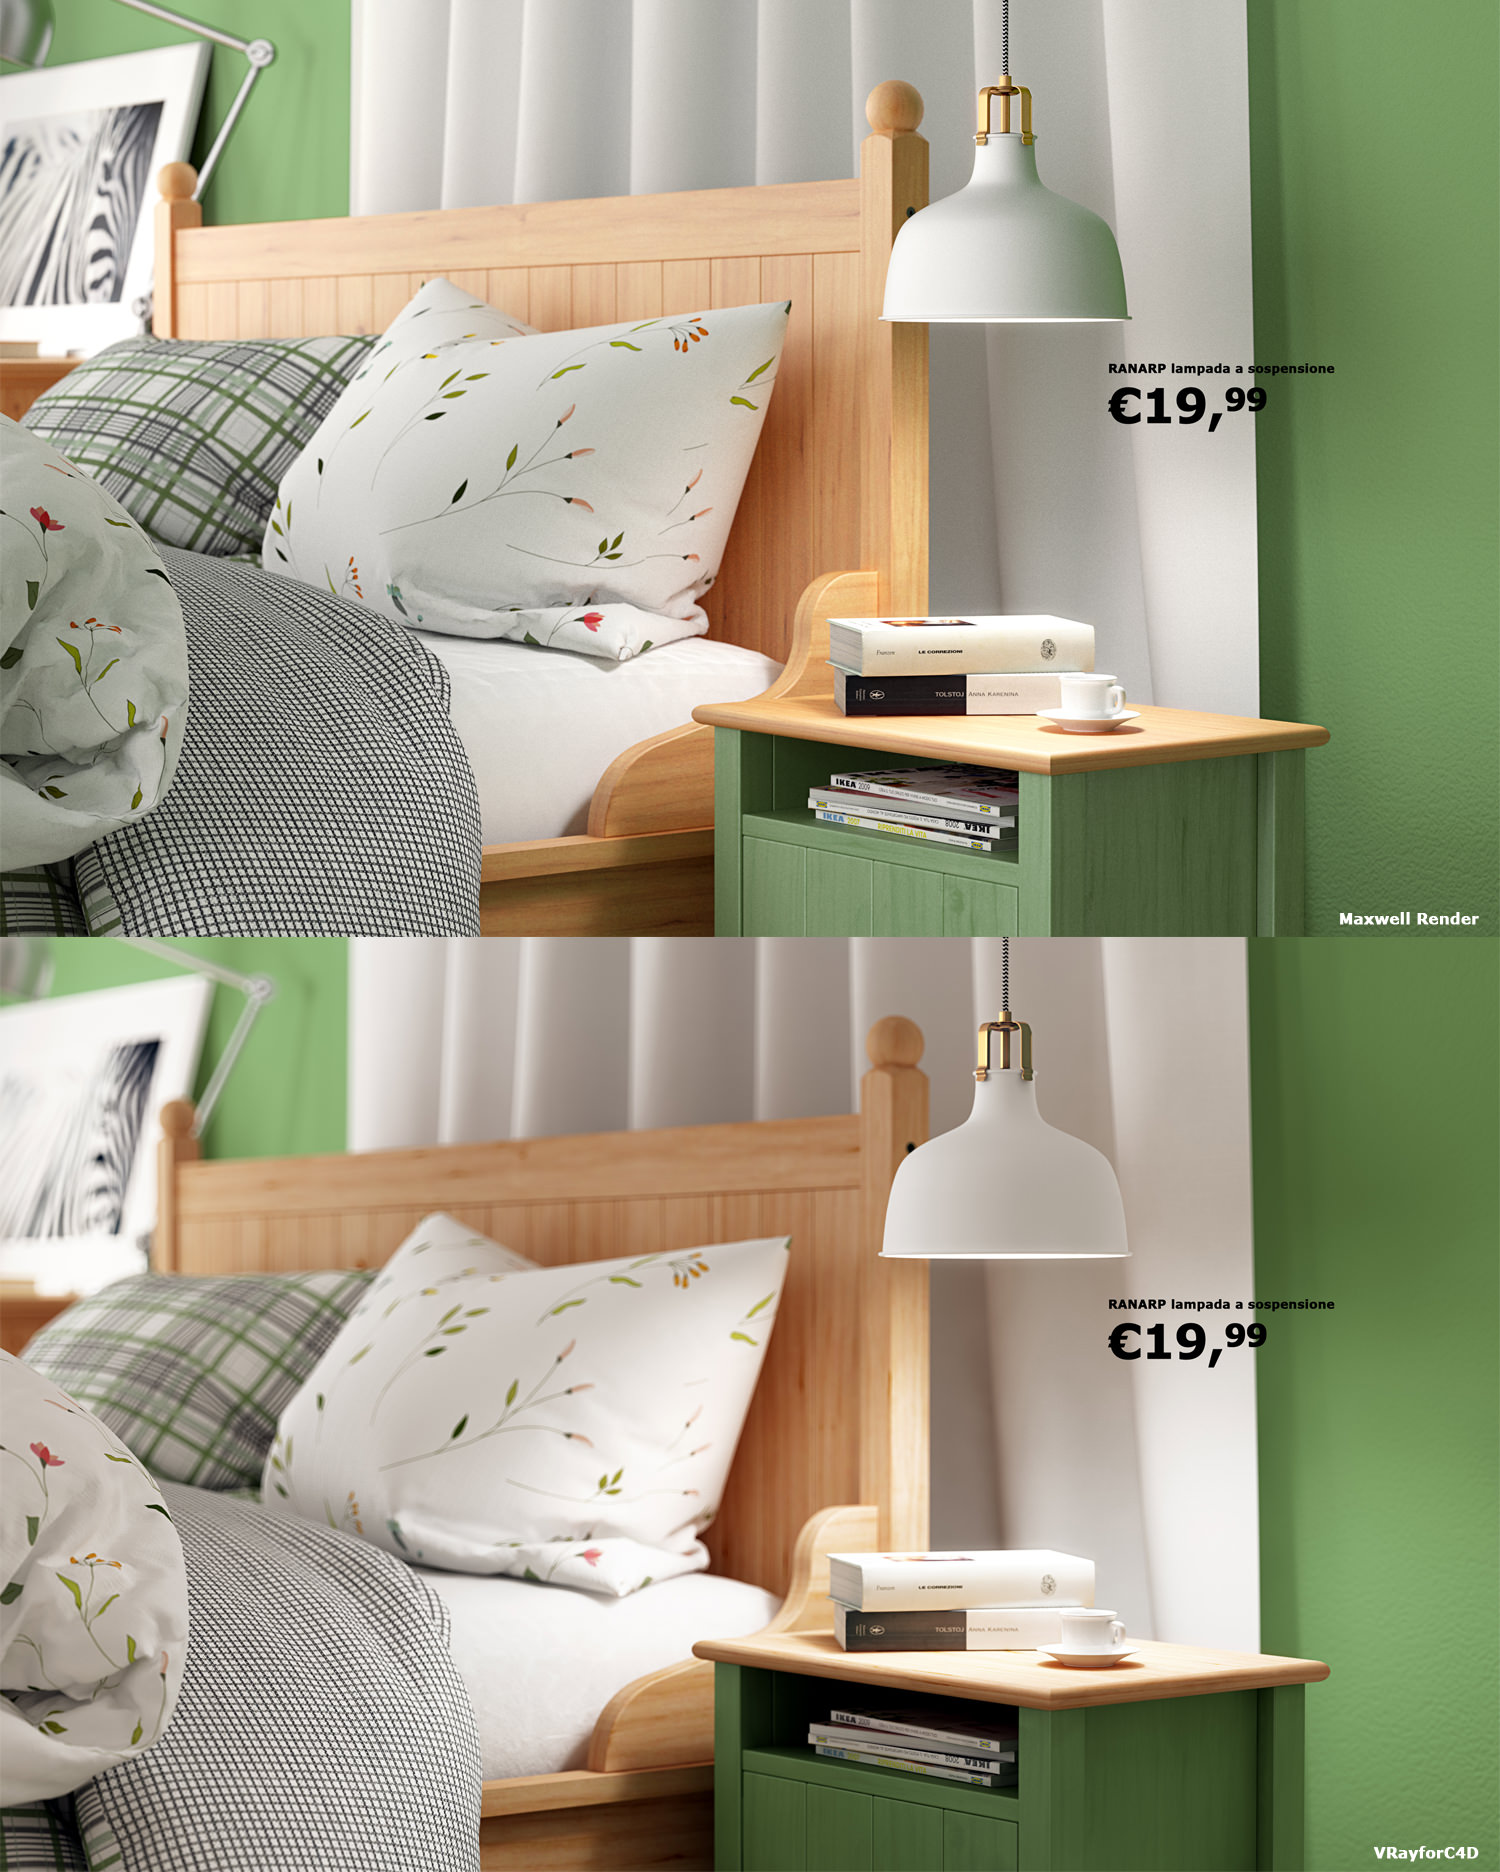
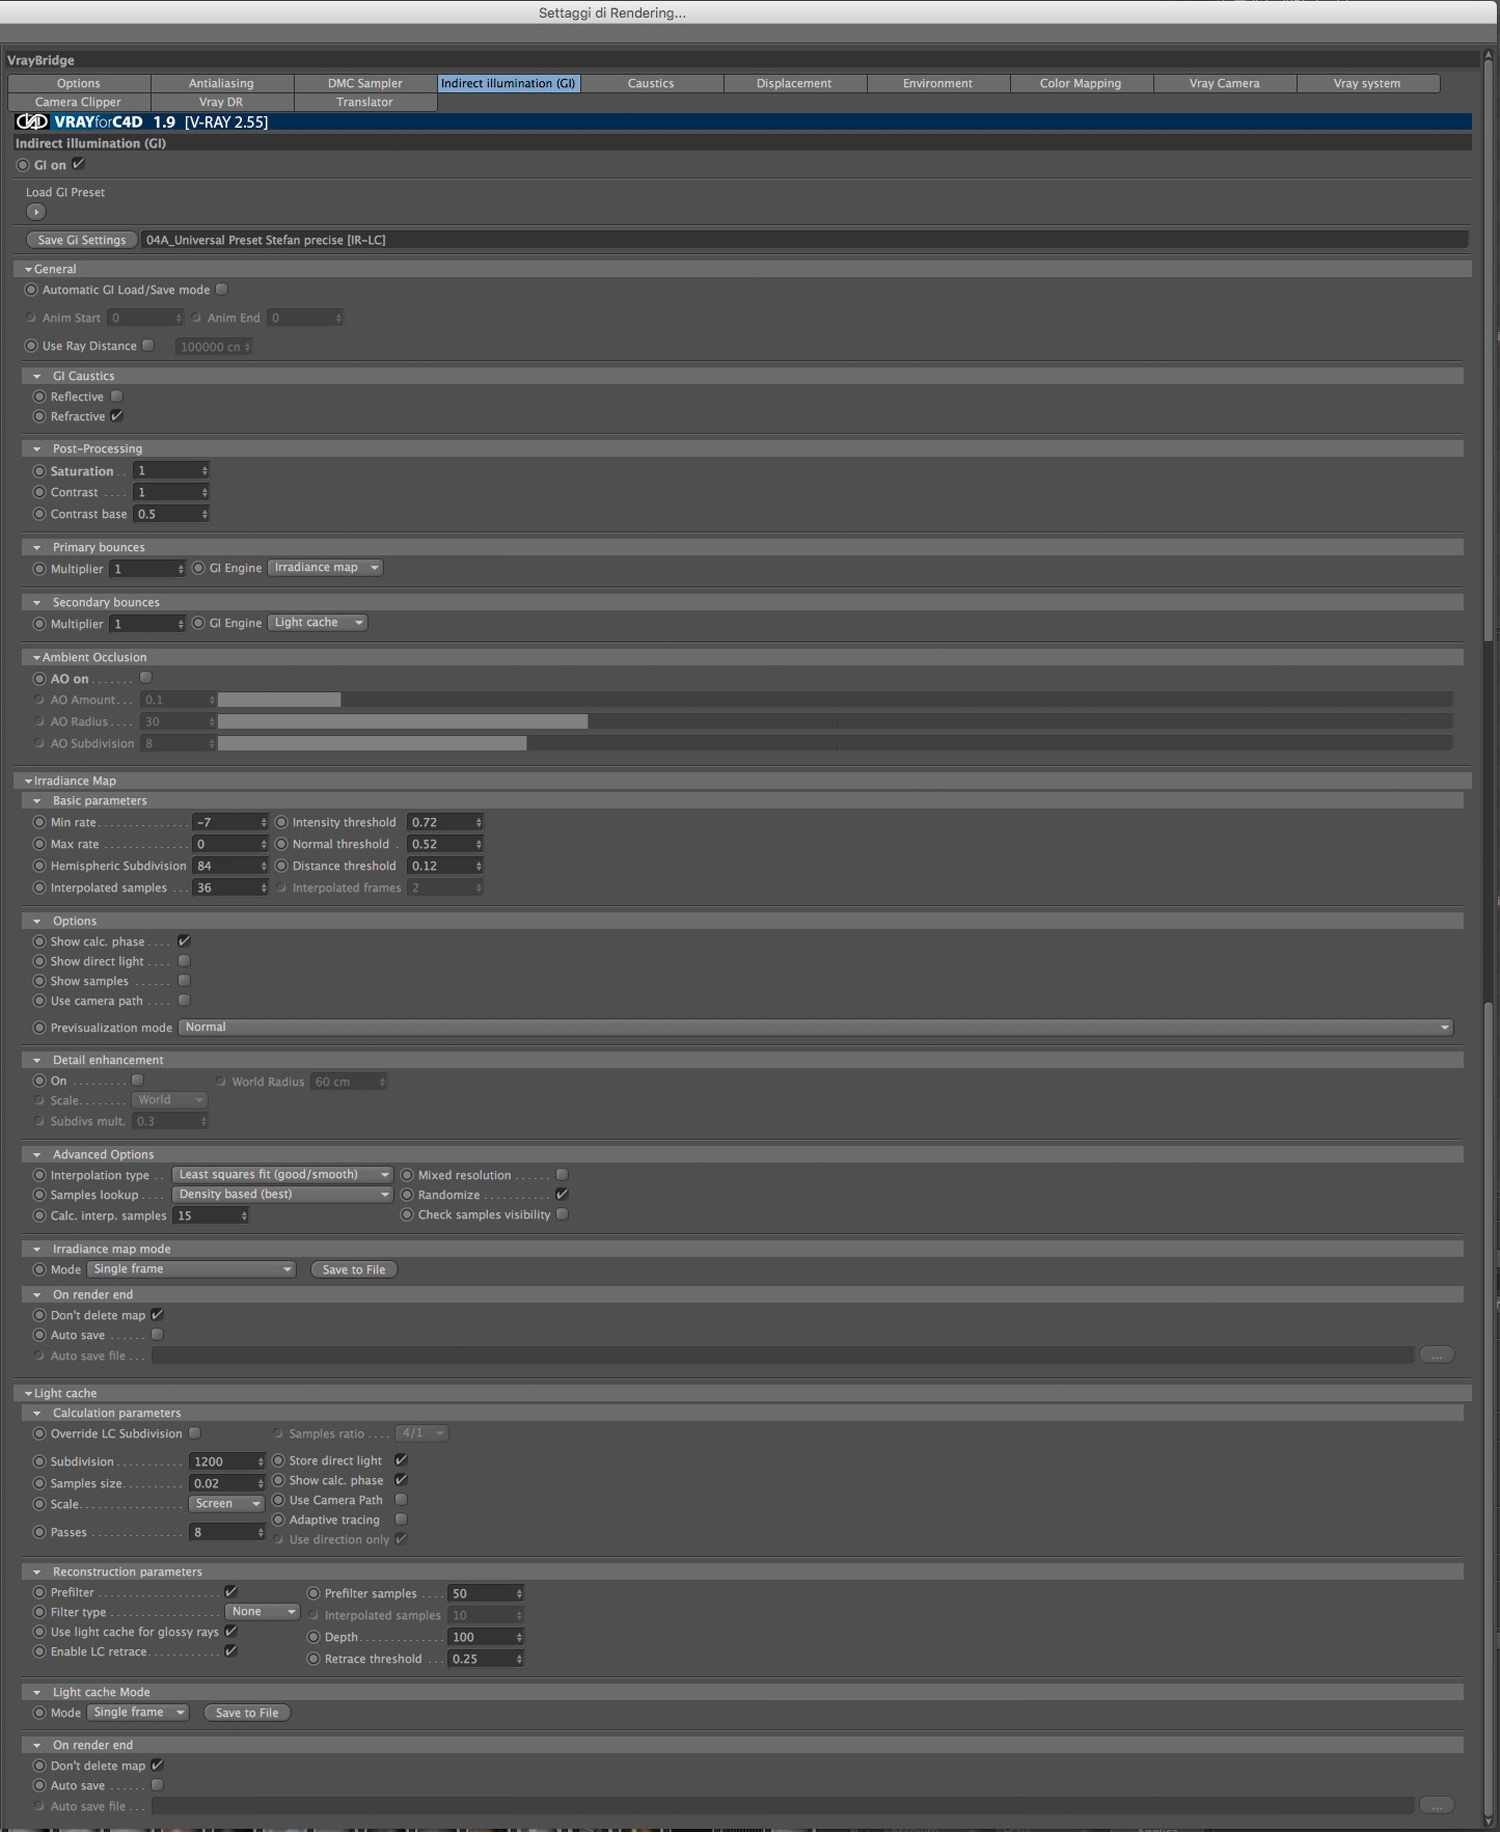
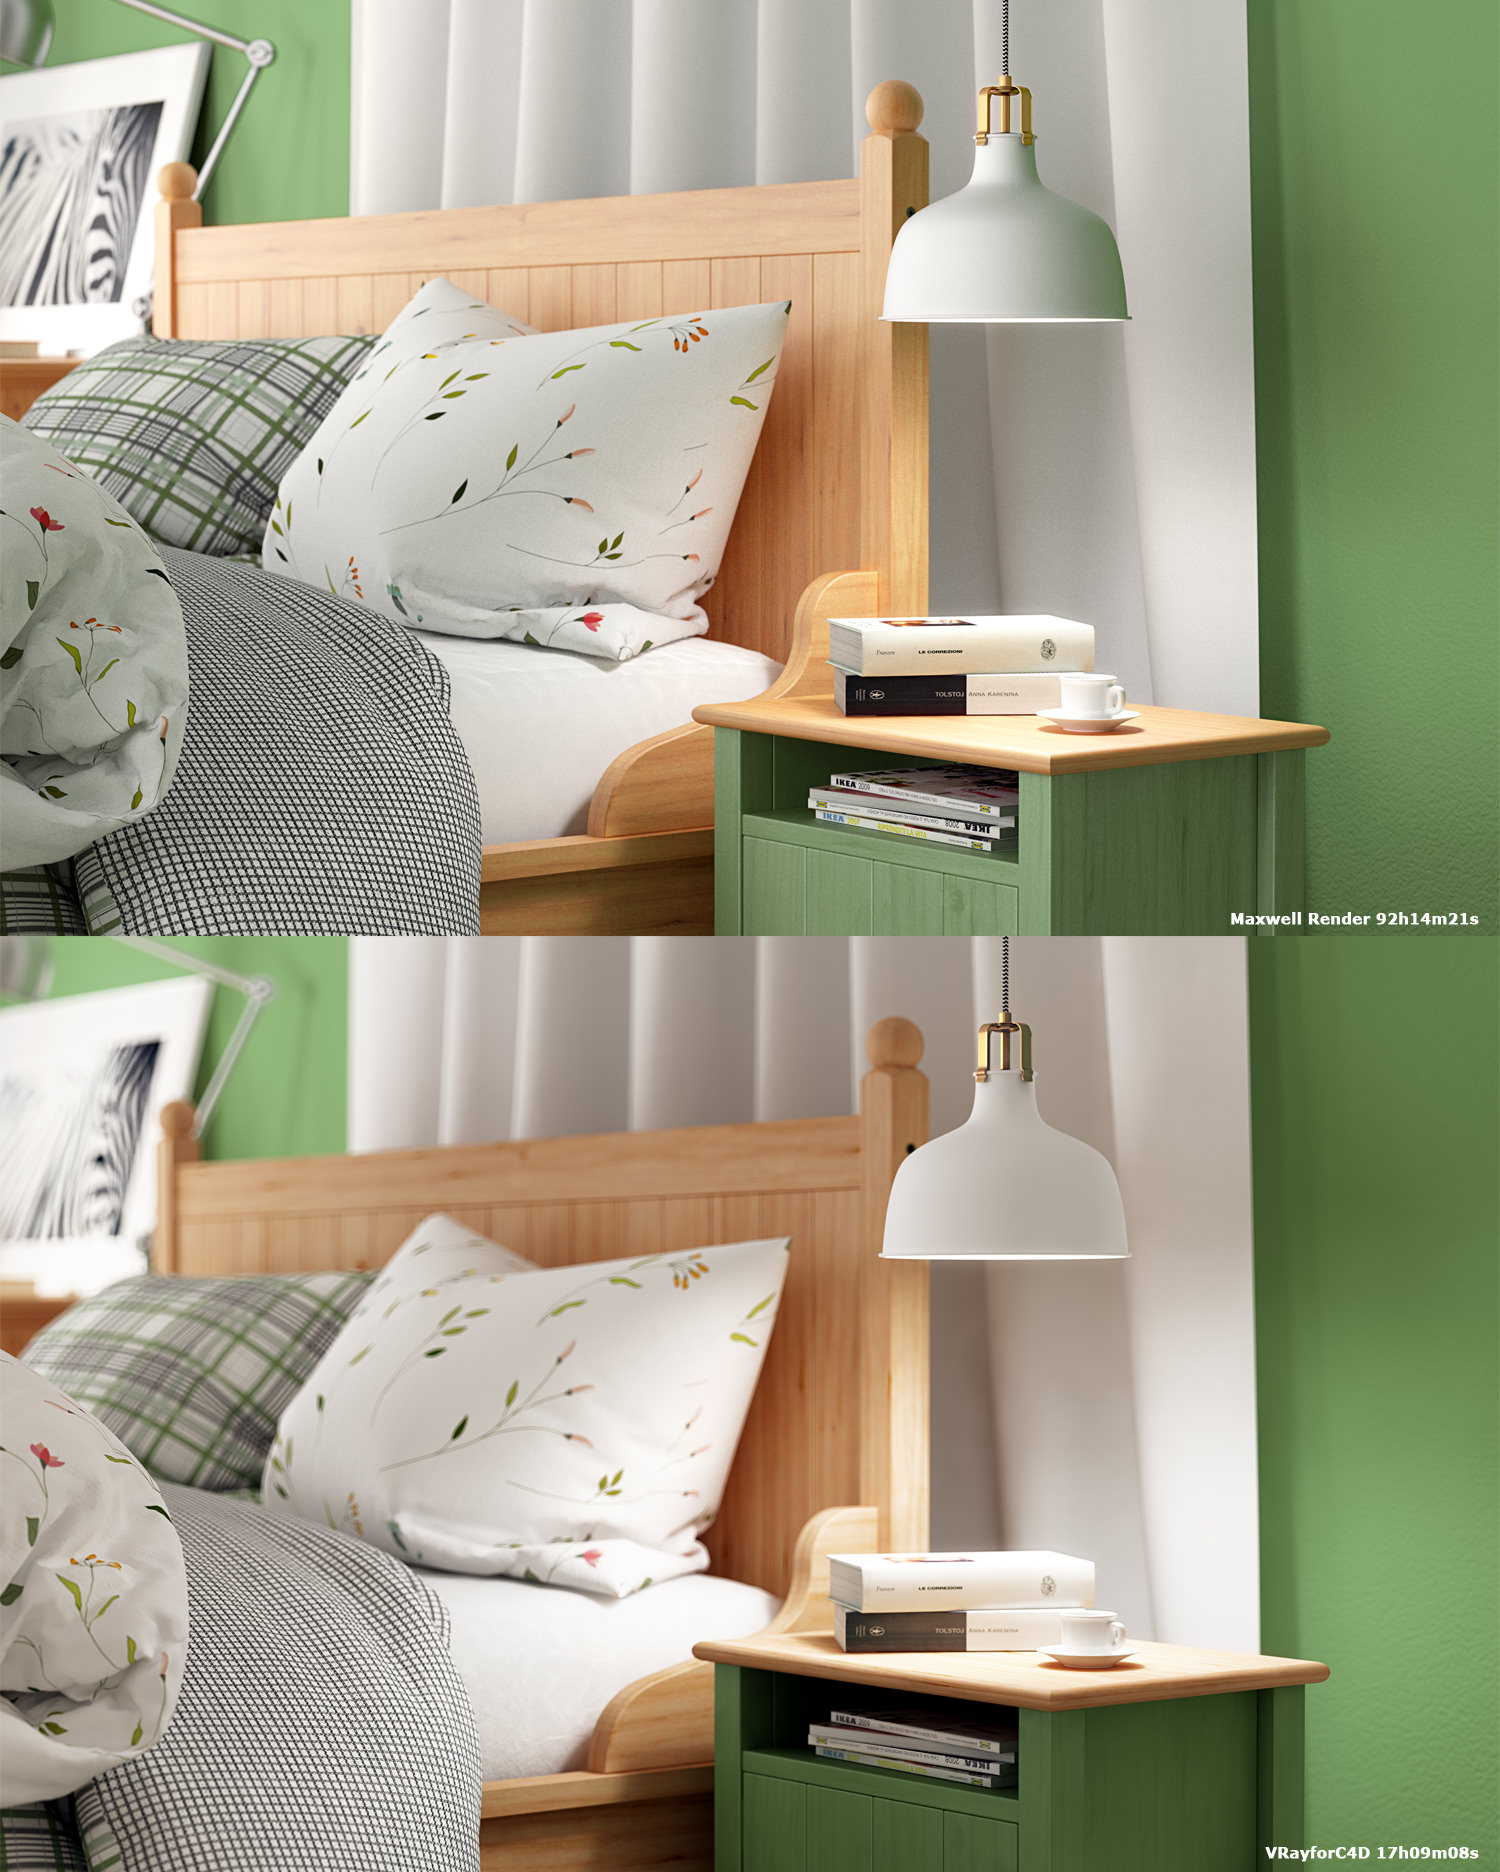
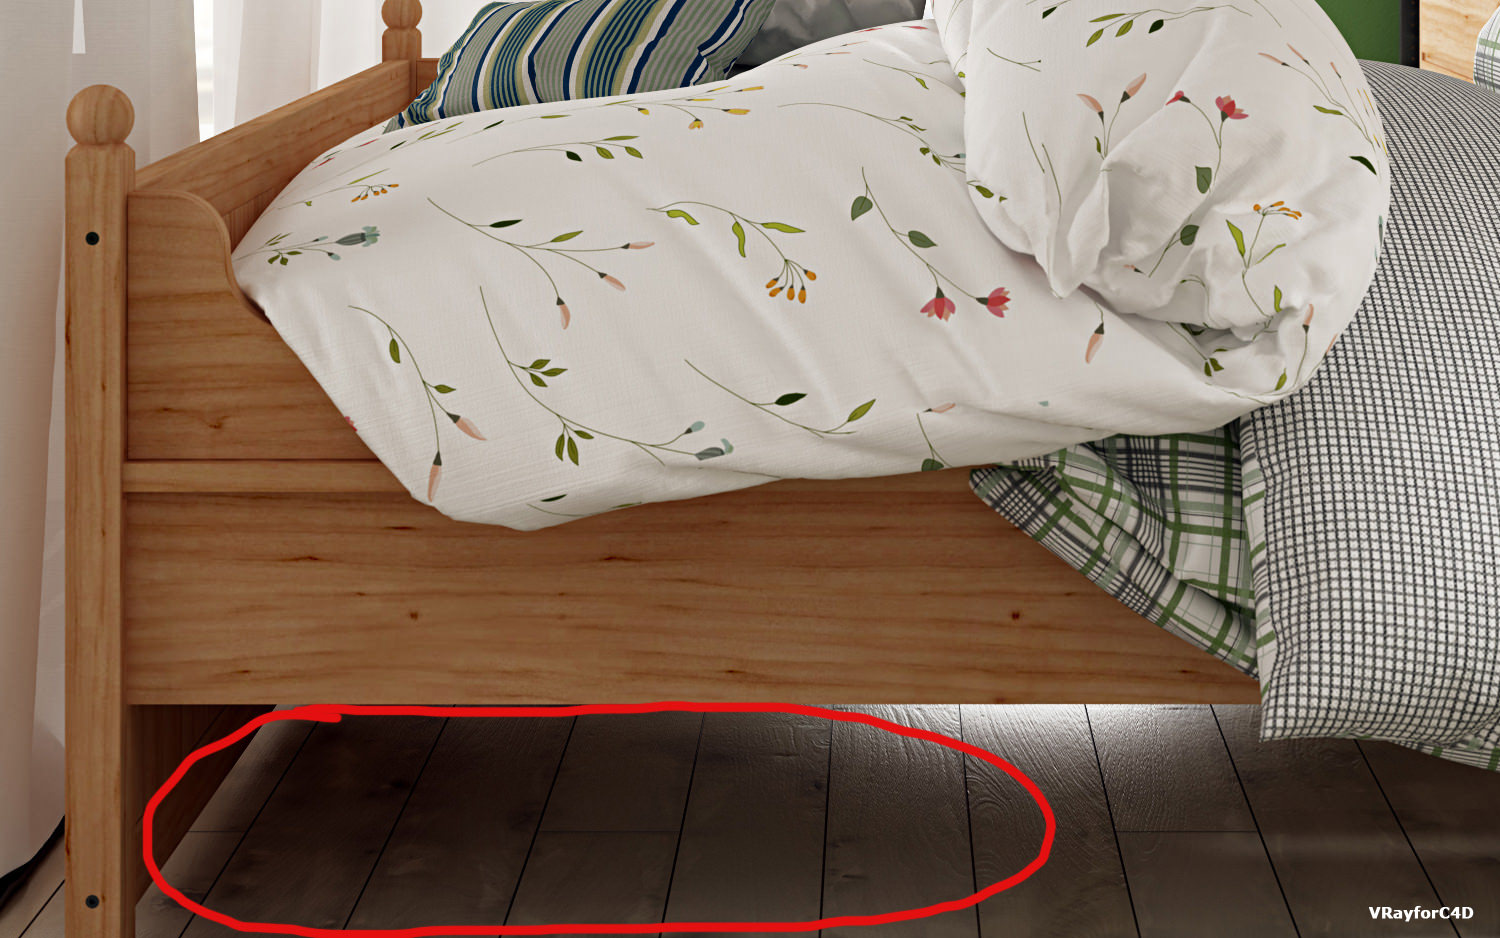
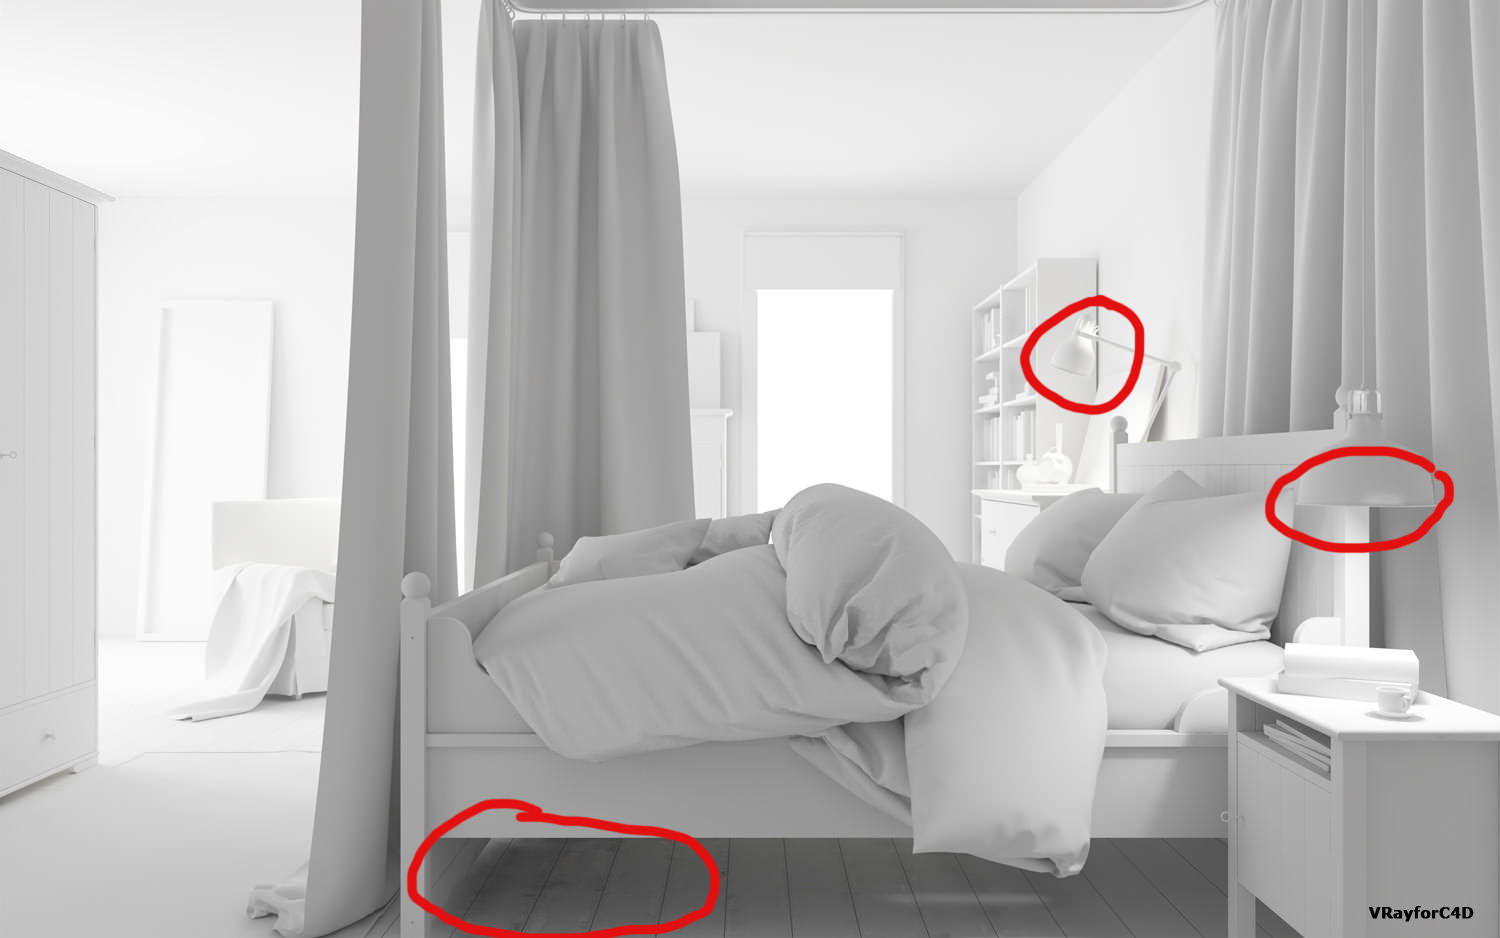
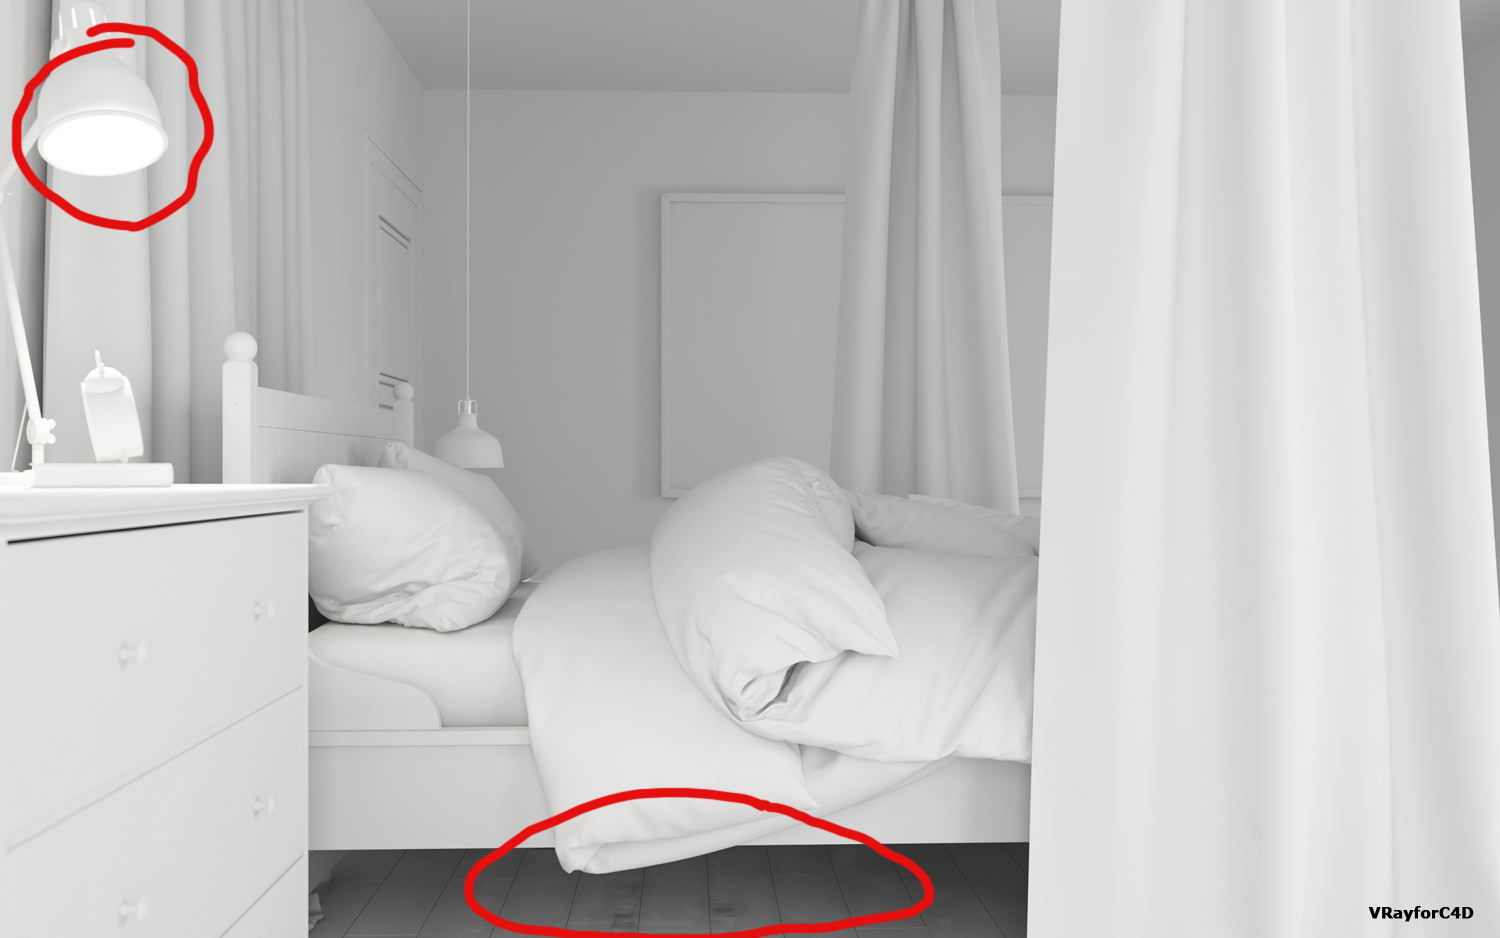
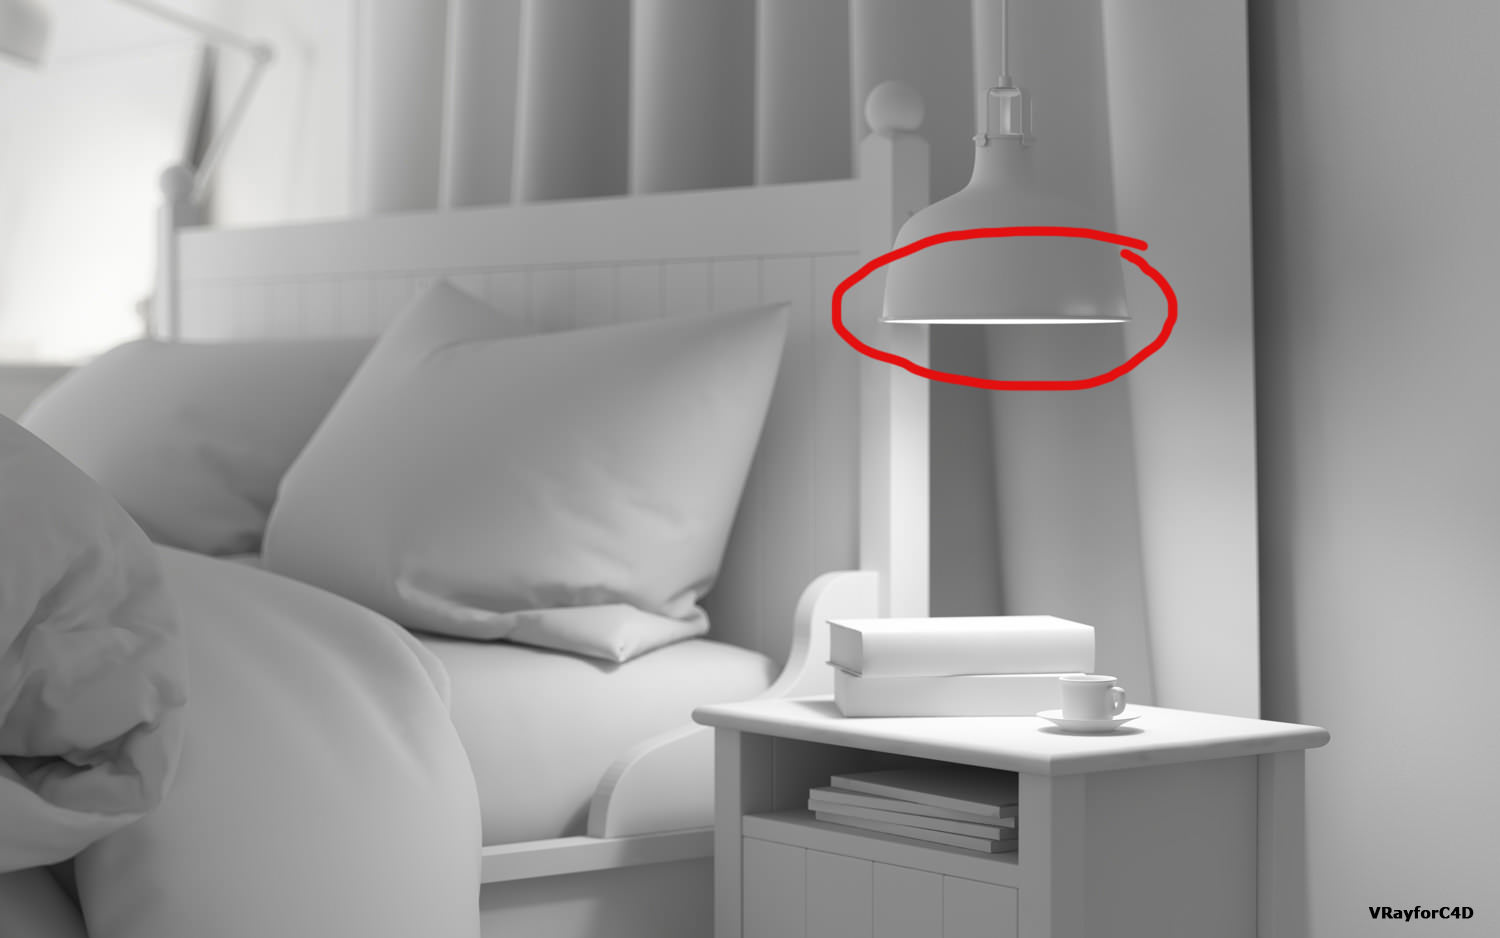
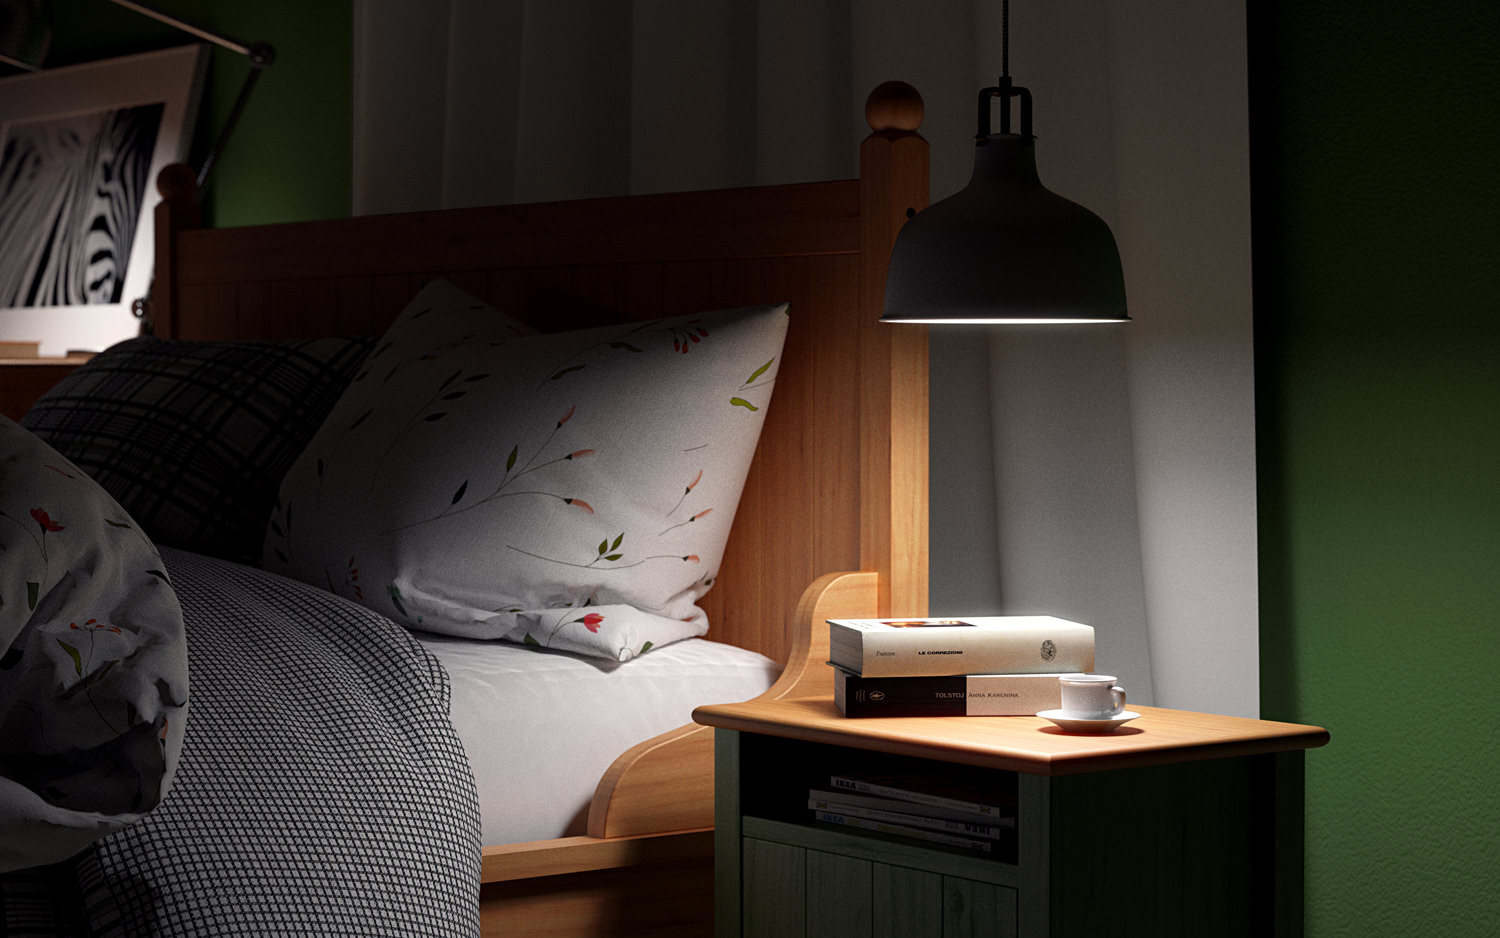
    I used a preset of Stefan (Stefan precise 04A_Universal Preset [IR-LC]) for VRayforC4D render, while for Maxwell Render, as mentioned above, are not necessary particular parameters. What I have noticed comparing the renders is the appearance of some of spots of light in some areas in the images produced by VRayforC4D (for example on the lamp or on the window areas) and some stains in the most inaccessible areas of the rendering (for example under the bed or on that areas distant from sources of light and very shady). They are little things that only an expert eye grasps, but we are here for that :-). The images produced by Maxwell Render are very clean, the shadows are particularly defined in the areas of the duvet and generally across the image and there aren’t problems with stains or blemishes. Rather whether the value of SL of the rendering is too low the picture will present a higher granularity. In this test I ‘ve get clean images with a SL of 17 even if a SL of 16 would have been acceptable. You will notice that only in images with few lights on the grain increases, but personally I think this is great because it remembers the films with high ISO values. In extreme cases, for example with translucent materials, you can set a SL value that is general for the scene, and one that is specific for the most complex materials. Done this the software, once reached the overall value, will continue to calculate only the materials or objects with an upper SL, with a considerable saving of time. For example, if there are windows or curtains in the scene we could only calculate these objects with greater accuracy. I haven’t used this method in these tests.

    [br]
    Per il calcolo in VRayforC4D abbiamo utilizzato un preset di Stefan (04A_Universal Preset Stefan precise [IR-LC]), mentre per Maxwell Render, come già detto, non sono necessari parametri particolari. Quello che abbiamo notato paragonando i render è la comparsa di alcune macchie di luce in alcune zone nelle immagini prodotte da VRayforC4D (per esempio nella lampada, ma spesso compaiono anche nelle zone delle finestre) e alcune macchie nelle zone più impervie del calcolo (per esempio sotto il letto o nelle zone più lontane dalle fonti luminose e molto in ombra). Sono veramente piccolezze che solo un occhio esperto coglie, ma siamo qui per questo:-). Le immagini prodotte da Maxwell Render sono invece molto pulite, le ombre sono molto più definite soprattutto nelle zone del piumone e in generale in tutta l’immagine; non abbiamo problemi di macchie o imperfezioni, piuttosto se il valore di SL del calcolo è troppo basso l’immagine presenterà una grana tanto più alta quanto più è basso il valore di SL. In questo caso abbiamo ottenuto immagini pulite a SL 17 anche se già a SL 16 sarebbero state accettabili. Noterete come solo nelle immagini con poche luci accese la grana aumenta, ma personalmente un po’ di grana mi piace, ricorda le pellicole con alti valori di ISO. In casi estremi, con materiali traslucenti per esempio, si può stabilire un valore di SL generale per la scena e uno specifico per i materiali più complessi in modo che il software una volta raggiunto il valore generale continuerà a calcolare solo i materiali o gli oggetti con un SL superiore, con un notevole risparmio di tempo. Se per esempio abbiamo vetri o tende nella scena potremmo calcolare solo questi oggetti con una precisione maggiore. In questi test non ho usato questo metodo.

    [br]

    [br]

    [br]

    [br]

    [br]

    [br]

    [br]
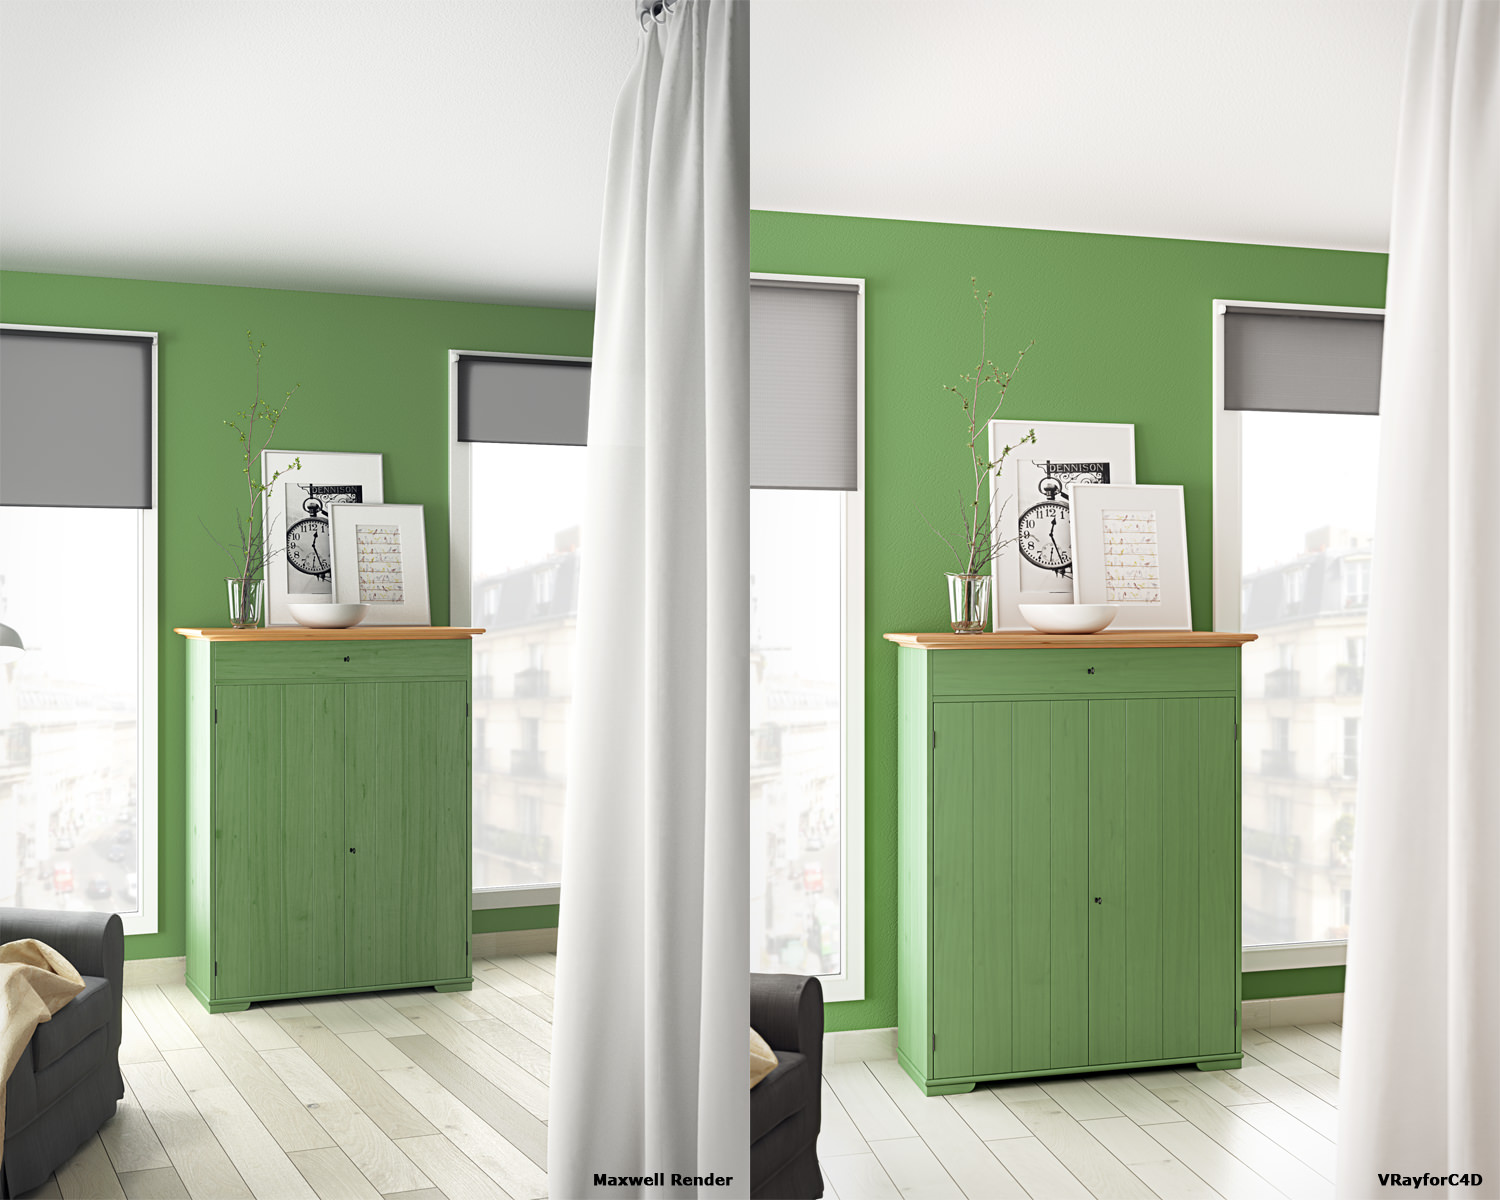
    Another aspect to consider is the influence of the VRayforC4D Color Mapping in the rendering. The scene was illuminated with area lights on the windows, without sky or sunlight. The color mapping is definitely a big plus, a very useful tool in situations of strong contrasts of light. Basically it balances black and white areas of the image. This is a great help, but often the result is that the image is “fogged”, with no contrasts and flat color. Especially the whites tend to turn gray and warm colors lose vividness. This involves a massive work in postproduction. I’ve also deleted some wood knots in Photoshop because they were very strong and red. In these pictures I used the Exponential Color Mapping. To avoid this you can work in Linear Multiply but with considerable difficulty in the management of lights, as I said before. In Maxwell Render this parameter doesn’t exist, which makes the management of lights harder, more like that of the photographer (you work as in Linear Multiply the VRayforC4D), but the color rendering and the correspondence with the texture is perfect. Furthermore Maxwell Render has the Multilight that allows us to go in post production to correct any overexposure or burn, but I’ll talk about this later. In the images we can see the difference among renders without post production.

    [br]
    Un altro aspetto da considerare è l’influenza del Color Mapping di VRayforC4D nel calcolo dell’immagine. La scena è stata illuminata con luci area alle finestre, niente cielo o sole. Il color mapping è sicuramente un grande vantaggio, è uno strumento molto utile soprattuto in situazioni di forti contrasti di luce, strumento di cui per esempio un fotografo non può disporre. Fondamentalmente media le zone di picco del bianco e del nero dell’immagine evitando le “bruciature”. Questo ci facilita molto la vita, ma spesso il risultato è che l’immagine risulta slavata, priva di contrasti, con colori virati e piatti. Soprattutto i bianchi tendono a ingrigirsi e le tonalità calde perdono il colore. Questo comporta un lavoro massiccio in postproduzione. Ho anche eliminato alcuni nodi del legno in photoshop perchè molto forti e rossi nelle tonalità. Nelle nostre immagini abbiamo utilizzato l’Exponential. Per evitare tutto ciò si può lavorare in Linear Multiply ma con una notevole difficoltà nella gestione delle luci, come dicevo prima. In Maxwell Render questo parametro non esiste, il che rende più difficile la gestione delle luci, più simile a quella del fotografo (si lavora come nel Linear Multiply di VRayforC4D), ma la resa dei colori e la corrispondenza con le texture è perfetta. A differenza di VRayforC4D, inoltre, Maxwell Render ha il Multilight che ci permette in postproduzione di andare a correggere eventuali sovraesposizioni o bruciature, ma ne parleremo più avanti. Nelle immagini notiamo la differenza tra i render “così come mamma li ha fatti”.

    [br]

    [br]
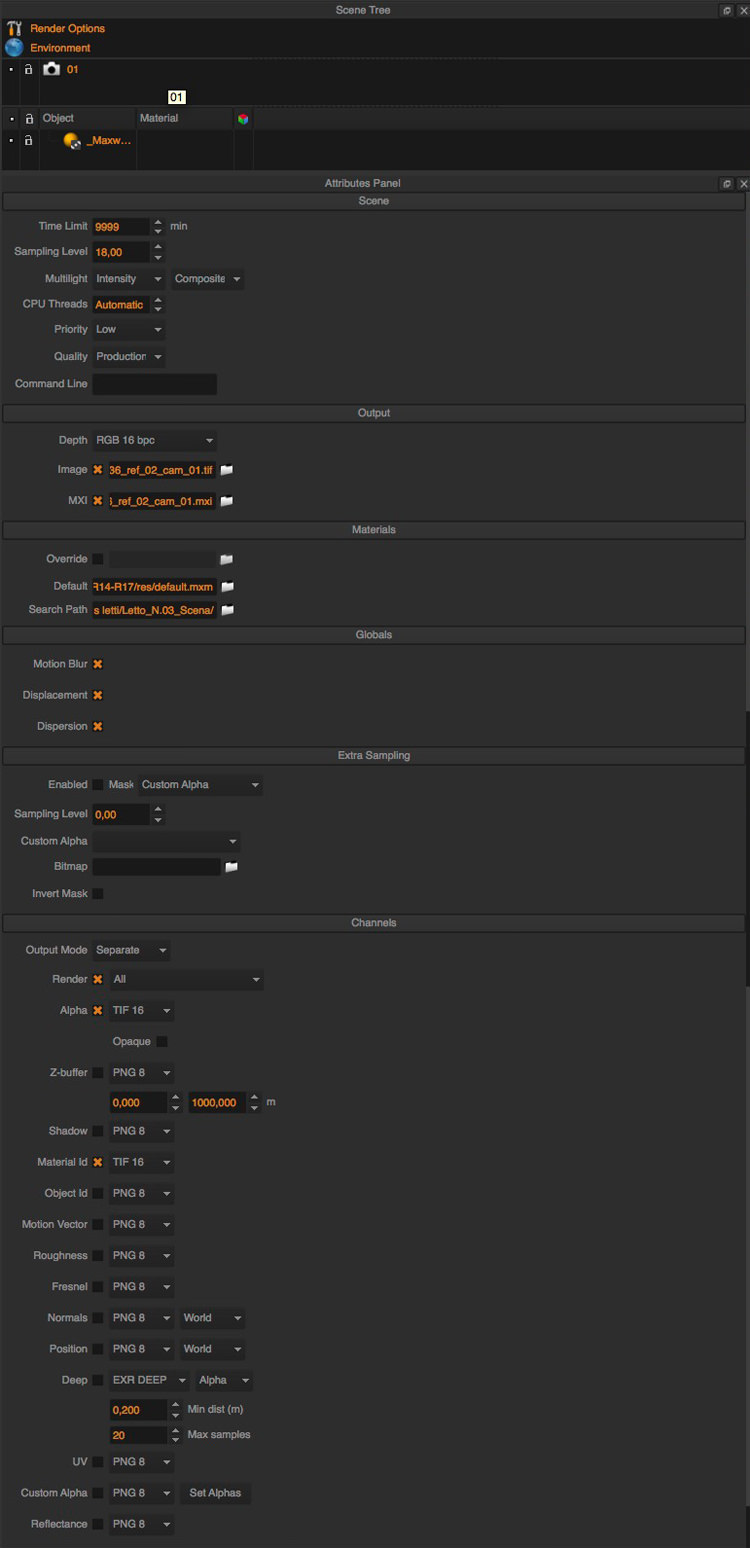
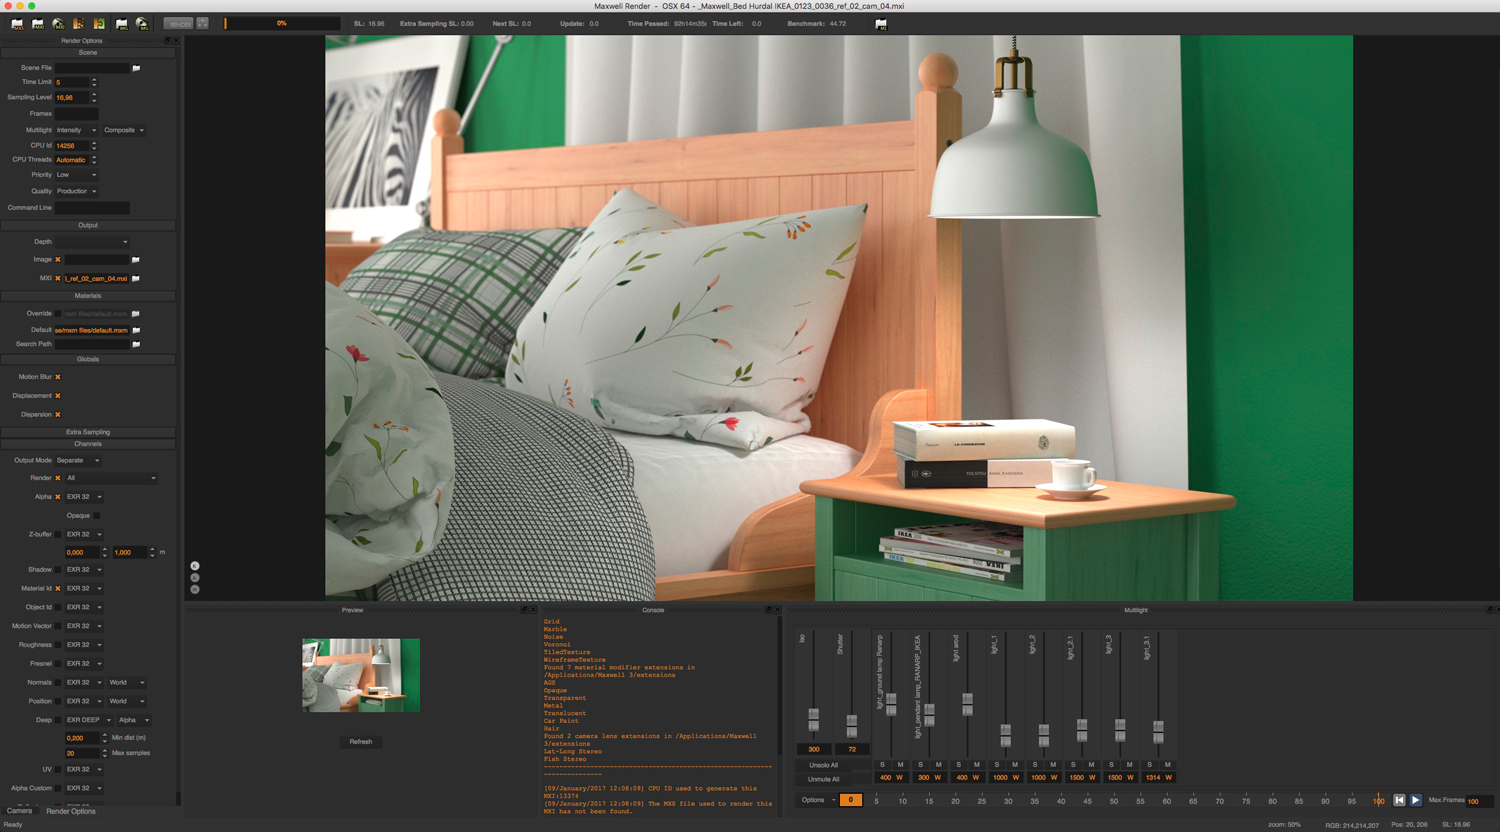
    The final output of the images is 16-bit tiff for VRayforC4D and MXI for Maxwell Render. I’ve also activated the alpha channel for both and the material ID channel for Maxwell Render. The possibility of exporting different image channels to facilitate post-production. Both software have this possibility, but as I used the exponential color mapping in VRayforC4D the multipass image would have been lightened. Furthermore, the management of the channel selection in VRayforC4D is not immediate in contrast to Maxwell Render where everything is very simple: check the desired channels from a list, choose the type of file to save and you have done. Usually, if I need some alpha maps of some object for post-production in VRayforC4D, I make a scene without lights and materials so the rendering is fast, then I add the compositing tag to the object I have to cut. The result are a completely black render and an alpha map of my object. It’s a very convenient method.

    [br]
    Per quanto riguarda l’output finale dell’immagine abbiamo utilizzato tiff a 16 bit per VRayforC4D e MXI per Maxwell Render. Inoltre abbiamo attivato per entrambi il canale alpha e per Maxwell Render anche l’ID material. Questo per aprire una parentesi sulla possibilità di esportare diversi canali dell’immagine per facilitarne la postproduzione. Entrambi i software hanno questa possibilità, ma avendo utilizzato il color mapping exponential in VRayforC4D l’immagine in Multipass sarebbe risultata schiarita. Inoltre la gestione della selezione dei canali in generale è un po’ macchinosa rispetto a Maxwell Render dove è tutto molto semplice, basta spuntare i canali desiderati da una lista, scegliere il tipo di file da salvare e il gioco è fatto. Di solito in VRayforC4D se mi servono delle mappe alpha di qualche oggetto in particolare per la postproduzione, creo una scena priva di luci e materiali in modo da poter renderizzare velocemente, aggiungo il tag compositing all’oggetto che devo scontornare e renderizzo in modo da avere un render completamente nero e la mappa alpha del mio oggetto; è un metodo molto comodo.

    [br]

    [br]
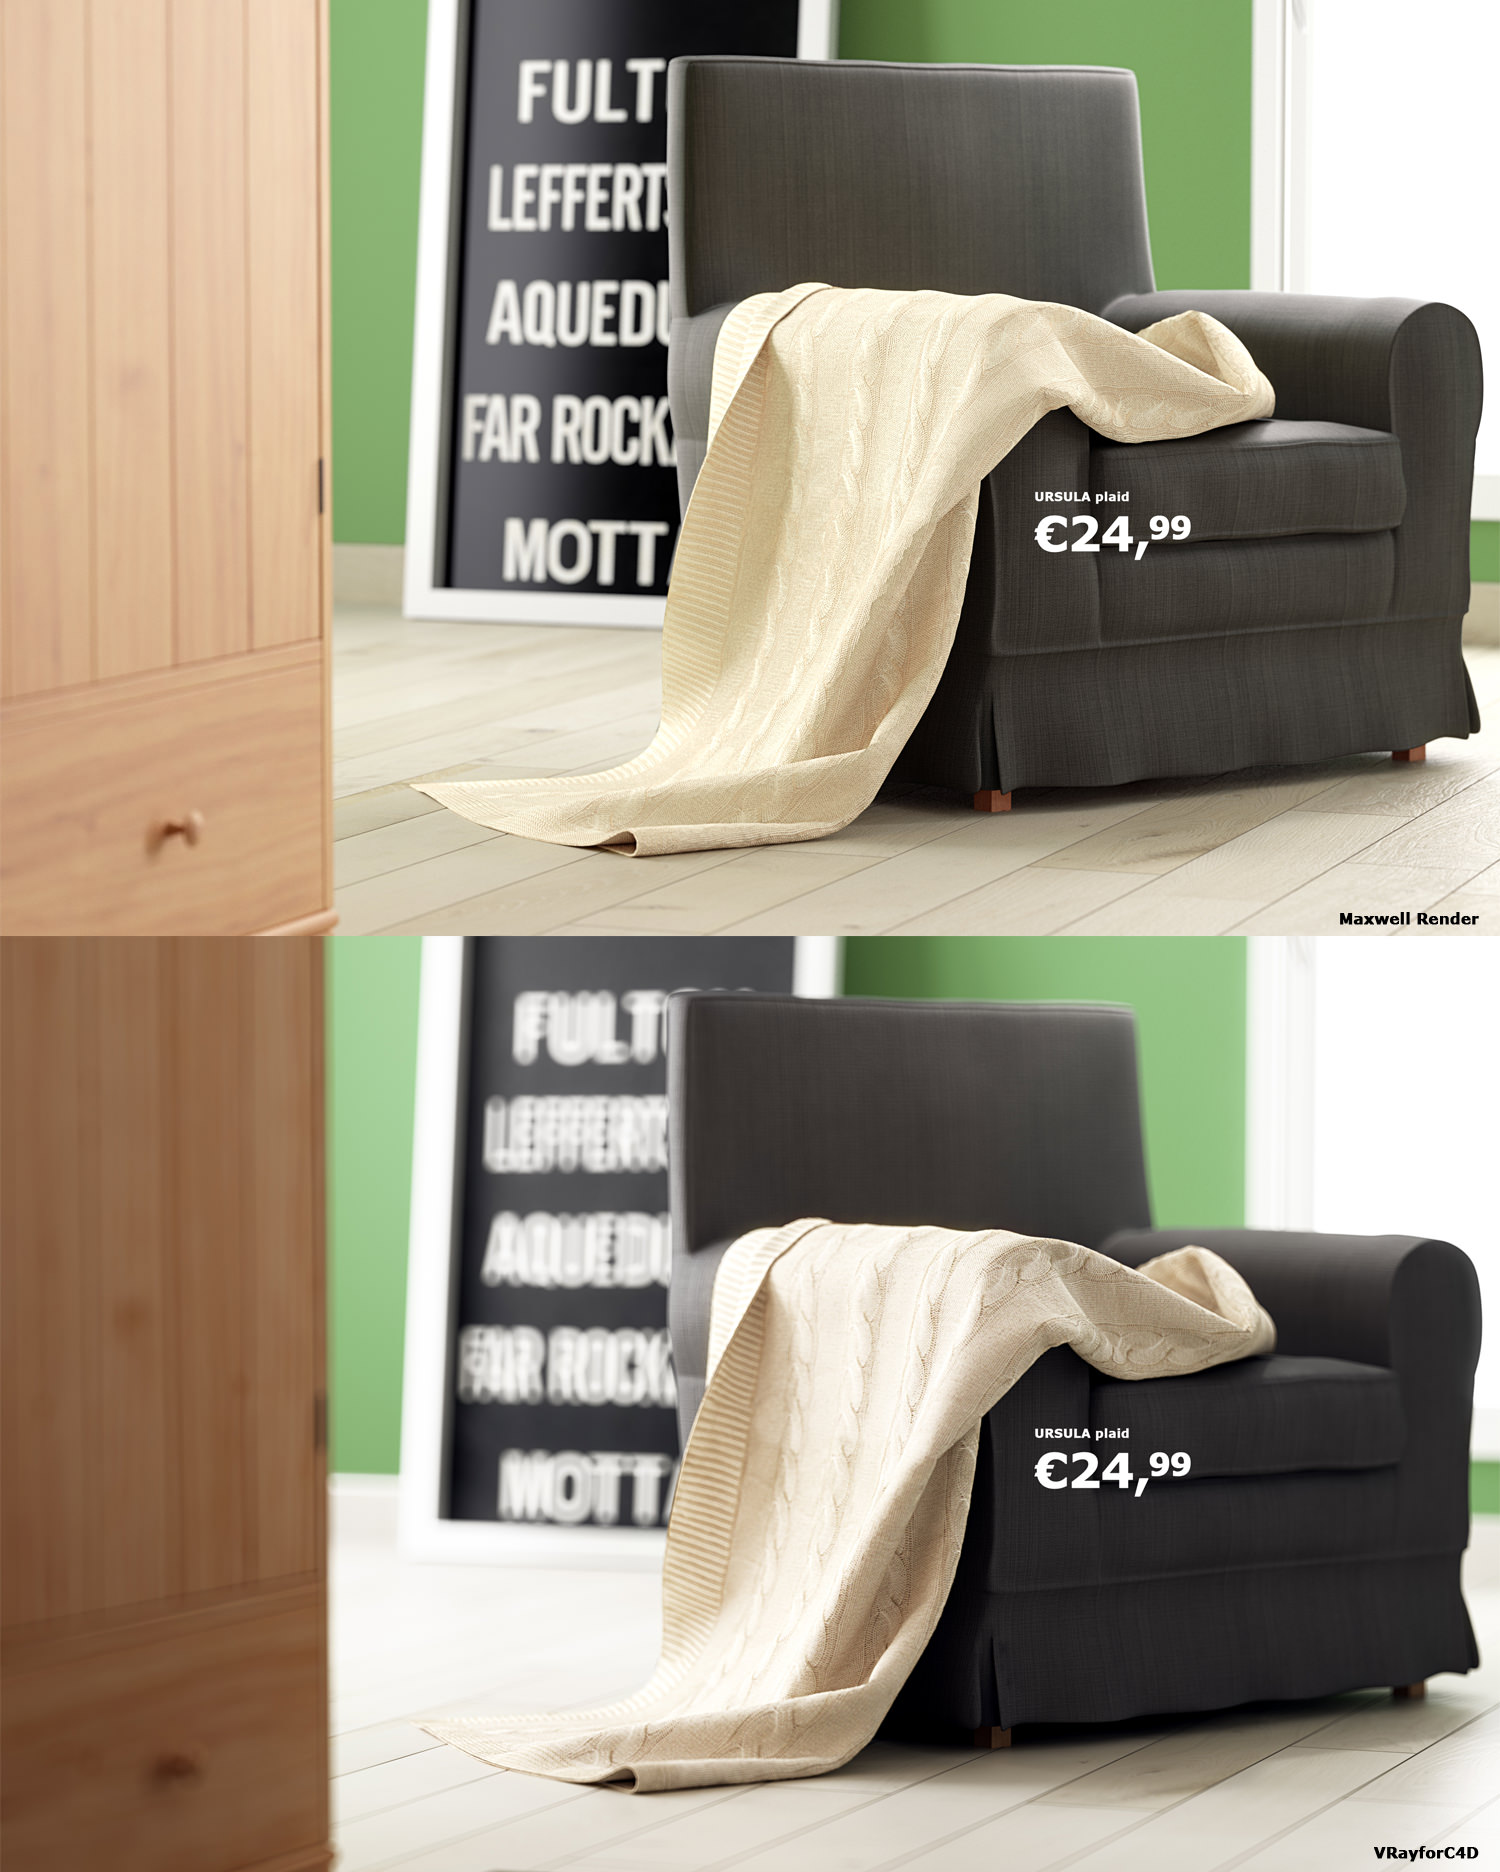
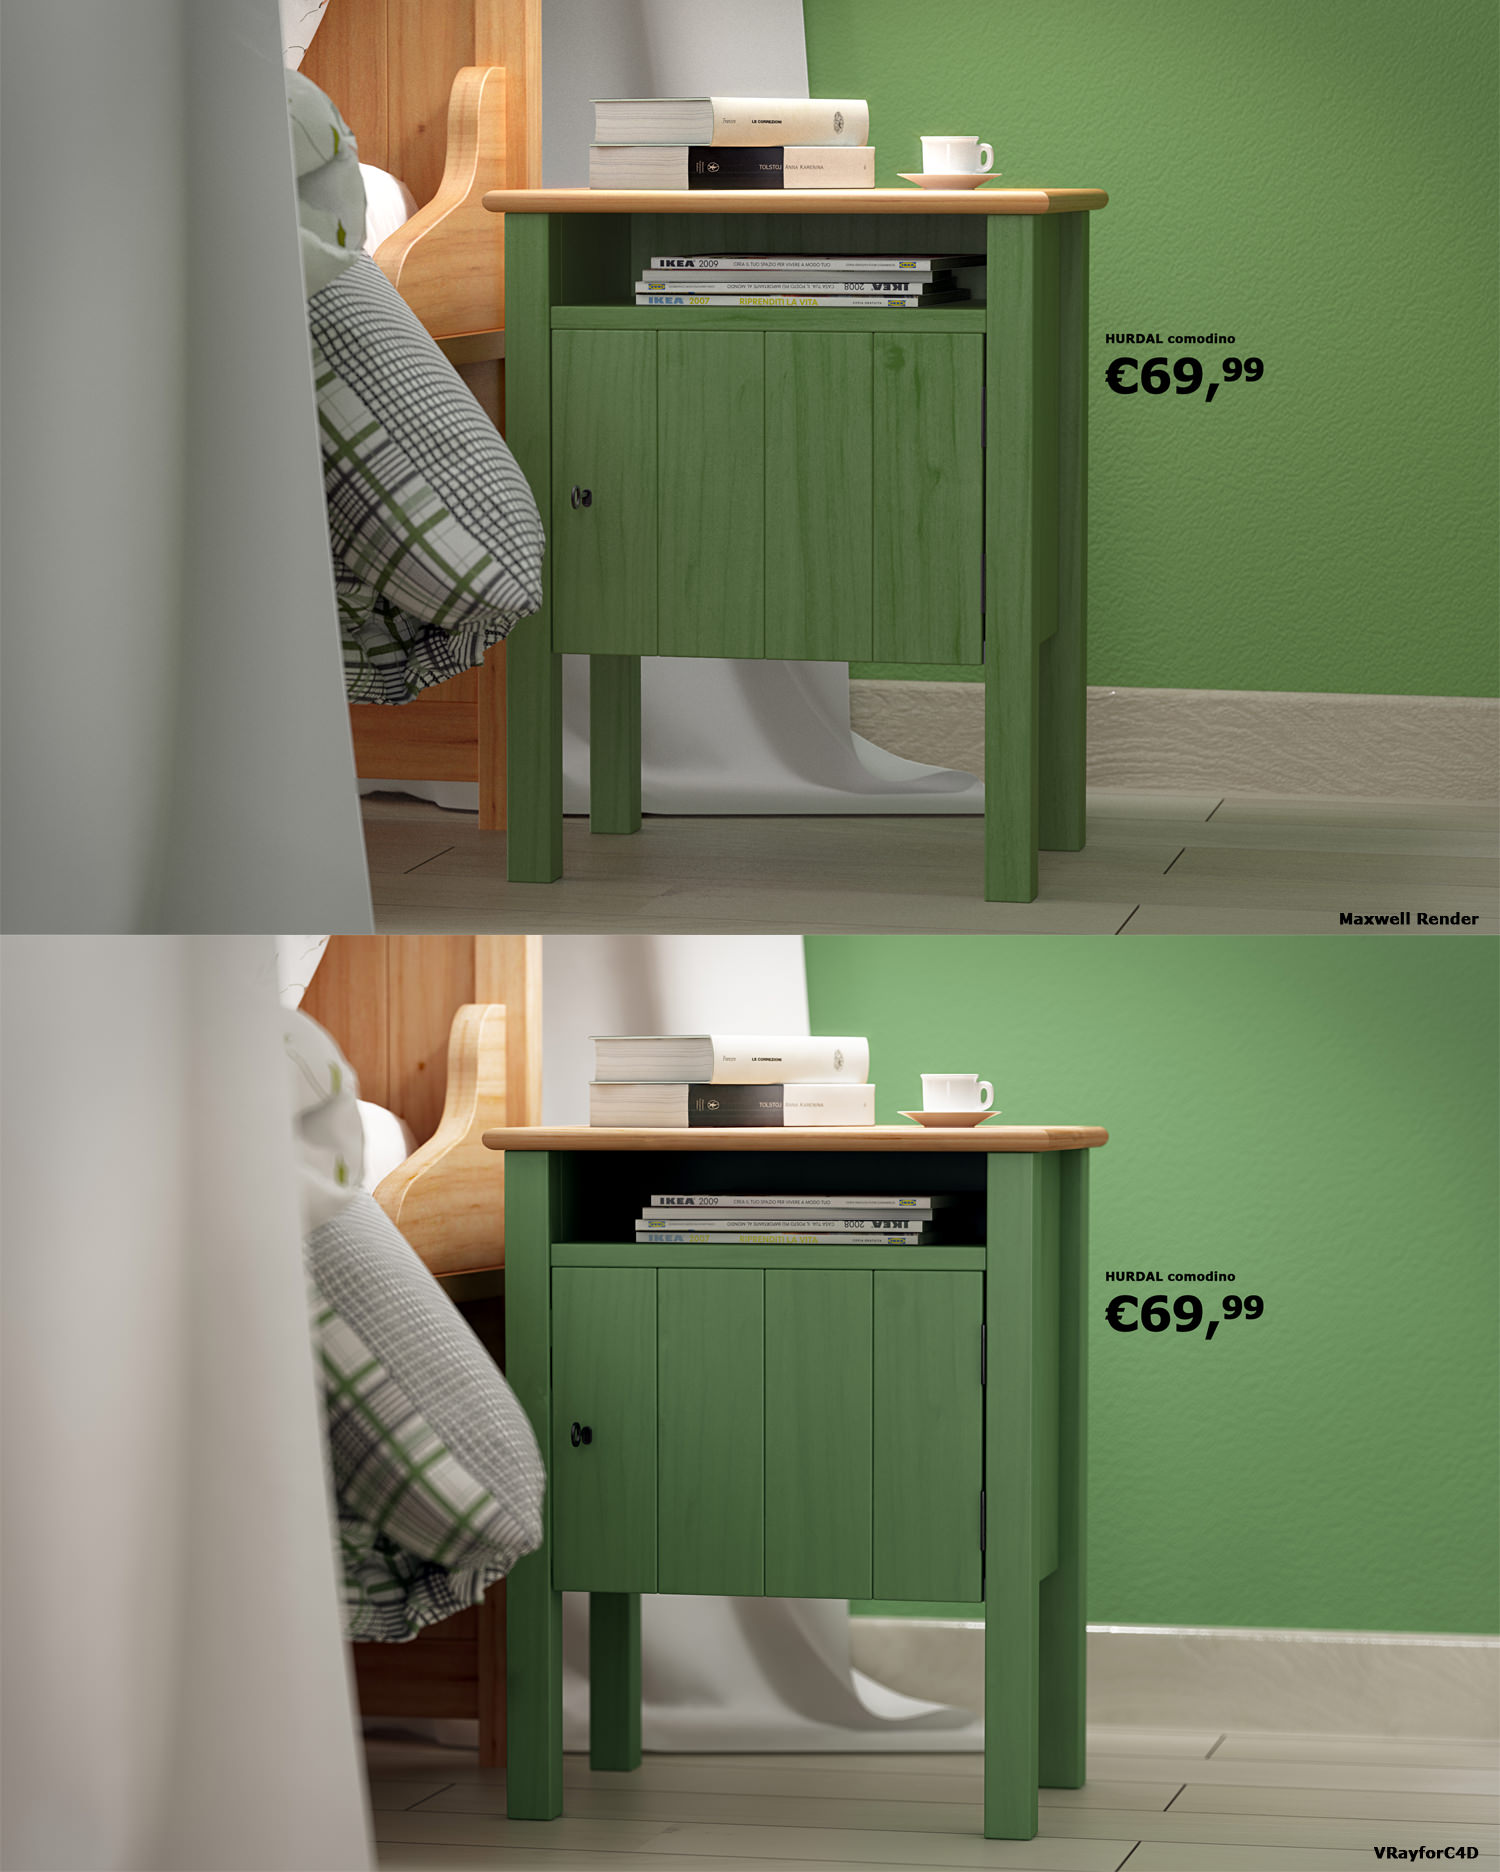
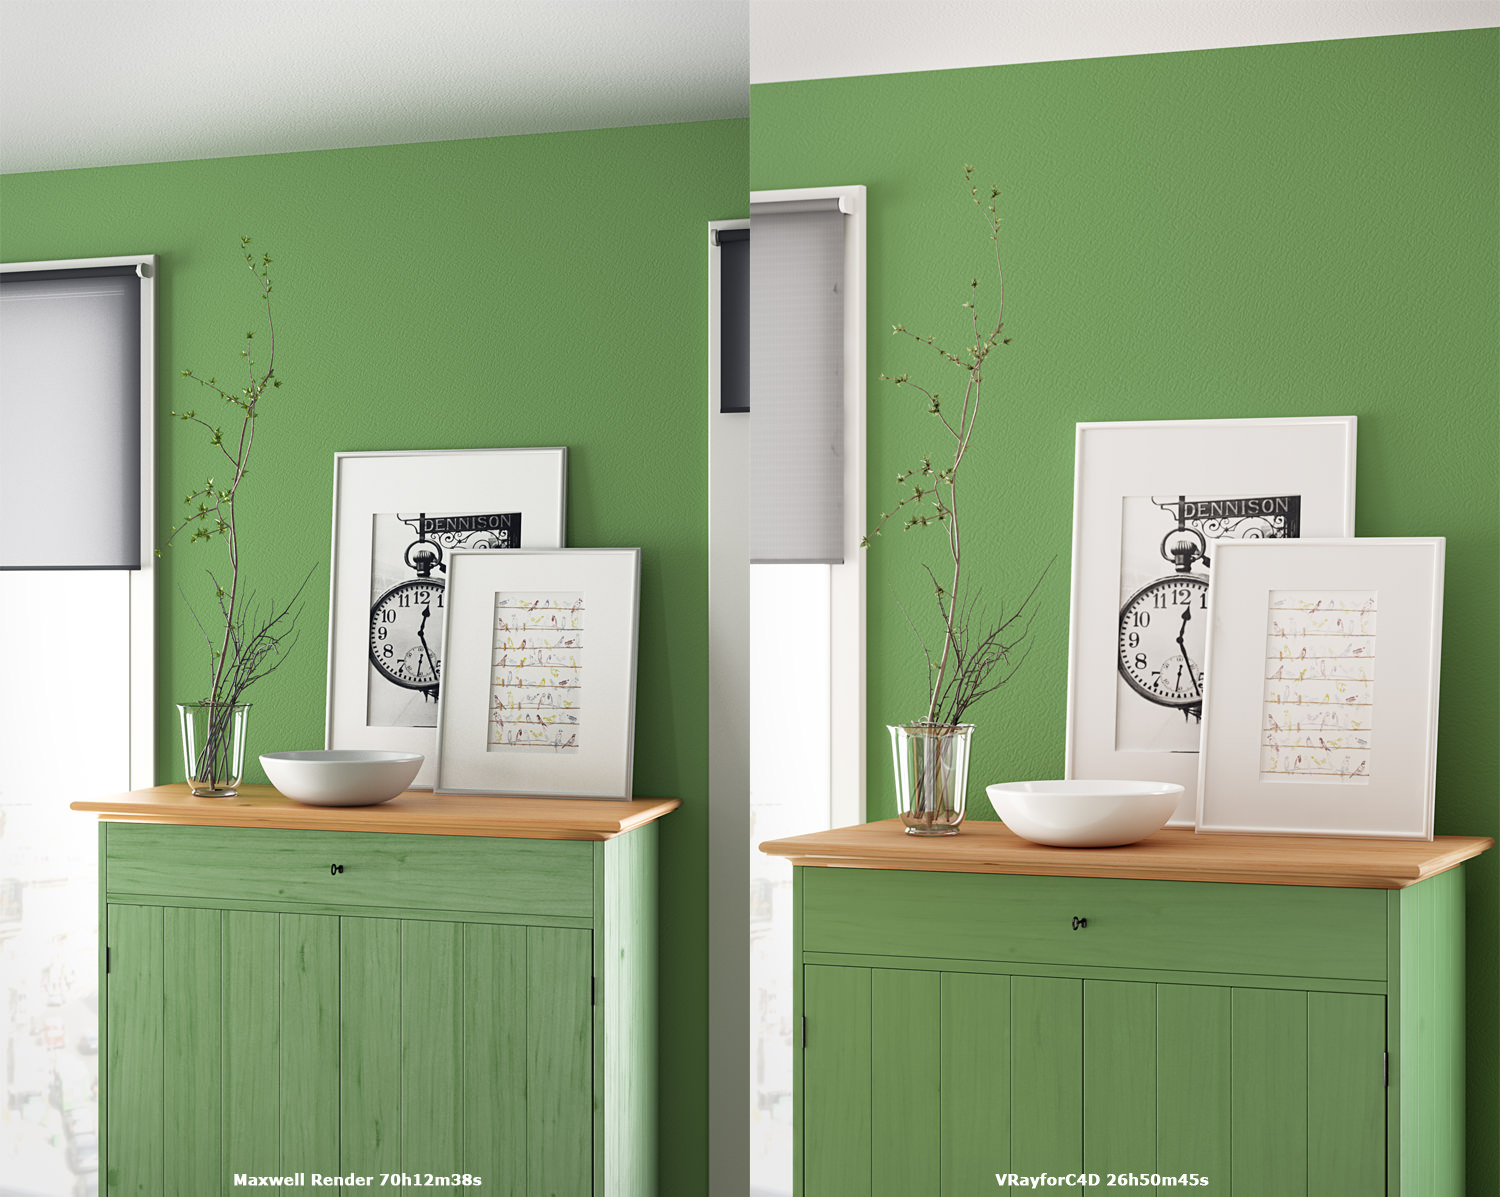
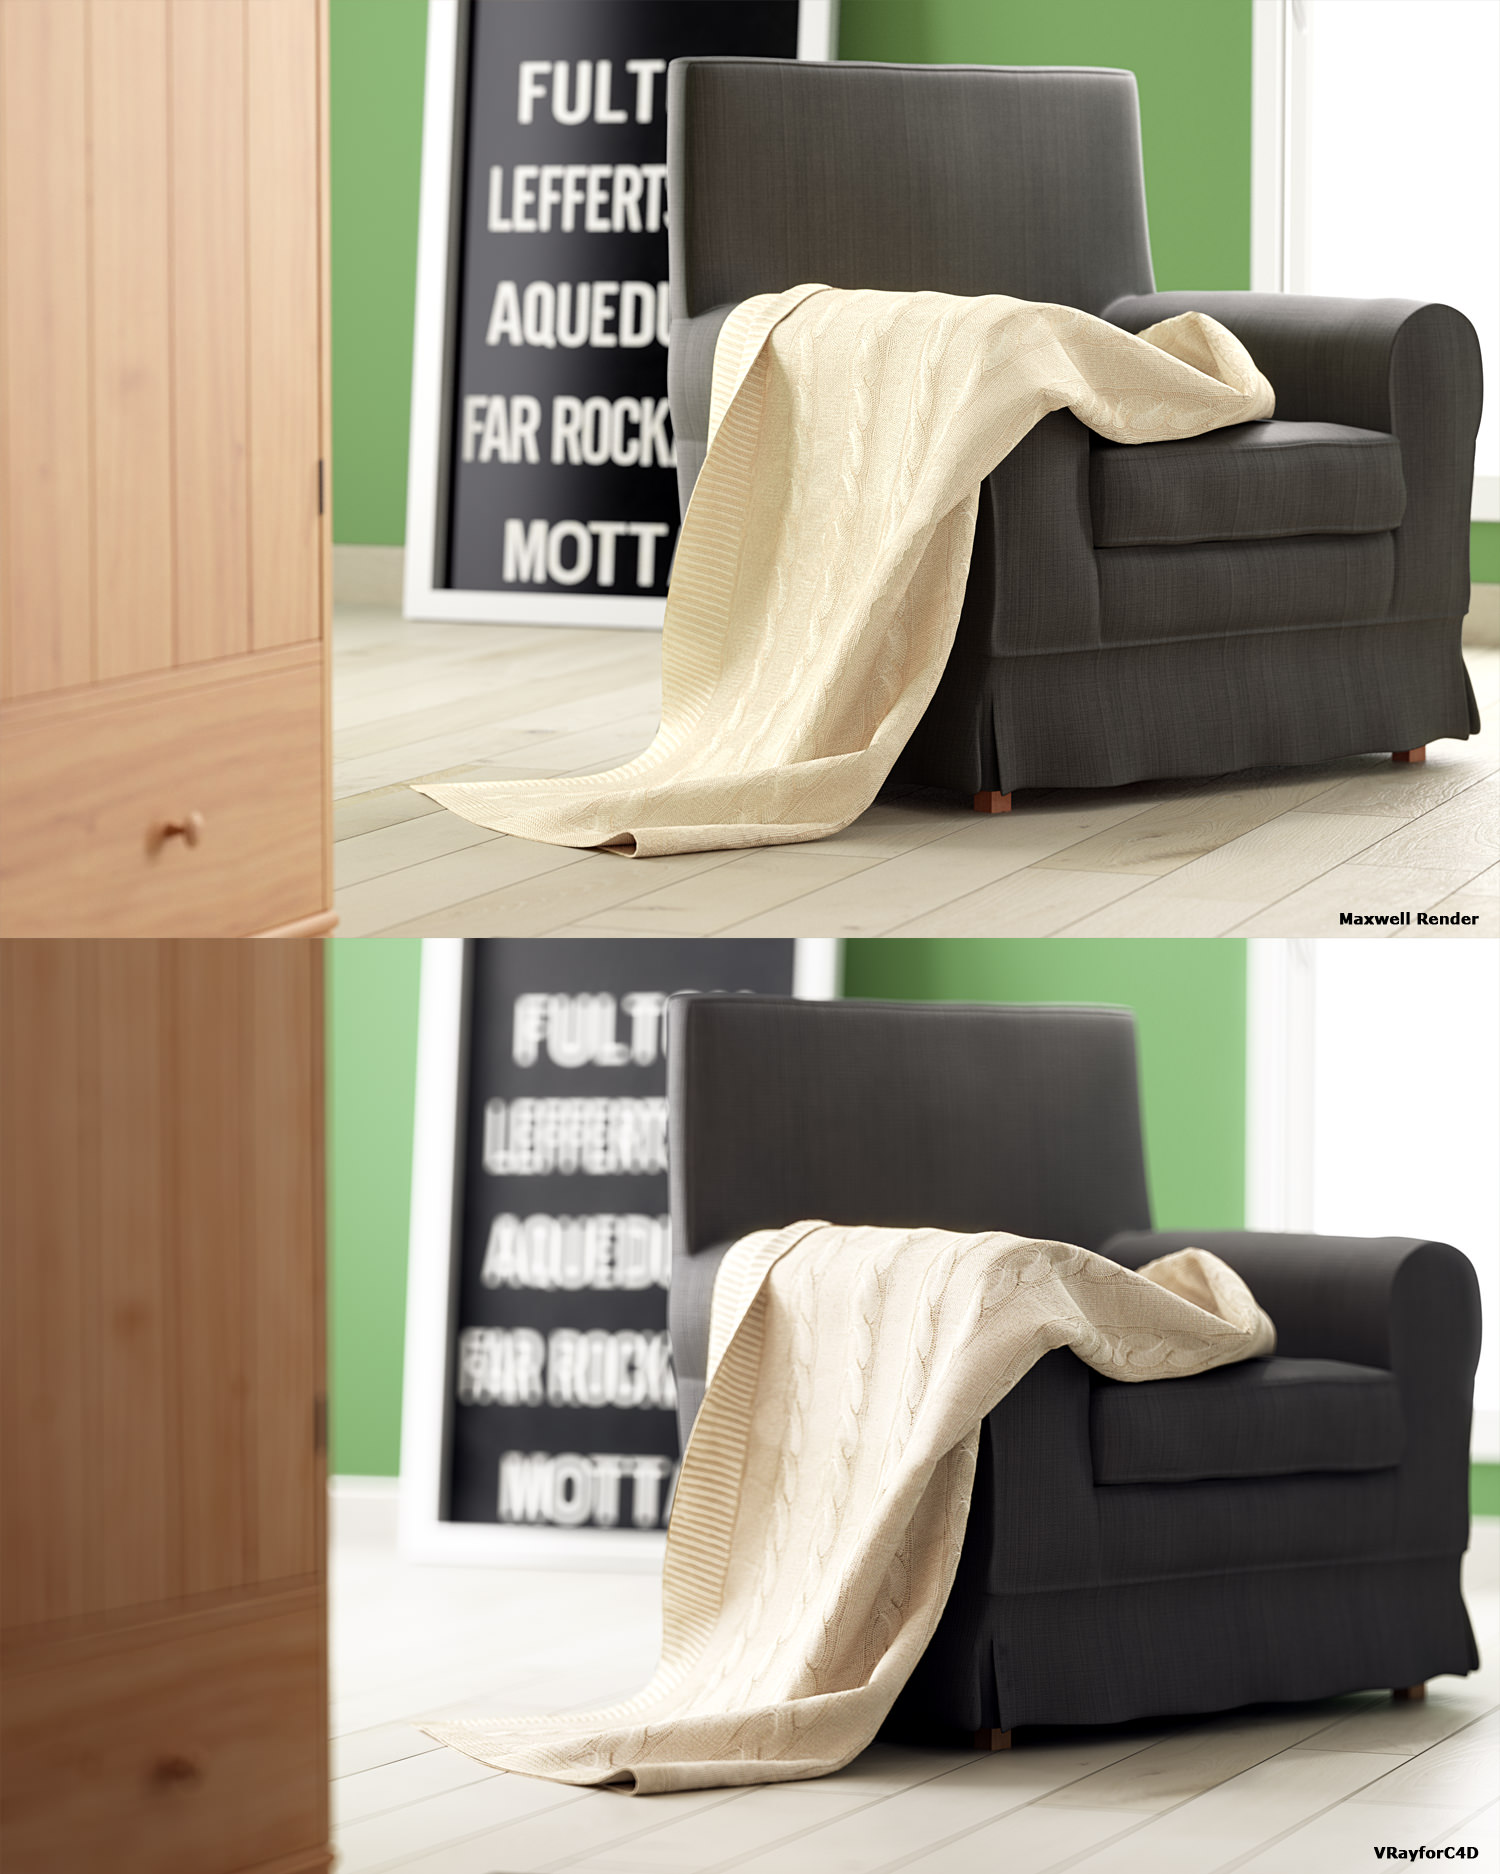
    All the shots have been created using the same focal length, the same aperture and the same shutter speed. We note how, especially for longer focal lengths, the interpretations of the standard cameras of both software are different, both as angle of view and depth of field. Honestly, I would not have expected this:-) The VRayforC4D images are much more blurred and the subject is closer, as if the focal length was longer (I checked several times and are equal, I swear:-). I have set the scene and the DOF in VRayforC4D and in my opinion the DOF are more beautiful, those in Maxwell Render have a weak blurring, but this has nothing to do with the software.

    [br]
    Tutte le inquadrature sono state create utilizzando stessa focale, stessa apertura di diaframma e stessa velocità di scatto. Notiamo come, soprattutto per le focali più lunghe, le interpretazioni della fotocamera standard di entrambi i software siano differenti, sia come angolo di vista, sia come profondità di campo. Questo sinceramente non me lo sarei aspettato:-) Le immagini di VRayforC4D sono molto più sfocate a parità di esposizione e il soggetto è più vicino quasi come se la focale fosse più lunga (le ho ricontrollate più volte e sono uguali, lo giuro:-). Avendo impostato le scene prima in VRayforC4D ed avendone studiato le sfocature del DOF le immmagini secondo me sono più belle, quelle in Maxwell Render hanno una sfocatura troppo debole, ma questo non ha niente a che vedere con il software.

    [br]

    [br]

    [br]

    [br]
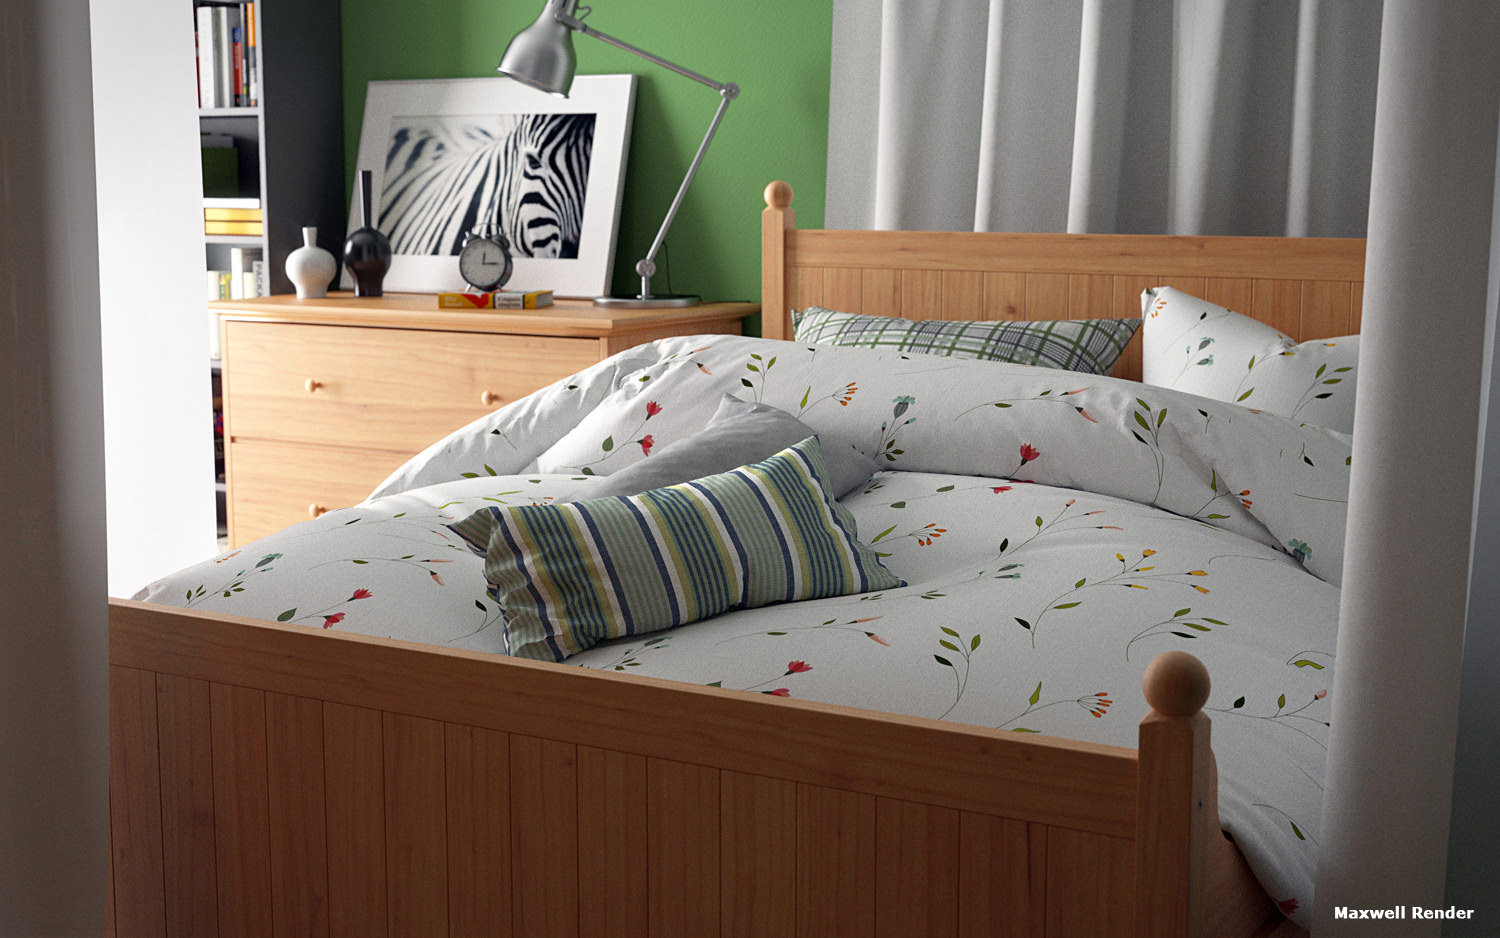
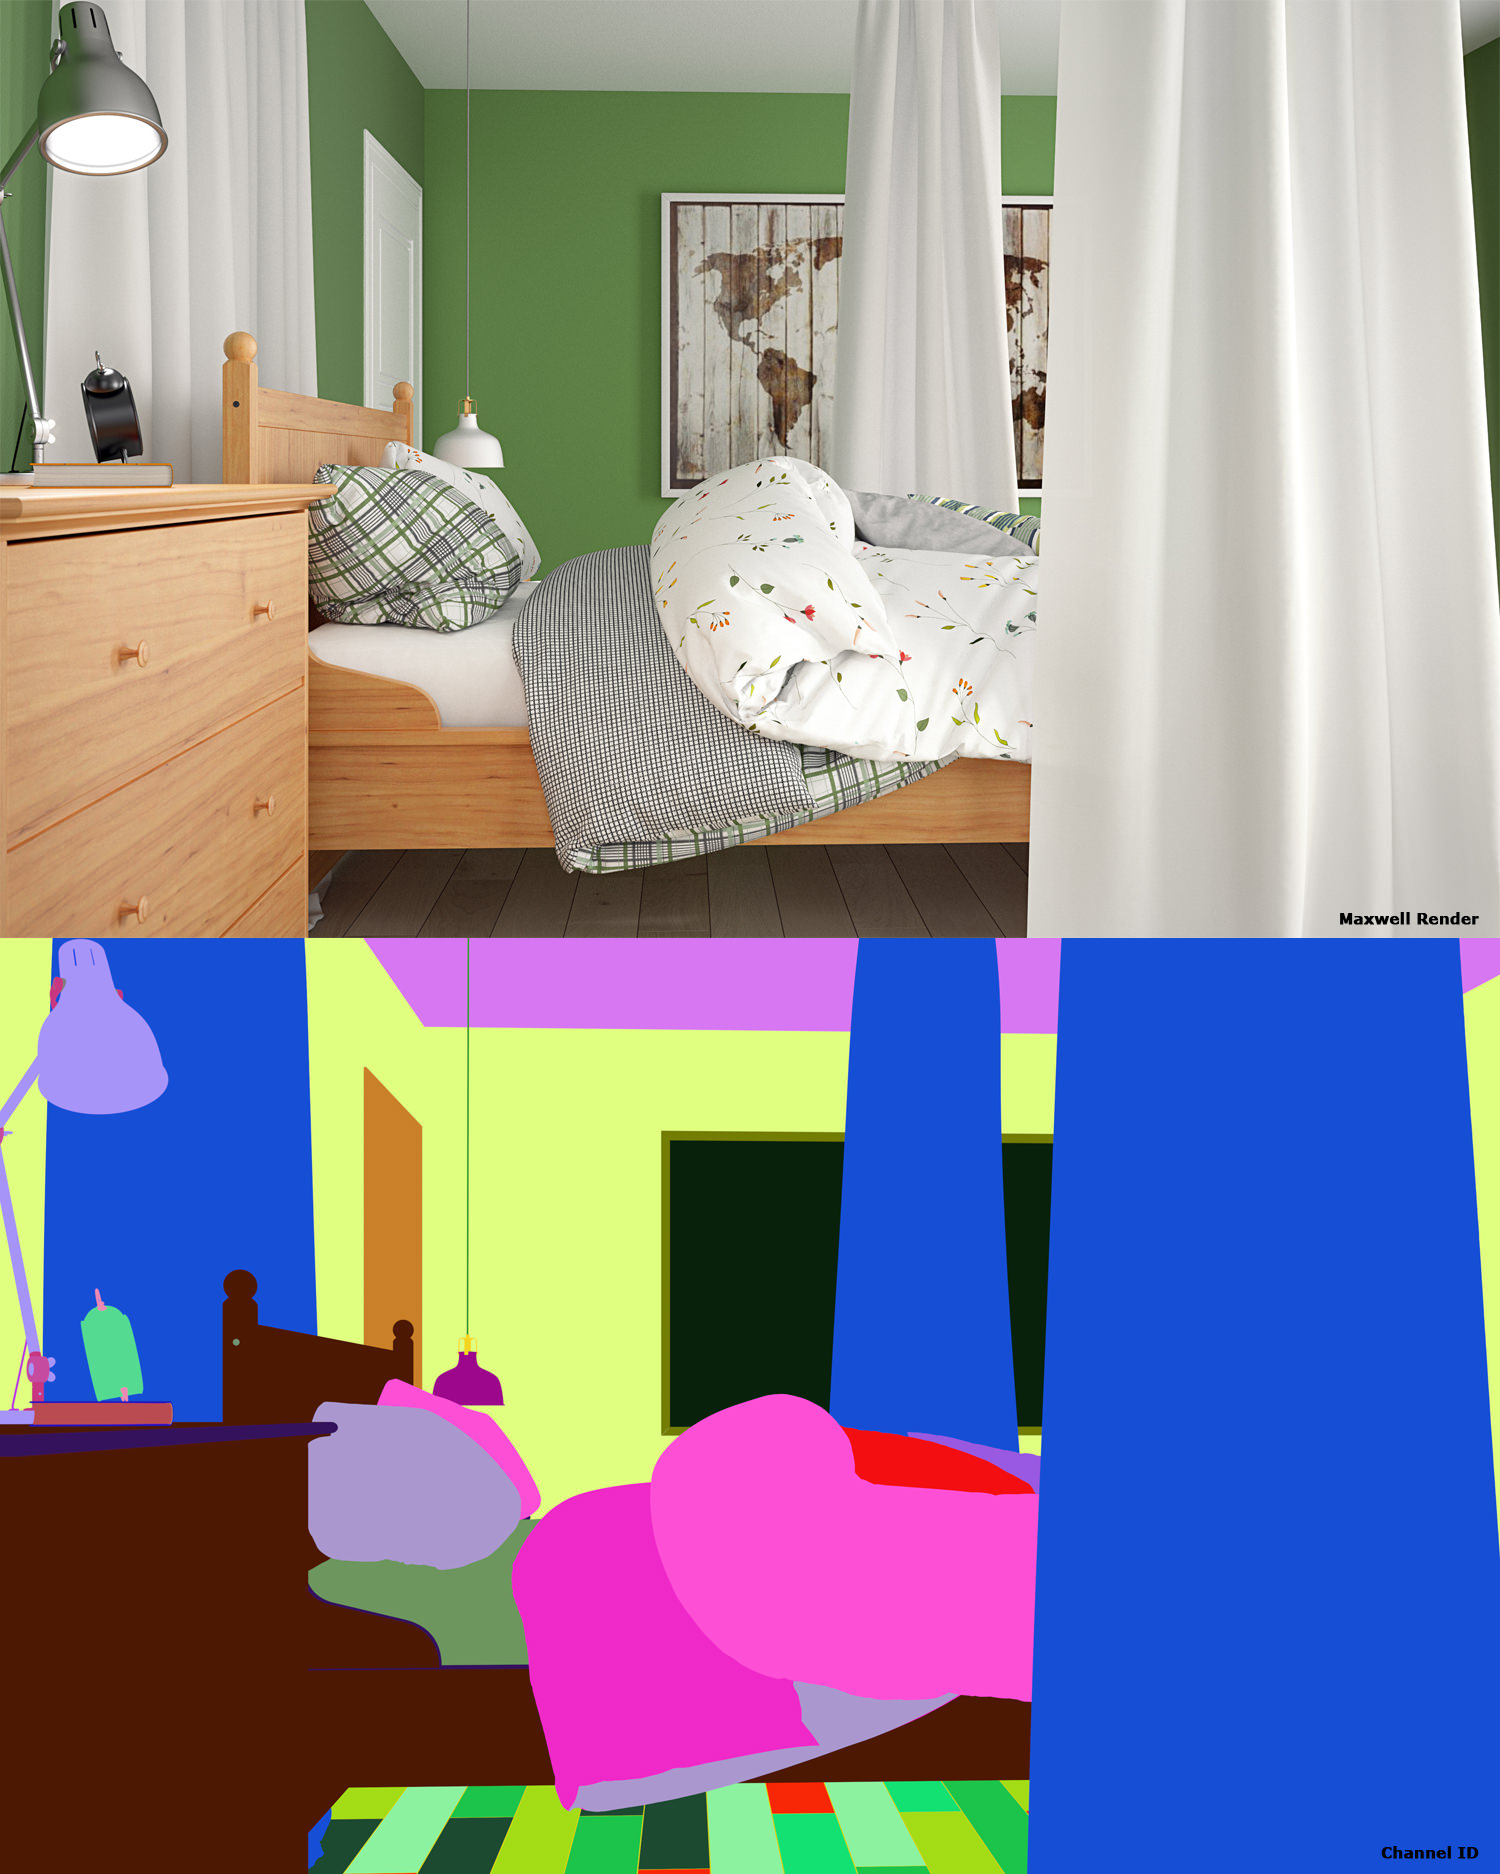
    As I mentioned before, Maxwell Render has a powerful tool called Multilight that gives us the ability to changing intensity, color of the stage lights, ISO and shutter speed of the camera in post production. A simple refresh, and you have done! With a single render you can pull out several images with different illuminations, that’s a powerful tool! You can also create videos with animations of lights as the one you will find below. In addition to this possibility, the Multilight is useful in post-production. As stated before there is no Color Mapping in Maxwell Render so it’s very easy to have areas or objects “burned” or excessively underexposed. In my scene, for example, the white curtains are subject to burns; with Multilight we can lower the lights that affect the appearance of the curtains by using the Next Limit tool, save the image darker but with the curtains to the right exposure (not burned) and then in Photoshop we simply select them with Material ID Channel and replace them, in order to have a more proper exposure. So, from a render we can create many renders for each object that we need to correct and that’s very convenient!
    [br]
    Come accennato prima, Maxwell Render ha un potente strumento chiamato Multilight che ci da la possibilità in postproduzione a render finito di cambiare intensità, colore delle luci della scena, ISO e shutter speed della fotocamera, un semplice refresh e il gioco è fatto! Da un solo render si possono tirare fuori parecchie immagini con illuminazioni diverse, uno strumento potentissimo! Inoltre si possono creare video con animazioni di luci come quello che troverete sotto. Ma oltre a questa possibilità, il multilight è utilissimo in fase di postproduzione; come detto prima non esiste Color Mapping quindi è molto facile avere zone o oggetti “bruciati” o eccessivamente sottoesposti. Nella nostra scena per esempio le tende bianche sono soggette a bruciature; con il Multilight in combinazione con il canale Material ID, possiamo abbassare le luci che influiscono sull’aspetto delle tende utilizzando l’apposito software di casa Next Limit, salvare l’immagine più scura ma con le tende alla giusta esposizione (quindi non bruciate) e in photoshop selezionarle semplicemente con il Material ID e sostituirle, in modo da avere un’immagine con un’esposizione più corretta. Quindi da un solo render possiamo creare tanti render per ogni oggetto da correggere, il che è molto comodo!

    [br]
    [youtube src=”https://www.youtube.com/embed/FCrMSjlc3m0″]
    [br]

    [br]

    [br]

    [br]

    [br]

    [br]

    [br]

    [br]
    In conclusion, both render engines are spectacular. Personally I would not abandon either of them for the other. Basically if I have to deliver work with tight deadlines I use VRayforC4D, it suits to many situations and it’s very flexible. But if I have more time or I have to create still life of jewelry where the management of lights and materials must be very accurate, I use Maxwell Render. Even if it’s slower in most situations I noticed that if the number of lights of a set is very high (like in large set such as supermarkets and hotels), Maxwell Render becomes faster than VRayforC4D and AR, also in the process of animation , with a superior cleaning of image. Maxwell Render require the use of render farm or a dedicated computer if you work in CPU, unless you have to create a low number of images that can be managed by a single computer. As mentioned before the latest versions of both software use GPU computing, like many other render engines that are coming on the market. Personally I prefer not to try every new product of different software house, but I choose to use software of solid companies that give me the confidence to carry on my work. Although I’ve got the opportunity to try Octane Render and it is spectacular! Currently the GPU version of Maxwell Render is still immature and the one of VrayforC4D I still have to test it to verify stability and compatibility with previous versions, but as I always need to create a large number of images and I have a render farm, probably the CPU rendering (or mixed rendering) it’s still the best solution for me because it gives me the possibility to calculate a large number of renders on different works while continuing to modeling on my machine. I hope you have found this test useful. See you soon! All scenes and models are available at the links at the end of the article.

    [br]
    In conclusione entrambi i motori di render sono spettacolari, personalmente non abbandonerei nessuno dei due per l’altro, mi trovo bene con entrambi. Tendenzialmente se devo consegnare lavori con tempistiche strette utilizzo VRayforC4D, si adatta a tante situazioni ed è molto flessibile, se invece i tempi sono più dilatati oppure bisogna creare per esempio still life di gioielli dove la gestione di luci e materiali deve essere molto accurata tendo ad utilizzare Maxwell Render. Inoltre per quanto più lento nella maggior parte delle situazioni ho notato che se il numero di luci di un ambiente è molto elevato (pensiamo a grandi ambienti quali supermercati o alberghi), Maxwell Render diventa più veloce di VRayforC4D e AR, anche in fase di animazione, con una pulizia di immagine nettamente superiore. Maxwell Render presuppone comunque l’utilizzo di una render farm o di un computer dedicato se si lavora in CPU a meno che non si debba produrre un numero di immagini basso che possano essere gestite da una sola macchina. Come accennato prima le ultime versioni di entrambi i software utilizzano il calcolo GPU, come molti altri motori di render che stanno uscendo sul mercato. Personalmente preferisco non correre dietro ad ogni novità di software house diverse ma affidarmi a realtà solide che mi diano la sicurezza di poter portare avanti il mio lavoro, anche se ho avuto modo di provare Octane Render ed è spettacolare! Attualmente la versione GPU di Maxwell Render è ancora acerba e quella di VrayforC4D devo testarla per verificarne compatibilità e stabilità con le versioni precedenti, ma avendo la necessità di creare sempre un gran numero di immagini e disponendo di una render farm, probabilmente il calcolo CPU (o calcolo misto) per me è ancora performante, mi da la possibilità di calcolare un gran numero di render su lavori diversi mentre continuo a modellare sulla mia macchina. Spero abbiate trovato questo test utile. Alla prossima! Tutte le scene e i modelli sono disponibili a questi link:
    [br]
    FREE DOWNLOAD Ikea Hurdal Bedside Table
    [br]
    Ikea Complete Scene with Lights and Materials
    [br]
    Shop Hurdal Bed
    [br]
    Shop Ikea Alarm Clock
    [br]
    Shop Ikea Arod Lamp
    [br]
    Shop Ikea Hurdal Drawers
    [br]
    Shop Ikea Hurdal Mobile
    [br]
    Shop Ikea Hurdal Wardrobe Clothes
    [br]
    Shop Ikea Jannylund Armchair with Ursula Plaid
    [br]
    Shop Ikea Ranarp Ground Lamp
    [br]
    Shop Ikea Ranarp Pendant Lamp
    [br]
    Shop Ikea Bookcase Billy with Books
    [br]

    [br]

    [br]

    [br]

    [br]

    [br]

    [br]

    3dedintorni on Maxon showreel

    Hi to all, I’m Carlo Maura aka Boda and I would like to advise you the new Cinema4d Architecture showreel. I am very happy that they started the reel with my work, the promotional video of Models4d Volume 2. Special thanks to Maxon!

    [br]
    Ciao a tutti, sono Carlo Maura aka Boda e vi segnalo il nuovo showreel di architettura targato Maxon. Sono molto contento che in apertura ci siano i miei lavori, il video promozionale di Models4d volume 2. Un ringraziamento speciale alla Maxon!


    [br]

    Carlo Maura on Novedge.com

    Hi to all, I’m Carlo Maura aka Boda. I’m very happy to have been contacted for an interview by the Novedge blog, a point of reference for everything related to architecture, design and innovation in terms of software. Thank you very much Aurora Meneghello for the opportunity to let me know and for the valuable information about San Francisco, they have been very useful in my travel in California!

    Click this link to read the interview. Enjoy!

    [br]
    Ciao a tutti, sono Carlo Maura aka Boda. Sono molto contento di essere stato contattato per un’intervista dal blog di Novedge, un punto di riferimento per tutto quello che riguarda l’architettura, il design e le novità in fatto di software. Ringrazio molto Aurora Meneghello per l’opportunità di farmi conoscere e per tutte le preziose informazioni su San Francisco che mi sono state utili per il mio viaggio in California!.

    Cliccate qui per leggere l’intervista. Enjoy!


    [br]
    novedge_preview

    3dedintorni di Carlo Giuseppe Maura - Via Torino 19 Trofarello (TO) - P.IVA 09053070018

    Privacy Settings
    We use cookies to enhance your experience while using our website. If you are using our Services via a browser you can restrict, block or remove cookies through your web browser settings. We also use content and scripts from third parties that may use tracking technologies. You can selectively provide your consent below to allow such third party embeds. For complete information about the cookies we use, data we collect and how we process them, please check our Privacy Policy
    Youtube
    Consent to display content from Youtube
    Vimeo
    Consent to display content from Vimeo
    Google Maps
    Consent to display content from Google